Building Secure APIs with Vert.x and OAuth2

Preface
Today I would like to get back to the subject touched on in one of my previous articles – Vert.x toolkit. In the post Asynchronous Microservices With Vert.x. I described how to develop microservices using Vert.x modules for a web application, service discovery, circuit breaker, and distributed configuration. I did not mention there anything about security aspects, which are usually important when talking about open APIs. It is time to take a closer look at some Vert.x modules for authentication and authorization. Following description available on vert.io site it provides some simple out of the box implementations for authentication in our applications. There are modules providing auth implementation backed by JDBC, MongoDB, and also some supporting solutions like JSON web tokens (JWT), Apache Shiro, and OAuth2. Like you probably know OAuth2 is the most common authentication method for APIs provided by Facebook, Twitter, or LinkedIn. If you are interested in more details about that authentication method read my article Microservices security with Oauth2, where I described the basics and introduced the simple sample with Spring Security in conjunction with OAuth2 usage.
In the sample application which is available on GitHub under security branch I’m going to present how to provide Oauth2 security for Vertx application using Keycloak and Vert.x OAuth2 module.
Keycloak
For authentication and authorization management we use Keycloak. It is an open-source identity and access management solution, which provides mechanisms supporting OAuth2. Keycloak has a web admin console where administrators can manage all aspects of the server. We can easily run it using a Docker container.
$ docker run -d --name keycloak -p 38080:8080 -e KEYCLOAK_USER=admin -e KEYCLOAK_PASSWORD=admin -e KEYCLOAK_LOGLEVEL=DEBUG jboss/keycloak
Management dashboard is available under http://192.168.99.100:38080/. Let’s begin from creating Client. The client will be used by our application (or rather a service) for authenticating itself against Keycloak. In the first step we have to set Client ID and Root URL. Root URL is not needed while using OAuth2 Password Credentials Flow, but rather for Authorization Code Flow. I put there our sample application localhost address.
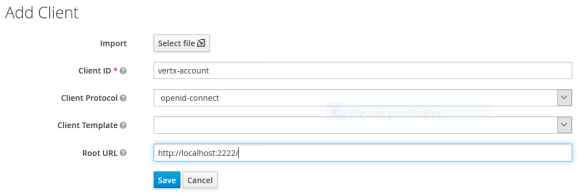
We should enable options Direct Access Grants and Authorization in the Settings section of newly created client. Also Access Type should be set to confidential and Valid Redirect URIs to the callback address routed inside application (it is explained in the later section).

The last information needed from Client section is a Secret available under Credentials tab.

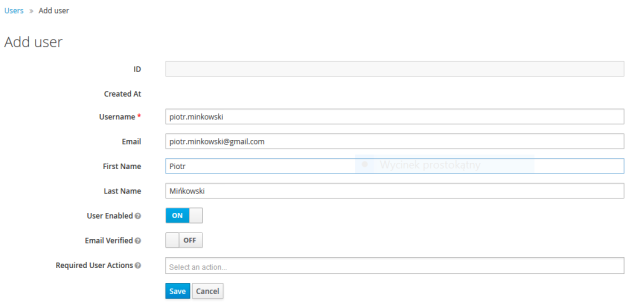
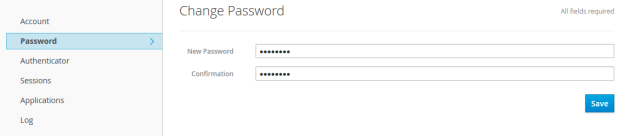
Now we can proceed to create a user with credentials. In the sample I’ll present in the next section we use password credentials flow, so don’t forget to change the password on the newly created user.
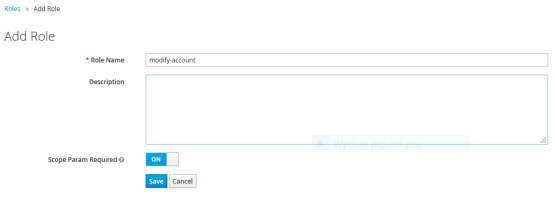
Finally, we set authorities for our user. First, let’s create some roles in Roles section. For me it is view-account, modify-account. For these roles I also enabled Scope Param Required. It means that if client need to obtain that authority it has to send role name in the request scope.
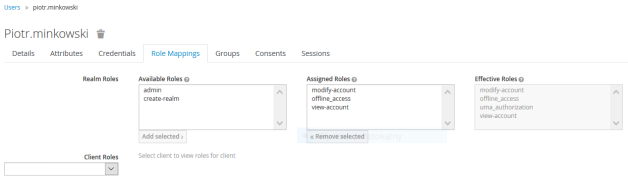
The last step is to assign the roles to our test user piotr.minkowski.
Building application
Vert.x provides the module supporting OAuth2 authorization. We should include the following dependency into our pom.xml.
<dependency>
   <groupId>io.vertx</groupId>
   <artifactId>vertx-auth-oauth2</artifactId>
   <version>${vertx.version}</version>
</dependency>
We have to begin from defining Keycloak OAuth2Auth provider. We use the default realm (1). In additional to the realm name we should set realm public key (2) which is available in the Realm Settings section under Keys tab. We should also set Keycloak Client ID (3) as resource and client secret as credentials (4).
JsonObject keycloakJson = new JsonObject()
   .put("realm", "master") // (1)
   .put("realm-public-key", "MIIBIjANBgkqhkiG9w0BAQEFAAOCAQ8AMIIBCgKCAQEA1xVBifXfS1uVM8S14JlyLpXck+0+hBQX258IiL5Fm2rZpkQ5lN9N1tadQdXBKk8V/0SxdTyoX7cpYQkcOs0Rj0XXmX7Lnk56euZwel+3MKAZWA20ld8BCfmDtX4/+VP311USUqR/W8Fd2p/gugKWF6VDMkri92qob1DdrcUiRlD8XYC0pwHwSvyW/3JvE5HeTy3U4vxC+19wHcwzLGNlVOlYPk9mzJHXN+LhZr/Tc7HeAsvVxYDXwOOh+/UWweMkvKy+OSNKG3aWLb92Ni3HejFn9kd4TRHfaapwWg1m5Duf3uqz8WDHbS/LeS4g3gQS0SvcCYI0huSoG3NA/z4K7wIDAQAB") // (2)
   .put("auth-server-url", "http://192.168.99.100:38080/auth")
   .put("ssl-required", "external")
   .put("resource", "vertx-account") // (3)
   .put("credentials", new JsonObject().put("secret", "73b55e04-e562-41ea-b39c-263b7b36945d")); // (4)

OAuth2Auth oauth2 = KeycloakAuth.create(vertx, OAuth2FlowType.PASSWORD, keycloakJson);

I exposed API method for login which retrieves token from Keycloak using OAuth2FlowType.PASSWORD authentication method.
router.post("/login").produces("application/json").handler(rc -> {
   User u = Json.decodeValue(rc.getBodyAsString(), User.class);
   oauth2.getToken(u.toJson(), res -> {
      if (res.failed()) {
         LOGGER.error("Access token error: {}", res.cause().getMessage());
         rc.response().setStatusCode(HttpResponseStatus.INTERNAL_SERVER_ERROR.code()).end();
      } else {
         AccessToken token = res.result();
         LOGGER.info("Access Token: {}", KeycloakHelper.rawAccessToken(token.principal()));
         User user = new User(KeycloakHelper.rawAccessToken(token.principal()));
         rc.response().end(user.toString());
      }
   });
});
I sent the following message to the endpoint POST /login.
{
   "username":"piotr.minkowski",
   "password":"Piot_123",
   "scope":"modify-account view-account"
}
That is an equivalent to the following Vert.x JsonObject passed as a parameter to OAuth2 getToken method.
new JsonObject().put("username", "piotr.minkowski").put("password", "Piot_123").put("scope", "modify-account view-account")
POST /login method return access token inside JSON object. That token should be passed as Authorization header parameter for every call of a protected resource. Here’s the main class with API methods definitions. We begin from creating OAuth2AuthHandler object (1) which is responsible for token validation. It takes OAuth2Auth Keycloak object as a parameter. Then we should set OAuth2AuthHandler as a handler for all methods matching /account/* path (2). If the token has been successfully validated we can proceed to authorization. We check if view-account role is assigned to user when calling GET method (3), and modify-account role when calling POST method (4). If using Keycloak for authorization we always have to set the prefix to “realm” while invoking isAuthorised method. If the role is realm then the lookup happens in global roles list.
OAuth2Auth oauth2 = KeycloakAuth.create(vertx, OAuth2FlowType.PASSWORD, keycloakJson);
OAuth2AuthHandler oauth2Handler = (OAuth2AuthHandler) OAuth2AuthHandler.create(oauth2, "http://localhost:2222"); // (1)
Router router = Router.router(vertx);
router.route("/account/*").handler(ResponseContentTypeHandler.create());
router.route("/account/*").handler(oauth2Handler); // (2)
router.route(HttpMethod.POST, "/account").handler(BodyHandler.create());
router.route(HttpMethod.POST, "/login").handler(BodyHandler.create());
oauth2Handler.setupCallback(router.get("/callback"));
router.get("/account/:id").produces("application/json").handler(rc -> {
   rc.user().isAuthorised("realm:view-account", authRes -> { // (3)
      LOGGER.info("Auth: {}", authRes.result());
      if (authRes.result() == Boolean.TRUE) {
         repository.findById(rc.request().getParam("id"), res -> {
         Account account = res.result();
         LOGGER.info("Found: {}", account);
         rc.response().end(account.toString());
      });
   } else {
      rc.response().setStatusCode(HttpResponseStatus.UNAUTHORIZED.code()).end();
   }
});
});
router.post("/account").produces("application/json").handler(rc -> {
   rc.user().isAuthorised("realm:modify-account", authRes -> { // (4)
   LOGGER.info("Auth: {}", authRes.result());
   if (authRes.result() == Boolean.TRUE) {
      Account a = Json.decodeValue(rc.getBodyAsString(), Account.class);
      repository.save(a, res -> {
         Account account = res.result();
         LOGGER.info("Created: {}", account);
         rc.response().end(account.toString());
      });
   } else {
      rc.response().setStatusCode(HttpResponseStatus.UNAUTHORIZED.code()).end();
   }
});
});
Testing
I created a JUnit test case to check if OAuth2 authentication works fine. Vert.x provides a library that can be used for testing. It is specially designed to work well with asynchronous code. Include the following dependency to your pom.xml.
<dependency>
   <groupId>io.vertx</groupId>
   <artifactId>vertx-unit</artifactId>
   <version>${vertx.version}</version>
   <scope>test</scope>
</dependency>
Then annotate your JUnit test class with @RunWith(VertxUnitRunner.class). Before running our test method we should deploy verticles. Verticle with REST API is deployed on port 2222.
Vertx vertx;

@Before
public void before(TestContext context) throws IOException {
   vertx = Vertx.vertx();
   vertx.deployVerticle(MongoVerticle.class.getName(), context.asyncAssertSuccess());
   DeploymentOptions options = new DeploymentOptions().setConfig(new JsonObject().put("http.port", 2222));
   vertx.deployVerticle(AccountServer.class.getName(), options, context.asyncAssertSuccess());
}
Here’s a JUnit test method. We use WebClient for calling HTTP methods and Vert.x-Unit Async for complete test case on asynchronous calls finishes (3). First, we are calling POST \login method to retrieve access token from Keycloak (1). Then we are calling one of API method and setting Authorization header with access token string retrieved from POST \login method (2). During test case execution verticle with MongoDB (MongoVerticle) and API definition (AccountServer) are deployed and started, but you need to start manually MongoDB database, Consul and Keycloak. I suggest running it with Docker.
@Test
public void testAuth(TestContext context) {
   Async async = context.async();
   WebClient client = WebClient.create(vertx);
   User u = new User("piotr.minkowski", "Piot_123", "modify-account view-account");
   client.post(2222, "localhost", "/login").sendJson(u, ar -> { // (1)
      LOGGER.info("Response code: {}", ar.result().statusCode());
      LOGGER.info("Response: {}", ar.result().bodyAsString());
      if (ar.result().statusCode() == 200) {
         User user = ar.result().bodyAsJson(User.class);
         client.get(2222, "localhost", "/account").putHeader("Authorization", "Bearer " + user.getAccessToken()).send(r -> { // (2)
            LOGGER.info("GET result: {}", r.result().bodyAsString());
            async.complete(); // (3)
         });
      } else {
         async.complete();
      }
   });
}
Final Thoughts
To be honest I have never dealt with Vert.x before the start of work on a series of articles published on my blog. From those couple of days spent on that toolkit recognition I’ll definitely recommend using it when working on REST APIs. Vert.x provides the smart implementation for security with OAuth2. Additionally, you can use it in combination with a solution like Keycloak, which is used for identity and access management. As usual, there are also some drawbacks. I had a problem with understanding how the authorities exactly work in Vert.x. When I created a role inside Keycloak client it didn’t work in my application. Only the global realm role worked fine. However, those problems do not overshadow Vert.x advantages.
0 COMMENTS