Envoy Proxy with Microservices

Introduction
I came across Envoy Proxy for the first time a couple of weeks ago, when one of my blog readers suggested that I write an article about it. I had never heard about it before and my first thought was that it is not my area of experience. In fact, this tool is not as popular as its competition like Nginx or HAProxy, but it provides some interesting features among which we can distinguish out-of-the-box support for MongoDB, Amazon RDS, flexibility around discovery and load balancing or generating a lot of useful traffic statistics. Ok, we know a little about its advantages but what exactly is Envoy proxy? ‘Envoy is an open-source edge and service proxy, designed for cloud-native applications’. It was originally developed by Lift as a high-performance C++ distributed proxy designed for standalone services and applications, as well as for large microservices service mesh. It sounds really good right now. That’s why I decided to take a closer look at it and prepare a sample of service discovery and distributed tracing realized with Envoy and microservices-based on Spring Boot.
Envoy Proxy Configuration
In most of the previous samples based on Spring Cloud we have used Zuul as edge and proxy. Zuul is a popular Netflix OSS tool acting as API Gateway in your microservices architecture. As it turns out, it can be successfully replaced by Envoy proxy. One of the things I really like in Envoy is the way to create configuration. The default format is JSON and is validated against JSON schema. This JSON properties and schema are documented well and can be easily understood. Just what you’d expect from a modern solution the recommended way to get started with it is by using the pre-built Docker images. So, in the beginning we have to create a Dockerfile for building a Docker image with Envoy and provide configuration files in JSON format. Here’s my Dockerfile. Parameters service-cluster and service-node are optional and has to do with provided configuration for service discovery, which I’ll say more about in a minute.
FROM lyft/envoy:latest
RUN apt-get update
COPY envoy.json /etc/envoy.json
CMD /usr/local/bin/envoy -c /etc/envoy.json --service-cluster samplecluster --service-node sample1
I assume you have a basic knowledge about Docker and its commands, which is mandatory at this point. After providing envoy.json configuration file we can proceed with building a Docker image.
$ docker build -t envoy:v1 .
Then just run it using docker run command. Useful ports should be exposed outside.
$ docker run -d --name envoy -p 9901:9901 -p 10000:10000 envoy:v1
The first pretty helpful feature is the local HTTP administrator server. It can be configured in a JSON file inside admin property. For the example purpose I selected port 9901 and as you probably noticed I also had exposed that port outside the Envoy Docker container. Now, the admin console is available under http://192.168.99.100:9901/. If you invoke that address it prints all available commands. For me the most helpful were stats, which print all important statistics related to proxy and logging, where I could change logging level dynamically for some of the defined categories. So, first if you had any problems with Envoy try to change logging level by calling /logging?name=level and watch them on Docker container after running docker logs envoy command.
"admin": {
  "access_log_path": "/tmp/admin_access.log",
  "address": "tcp://0.0.0.0:9901"
}
The next required configuration property is listeners. There we define routing settings and the address on which Envoy will listen for incoming TCP connections. The notation tcp://0.0.0.0:10000 is the wild card match for any IPv4 address with port 10000. This port is also exposed outside the Envoy Docker container. In this case it will therefore be our API gateway available under http://192.168.99.100:10000/ address. We will come back to the proxy configuration details at a next stage and now let’s take a closer look at the architecture of the presented example.
"listeners": [{
  "address": "tcp://0.0.0.0:10000",
  ...
}]
Architecture: Envoy proxy, Zipkin and Spring Boot
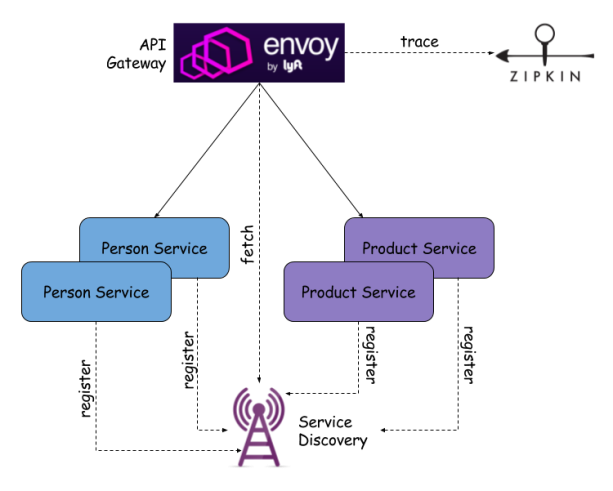
The architecture of the described solution is visible on the figure below. We have Envoy proxy as API Gateway, which is an entry point to our system. Envoy integrates with Zipkin and sends tracing messages with information about incoming HTTP requests and responses sent back. Two sample microservices Person and Product register itself in service discovery on startup and deregister on shutdown. They are hidden from external clients behind API Gateway. Envoy has to fetch actual configuration with addresses of registered services and route incoming HTTP requests properly. If there are multiple instances of each service available it should perform load balancing.

As it turns out Envoy does not support well known discovery servers like Consul or Zookeeper, but defines its own generic REST based API, which needs to be implemented to enable cluster members fetching. The main method of this API is GET /v1/registration/:service used for fetching the list of currently registered instances of service. Lyft’s provides its default implementation in Python, but for the example purpose we develop our own solution using Java and Spring Boot. Sample application source code is available on GitHub. In addition to service discovery implementation you would also find there two sample microservices.
Service Discovery
Our custom discovery implementation does nothing more than exposing REST based API with methods for registration, unregistration and fetching service’s instances. GET method needs to return a specific JSON structure which matches the following schema.
{
  "hosts": [{
    "ip_address": "...",
    "port": "...",
    ...
  }]
}
Here’s a REST controller class with discovery API implementation.
@RestController
public class EnvoyDiscoveryController {

   private static final Logger LOGGER = LoggerFactory.getLogger(EnvoyDiscoveryController.class);

   private Map<String, List<DiscoveryHost>> hosts = new HashMap<>();

   @GetMapping(value = "/v1/registration/{serviceName}")
   public DiscoveryHosts getHostsByServiceName(@PathVariable("serviceName") String serviceName) {
      LOGGER.info("getHostsByServiceName: service={}", serviceName);
      DiscoveryHosts hostsList = new DiscoveryHosts();
      hostsList.setHosts(hosts.get(serviceName));
      LOGGER.info("getHostsByServiceName: hosts={}", hostsList);
      return hostsList;
   }

   @PostMapping("/v1/registration/{serviceName}")
   public void addHost(@PathVariable("serviceName") String serviceName, @RequestBody DiscoveryHost host) {
      LOGGER.info("addHost: service={}, body={}", serviceName, host);
      List<DiscoveryHost> tmp = hosts.get(serviceName);
      if (tmp == null)
         tmp = new ArrayList<>();
      tmp.add(host);
      hosts.put(serviceName, tmp);
   }

   @DeleteMapping("/v1/registration/{serviceName}/{ipAddress}")
   public void deleteHost(@PathVariable("serviceName") String serviceName, @PathVariable("ipAddress") String ipAddress) {
      LOGGER.info("deleteHost: service={}, ip={}", serviceName, ipAddress);
      List<DiscoveryHost> tmp = hosts.get(serviceName);
      if (tmp != null) {
         Optional<DiscoveryHost> optHost = tmp.stream().filter(it -> it.getIpAddress().equals(ipAddress)).findFirst();
         if (optHost.isPresent())
            tmp.remove(optHost.get());
         hosts.put(serviceName, tmp);
      }
   }
}
Let’s get back to the Envoy configuration settings. Assuming we have built an image from Dockerfile visible below and then run the container on the default port we can invoke it under address http://192.168.99.100:9200. That address should be placed in envoy.json configuration file. Service discovery connection settings should be provided inside the Cluster Manager section.
FROM openjdk:alpine
MAINTAINER Piotr Minkowski <piotr.minkowski@gmail.com>
ADD target/envoy-discovery.jar envoy-discovery.jar
ENTRYPOINT ["java", "-jar", "/envoy-discovery.jar"]
EXPOSE 9200
Here’s a fragment from envoy.json file. Cluster for service discovery should be defined as a global SDS configuration, which must be specified inside sds property (1). The most important thing is to provide a correct URL (2) and on the basis of that Envoy automatically tries to call endpoint GET /v1/registration/{service_name}. The last interesting configuration field for that section is refresh_delay_ms, which is responsible for setting a delay between fetches a list of services registered in a discovery server. That’s not all. We also have to define cluster members. They are identified by the name (4). Their type is sds (5), what means that this cluster uses a service discovery server for locating network addresses of calling microservice with the name defined in the service-name property.
"cluster_manager": {
  "clusters": [{
    "name": "service1", (4)
    "type": "sds", // (5)
    "connect_timeout_ms": 5000,
    "lb_type": "round_robin",
    "service_name": "person-service" // (6)
  }, {
    "name": "service2",
    "type": "sds",
    "connect_timeout_ms": 5000,
    "lb_type": "round_robin",
    "service_name": "product-service"
  }],
  "sds": { // (1)
    "cluster": {
      "name": "service_discovery",
      "type": "strict_dns",
      "connect_timeout_ms": 5000,
      "lb_type": "round_robin",
      "hosts": [{
        "url": "tcp://192.168.99.100:9200" // (2)
      }]
    },
    "refresh_delay_ms": 3000 // (3)
  }
}
Routing configuration is defined for every single listener inside route_config property (1). The first route is configured for person-service, which is processing by cluster service1 (2), second for product-service processing by service2 cluster. So, our services are available under http://192.168.99.100:10000/person and http://192.168.99.100:10000/product addresses.
{
  "name": "http_connection_manager",
  "config": {
    "codec_type": "auto",
    "stat_prefix": "ingress_http",
    "route_config": { // (1)
      "virtual_hosts": [{
        "name": "service",
        "domains": ["*"],
        "routes": [{
          "prefix": "/person", // (2)
          "cluster": "service1"
        }, {
          "prefix": "/product", // (3)
          "cluster": "service2"
        }]
      }]
    },
    "filters": [{
      "name": "router",
      "config": {}
    }]
  }
}
Building Microservices
The routing on Envoy proxy has been already configured. We still don’t have running microservices. Their implementation is based on the Spring Boot framework and does nothing more than expose REST API providing simple operations on the object’s list and registering/unregistering service on the discovery server. Here’s @Service bean responsible for that registration. The onApplicationEvent method is fired after application startup and destroy method just before gracefully shutdown.
@Service
public class PersonRegister implements ApplicationListener<ApplicationReadyEvent> {

   private static final Logger LOGGER = LoggerFactory.getLogger(PersonRegister.class);

   private String ip;
   @Value("${server.port}")
   private int port;
   @Value("${spring.application.name}")
   private String appName;
   @Value("${envoy.discovery.url}")
   private String discoveryUrl;

   @Autowired
   RestTemplate template;

   @Override
   public void onApplicationEvent(ApplicationReadyEvent event) {
      LOGGER.info("PersonRegistration.register");
      try {
         ip = InetAddress.getLocalHost().getHostAddress();
         DiscoveryHost host = new DiscoveryHost();
         host.setPort(port);
         host.setIpAddress(ip);
         template.postForObject(discoveryUrl + "/v1/registration/{service}", host, DiscoveryHosts.class, appName);
      } catch (Exception e) {
         LOGGER.error("Error during registration", e);
      }
   }

   @PreDestroy
   public void destroy() {
      try {
         template.delete(discoveryUrl + "/v1/registration/{service}/{ip}/", appName, ip);
         LOGGER.info("PersonRegister.unregistered: service={}, ip={}", appName, ip);
      } catch (Exception e) {
         LOGGER.error("Error during unregistration", e);
      }
   }

}
The best way to shutdown Spring Boot application gracefully is by its Actuator endpoint. To enable such endpoints for the service include spring-boot-starter-actuator to your project dependencies. Shutdown is disabled by default, so we should add the following properties to application.yml to enable it and additionally disable default security (endpoints.shutdown.sensitive=false). Now, just by calling POST /shutdown we can stop our Spring Boot application and test unregister method.
endpoints:
  shutdown:
    enabled: true
    sensitive: false
Same as before for microservices we also build docker images. Here’s person-service Dockerfile, which allows you to override default service and SDS port.
FROM openjdk:alpine
MAINTAINER Piotr Minkowski <piotr.minkowski@gmail.com>
ADD target/person-service.jar person-service.jar
ENV DISCOVERY_URL http://192.168.99.100:9200
ENTRYPOINT ["java", "-jar", "/person-service.jar"]
EXPOSE 9300
To build an image and run a container of the service with custom listen port type you need to execute the following docker commands.
$ docker build -t piomin/person-service .
$ docker run -d --name person-service -p 9301:9300 piomin/person-service
Distributed Tracing
It is time for the last piece of the puzzle – Zipkin tracing. Statistics related to all incoming requests should be sent there. The first part of configuration in Envoy proxy is inside tracing property which specifies global settings for the HTTP tracer.
"tracing": {
  "http": {
    "driver": {
      "type": "zipkin",
      "config": {
        "collector_cluster": "zipkin",
        "collector_endpoint": "/api/v1/spans"
      }
    }
  }
}
Network location and settings for Zipkin connection should be defined as a cluster member.
"clusters": [{
  "name": "zipkin",
  "connect_timeout_ms": 5000,
  "type": "strict_dns",
  "lb_type": "round_robin",
  "hosts": [
    {
      "url": "tcp://192.168.99.100:9411"
    }
  ]
}]
We should also add a new section tracing in HTTP connection manager configuration (1). Field operation_name is required and sets a span name. Only ‘ingress’ and ‘egress’ values are supported.
"listeners": [{
  "filters": [{
    "name": "http_connection_manager",
    "config": {
      "tracing": { // (1)
        "operation_name": "ingress" // (2)
      }
      // ...
    }
  }]
}]
Zipkin server can be started using its Docker image.
$ docker run -d --name zipkin -p 9411:9411 openzipkin/zipkin
Summary
Here’s a list of running Docker containers for the test purpose. As you probably remember we have Zipkin, Envoy, custom discovery, two instances of person-service and one of product-service. You can add some person objects by calling POST /person and that display a list of all persons by calling GET /person. The requests should be load balanced between two instances basing on entries in the service discovery.

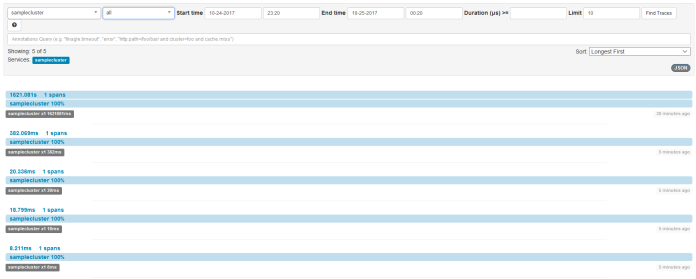
Information about every request is sent to Zipkin with a service name taken –service-cluster Envoy proxy running parameter.

18 COMMENTS