Code Quality with SonarQube
Source code quality with SonarQube analysis is an essential part of the Continuous Integration process. Together with automated tests, it is the key element of delivering reliable software without any bugs, security vulnerabilities, or performance leaks. Probably the best static code analyzer you can find on the market is SonarQube. It has support for more than 20 programming languages. It can be easily integrated with the most popular Continuous Integration engines like Jenkins or TeamCity. Finally, it has many features and plugins which can be easily managed from an extensive web dashboard.
However, before we proceed to discuss the most powerful capabilities of this solution it is well worth asking Why we do it? Would it be productive for us to force developers to focus on code quality? Probably most of us are programmers and we exactly know that everyone else expects from us to deliver code which meets business demands rather than looks nice 🙂 After all, do we really want to break the build by not fulfilling important rules like maximum line length – rather a little pleasure. On the other hand, taking over source code from someone else who was not paying attention to any good programming practice is also not welcome if you know what I mean. But be calm, SonarQube is the right solution for you. In this article, I’ll to show you that carrying about high code quality can be good fun and above all, you can learn more how to develop better code, while other team members spend time on fixing their bugs 🙂
Enough talk, let’s go to action. I suggest you run your test instance of SonarQube using Docker. Here’s SonarQube run command. Then you can login to web dashboard available under http://localhost:9000 with admin/admin credentials.
$ docker run -d --name sonarqube -p 9000:9000 -p 9092:9092 sonarqube
You are signed into the web dashboard but there are no projects created yet. To perform source code scanning you should just run one command mvn sonar:sonar. Don’t forget to add the SonarQube server address in settings.xml file as shown below.
<profile>
  <id>sonar</id>
  <activation>
    <activeByDefault>true</activeByDefault>
  </activation>
  <properties>
    <sonar.host.url>http://localhost:9000</sonar.host.url>
  </properties>
</profile>
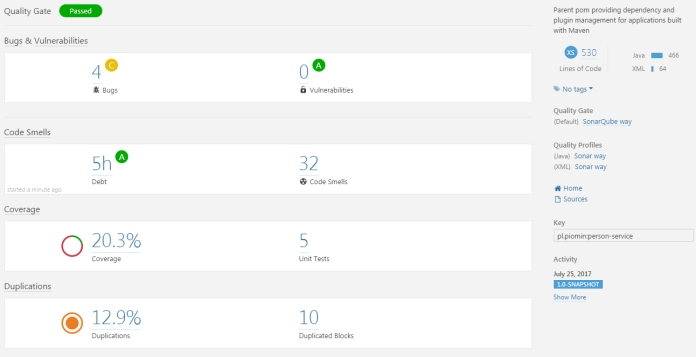
When a SonarQube scanning finishes you will see a new project with the same name as the Maven artifact name with your code metrics and statistics. I created a sample Spring Boot application where I tried to perform some most popular mistakes which impact code quality. Source code is available on GitHub. The right module for analyse is named person-service. However, the code with many bugs and vulnerabilities is pushed to v0.1 branch. The master branch has the latest version with the corrections performed basing on SonarQube scanning. Let’s start an analyze with mvn command. We can be surprised a little – the code analyse result for the 0.1 version is rather not satisfying. Although I spend much time on making important mistakes SonarQube reported only some bugs and code smells were detected and quality gate status is ‘Passed’.
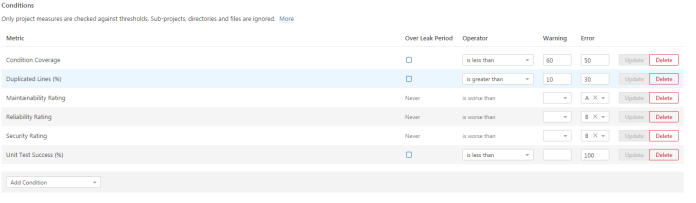
Let’s take a closer look at quality gates in SonarQube. Like I mentioned before we would not like to break the build by not fulfilling one or group of not very important rules. We can achieve it by creating a quality gate. This is a set of requirements that tells us whether or not going to deploy with a new version of a project. There is a default quality gate for Java but we can change its thresholds or create the new one. The default quality gate has thresholds set only for new code, so I decided to create the one for my sample application minimum test coverage set at 50 percent, unit test success detection, and ratings basic on full code. Now, the scanning result looks a little different 🙂

To enable scanning test coverage in SonarQube we should add jacoco plugin to maven pom.xml. During maven build mvn clean test -Dmaven.test.failure.ignore=true sonar:sonar the report would be automatically generated and uploaded to SonarQube.
<plugin>
  <groupId>org.jacoco</groupId>
  <artifactId>jacoco-maven-plugin</artifactId>
  <version>0.7.9</version>
  <executions>
    <execution>
      <id>default-prepare-agent</id>
      <goals>
        <goal>prepare-agent</goal>
      </goals>
      </execution>
      <execution>
      <id>default-report</id>
      <phase>prepare-package</phase>
      <goals>
        <goal>report</goal>
      </goals>
    </execution>
  </executions>
</plugin>
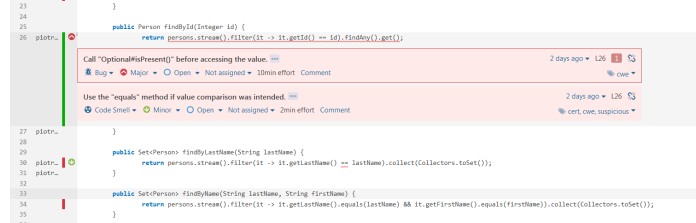
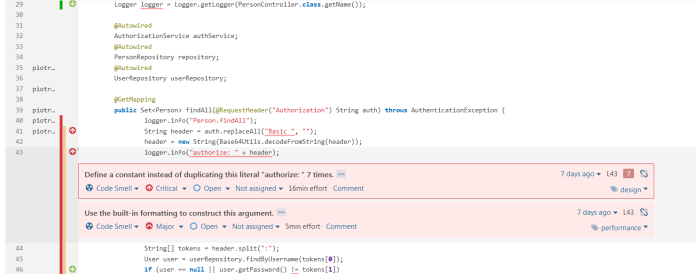
The last change that has to be done before the application rescans is to installing some plugins and enabling rules disabled by default. The list of all active and inactive rules can be displayed in Quality Profiles section. In the default profile for Java, there are more than 400 rules available and 271 active. I suggest you install FindBugs and Checkstyle plugins. Those plugins have many additional rules for Java which can be activated for our profile. Now there are about 1.1k inactive rules in many categories. Which of them should be activated depends on you, you can activate them in the default profile, create your new profile or use one of the predefined profiles, which was automatically created by plugins we installed before. In my opinion, the best way to select the right rules is to create a simple project and check which rules are suitable for you. Then you can check out the detailed description and disable the rule if needed. After activating some rules provided by Checkstyle plugin I have a report with 5 bugs and 77 code smells. The most important errors are visible in the pictures below.
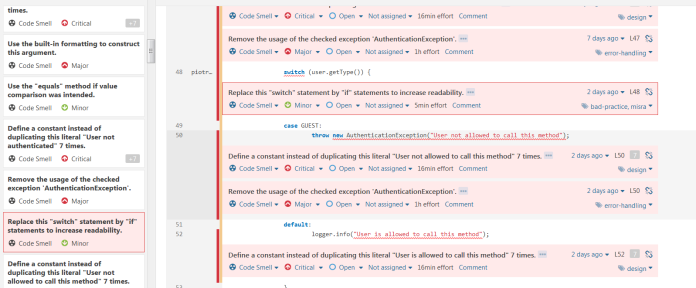
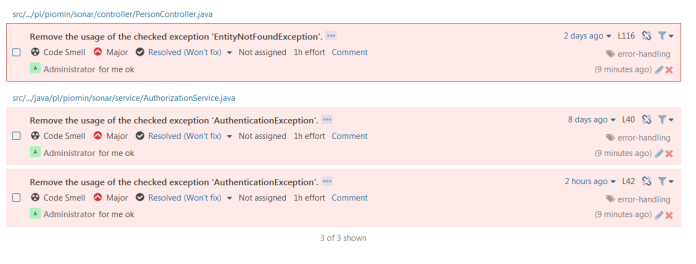
All issues reported by SonarQube can be easily reviewed using the UI dashboard for each project in the Issue tab. We can also install plugin SonarLint which integrates with most popular IDEs like Eclipse or IntelliJ and all those issues will be displayed there. Now, we can proceed to fix errors. All changes which I performed to resolve issues can be display on GitHub repository from branches v0.1 to v0.6. I resolved all problems except some checked exception warnings which I set to Resolved (Won’t fix). Those issues won’t be reported after the next scans.
Finally, my project looks as you could see in the picture below. All ratings have a score ‘A’, test coverage is greater than 60% and the quality gate is ‘Passed’. The final person-service version is committed to the master branch.

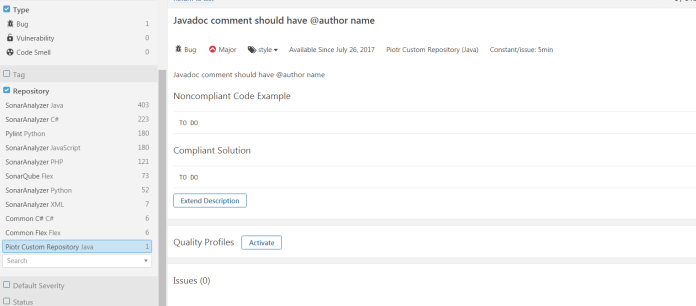
Like you see there are many rules which can be applied to your project during SonarQube scanning, but sometimes it would be not enough for your organization’s needs. In that case, you may search for some additional plugins or create your own plugin with the rules that meet your specific requirements. In my sample available on GitHub, there is a module sonar-rules where I defined the rule checking whether all public classes have Javadoc comments including @author field. To create SonarQube plugin add the following fragment to your pom.xml and change packaging type to sonar-plugin.
<plugin>
  <groupId>org.sonarsource.sonar-packaging-maven-plugin</groupId>
  <artifactId>sonar-packaging-maven-plugin</artifactId>
  <version>1.17</version>
  <extensions>true</extensions>
  <configuration>
    <pluginKey>piotjavacustom</pluginKey>
    <pluginName>PiotrCustomRules</pluginName>
    <pluginDescription>For test purposes</pluginDescription>
    <pluginClass>pl.piomin.sonar.plugin.CustomRulesPlugin</pluginClass>
    <sonarLintSupported>true</sonarLintSupported>
    <sonarQubeMinVersion>6.0</sonarQubeMinVersion>
  </configuration>
</plugin>
Here’s the class with custom rule definition. First we have to get a scanned class node (Kind.CLASS), a then process first comment (Kind.TRIVIA) in the class file. The rule parameters like name or priority are set inside @Role annotation.
@Rule(key = "CustomAuthorCommentCheck",
name = "Javadoc comment should have @author name",
description = "Javadoc comment should have @author name",
priority = Priority.MAJOR,
tags = {"style"})
public class CustomAuthorCommentCheck extends IssuableSubscriptionVisitor {

  private static final String MSG_NO_COMMENT = "There is no comment under class";
  private static final String MSG_NO_AUTHOR = "There is no author inside comment";

  private Tree actualTree = null;

  @Override
  public List<Kind> nodesToVisit() {
    return ImmutableList.of(Kind.TRIVIA, Kind.CLASS);
  }

  @Override
  public void visitTrivia(SyntaxTrivia syntaxTrivia) {
    String comment = syntaxTrivia.comment();
    if (syntaxTrivia.column() != 0)
      return;
    if (comment == null) {
      reportIssue(actualTree, MSG_NO_COMMENT);
      return;
    }
    if (!comment.contains("@author")) {
      reportIssue(actualTree, MSG_NO_AUTHOR);
      return;
    }
  }

  @Override
  public void visitNode(Tree tree) {
    if (tree.is(Kind.CLASS)) {
      actualTree = tree;
    }
  }

}
Before building and deploying plugin into SonarQube server it can be easily tested using junit. Inside the src/test/file directory we should place test data – java files which are scanned during junit test. For failure test we should also create file CustomAuthorCommentCheck_java.json in the /org/sonar/l10n/java/rules/squid/ directory with rule definition.
@Test
public void testOk() {
   JavaCheckVerifier.verifyNoIssue("src/test/files/CustomAuthorCommentCheck.java", new CustomAuthorCommentCheck());
}

@Test
public void testFail() {
   JavaCheckVerifier.verify("src/test/files/CustomAuthorCommentCheckFail.java", new CustomAuthorCommentCheck());
}
Finally, build maven project and copy generated JAR artifact from target directory to SonarQube docker container into $SONAR_HOME/extensions/plugins directory. Then restart your docker container.
$ docker cp target/sonar-plugins-1.0-SNAPSHOT sonarqube:/opt/sonarqube/extensions/plugins
After SonarQube restart your plugin’s rules are visible under Rules section.
The last thing to do is to run SonarQube scanning in the Continuous Integration process. SonarQube can be easily integrated with the most popular CI server – Jenkins. Here’s the fragment of the Jenkins pipeline where we perform source code scanning and then waiting for the quality gate result. If you interested in more details about Jenkins pipelines, Continuous integration and delivery read my previous post How to setup Continuous Delivery environment.
stage('SonarQube analysis') {
  withSonarQubeEnv('My SonarQube Server') {
    sh 'mvn clean package sonar:sonar'
  }
}
stage("Quality Gate") {
  timeout(time: 1, unit: 'HOURS') {
    def qg = waitForQualityGate()
    if (qg.status != 'OK') {
      error "Pipeline aborted due to quality gate failure: ${qg.status}"
    }
  }
}


Related Posts