Running Vertx Microservices on Kubernetes/OpenShift

In this article, you will learn how to run Vertx microservices on Kubernetes. Automatic deployment, scaling, container orchestration, self-healing are a few very popular topics in some recent months. This is reflected in the rapidly growing popularity of such tools like Docker, Kubernetes, or OpenShift. It’s hard to find any developer who didn’t hear about these technologies. How many of you did set up and run all those tools locally?
Despite appearances, it is not a very hard thing to do. Both Kubernetes and OpenShift provide simplified, single-node versions of their platform that allows you to create and try a local cluster, even on Windows.
In this article, I’m going to guide you through the all steps that result in deploying and running Vertx microservices on Kubernetes. They communicate with each other and use MongoDB as a data source.
Technologies – Vertx on Kubernetes
Eclipse Vert.x – a toolkit for building reactive applications (and more) on the JVM. It’s a polyglot, event-driven, non-blocking, and fast framework that makes it the perfect choice for creating light-weight, high-performance microservices.
Kubernetes – is an open-source system for automating deployment, scaling, and management of containerized applications. Now, even the Docker platform decided to get support for Kubernetes, although they are promoting their own clustering solution – Docker Swarm. You may easily run it locally using Minikube. However, we won’t use it this time. You can read an interesting article about creating Spring Boot microservices and running them on Minikube here: Microservices with Kubernetes and Docker.
RedHat OpenShift – is an open-source container application platform build on top of Docker containers and Kubernetes. It is also available online on website https://www.openshift.com/. You may easily run it locally with Minishift.
Getting started with Minishift
Of course, you can read some tutorials available on the RedHat website, but I’ll try to condense an instruction of installation and configuration in a few words. Firstly, I would like to point out that all the instructions will be applied to Windows OS.
Minishift requires a hypervisor to start the virtual machine, so first, you should download and install one of these tools. If you use another solution than Hyper-V, as I do, you would have to pass that driver’s name during Minishift starting. The command visible below launches it on Oracle VirtualBox and allocates 3GB of RAM memory for VM.
$ minishift start --vm-driver=virtualbox --memory=3G
The executable minishift.exe should be included in the system path. You should also have Docker client binary installed on your machine. Docker daemon is in turn managed by Minishift, so you can reuse it for other use-cases as well. All you need to do to take advantage of this functionality is to run the following command in your shell.
$ @FOR /f "tokens=* delims=^L" %i IN ('minishift docker-env') DO @call %i
OpenShift platform my be managed using CLI or web console. To enable CLI on Windows you should add it to the path and then run one command to configure your shell. The description of the required steps is displayed after running the following command.
$ minishift oc-env
SET PATH=C:\Users\minkowp\.minishift\cache\oc\v3.7.1\windows;%PATH%
REM Run this command to configure your shell:
REM @FOR /f "tokens=*" %i IN ('minishift oc-env') DO @call %i
In order to use web console just run command $ minishift console, which automatically opens it in your web browser. For me, it is available under address https://192.168.99.100:8443/console. To check your IP just execute $ minishift ip.
Sample Vertx microservices
The source code of sample applications is available on GitHub (https://github.com/piomin/sample-vertx-kubernetes.git). In fact, the similar application have been ran locally and described in the article Asynchronous Microservices with Vert.x. This article can be treated as an introduction to building microservices with Vertx framework and to Vertx framework in general. The current application is even simpler because it does not have to integrate with any external discovery server like Consul.
Now, let’s take a look at the code below. It declares a verticle that establishes a client connection to MongoDB and registers the repository object as a proxy service. Such a service may be easily accessed by another verticle. MongoDB network address is managed by Minishift.
public class MongoVerticle extends AbstractVerticle {

   @Override
   public void start() throws Exception {
      JsonObject config = new JsonObject();
      config.put("connection_string", "mongodb://micro:micro@mongodb/microdb");
      final MongoClient client = MongoClient.createShared(vertx, config);
      final AccountRepository service = new AccountRepositoryImpl(client);
      ProxyHelper.registerService(AccountRepository.class, vertx, service, "account-service");
   }

}
That verticle can be deployed in the application’s main method. It is also important to set property vertx.disableFileCPResolving to true, if you would like to run your application on Minishift. It forces Vertx to resolve the file from its classloader in addition to the file system.
public static void main(String[] args) throws Exception {
   System.setProperty("vertx.disableFileCPResolving", "true");
   Vertx vertx = Vertx.vertx();
   vertx.deployVerticle(new MongoVerticle());
   vertx.deployVerticle(new AccountServer());
}
AccountServer verticle contains simple API methods that performs CRUD operations on MongoDB.
Building Docker image
Assuming you have successfully installed and configured Minishift, and cloned my sample Maven project shared on GitHub, you may proceed to the build and deploy stage. The first step is to build the applications from source code by executing mvn clean install command on the root project. It consists of two independent modules: account-vert-service, customer-vertx-service. Each of these modules contains Dockerfile with image definition. Here’s the one created for customer-vertx-service. It is based on the openjdk:8-jre-alpine image. Alpine Linux is much smaller than most distribution base images, so our result image would have around 100MB, instead of around 600MB if using standard OpenJDK image. Because we are generating Fat JAR files during Maven build we only have to run the application inside the container using java -jar command.
FROM openjdk:8-jre-alpine
ENV VERTICLE_FILE customer-vertx-service-1.0-SNAPSHOT.jar
ENV VERTICLE_HOME /usr/verticles
EXPOSE 8090
COPY target/$VERTICLE_FILE $VERTICLE_HOME/
WORKDIR $VERTICLE_HOME
ENTRYPOINT ["sh", "-c"]
CMD ["exec java -jar $VERTICLE_FILE"]
Once we have successfully built the project, we should navigate to the main directory of every module. The sample command visible below builds Docker’s image of customer-vertx-service.
$ docker build -t microservices/customer-vertx-service:1.0 .
In fact, there are some different approaches to building and deploying microservices on OpenShift. For example, we could use the Maven plugin or the OpenShift definition file. The currently discussed way of deploying applications is obviously one the simplest, and it assumes using CLI and web console for configuring deployments and services.
Deploy Vertx microservice on Kubernetes
Before proceeding to the main part of that article including deploy and run the application on Minishift we have to provide some pre-configuration. We have to begin by logging into OpenShift and creating a new project with oc command. Here are two required CLI commands. The name of our first OpenShift project is microservices.
$ oc login -u developer -p developer
$ oc new-project microservices
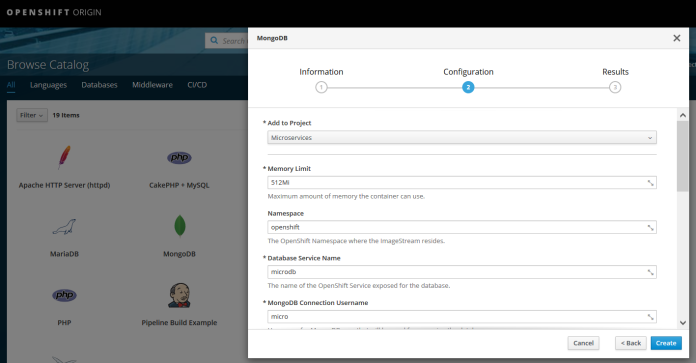
We might as well perform the same actions using the web console. After successful login, first, you will see a dashboard with all available services brokered by Minishift. Let’s initialize a container with MongoDB. All the provided container settings should the same as configured inside the application. After creating MongoDB service would available for all other services under mongodb name.
Creating a MongoDB container managed by Minishift is only a part of success. The most important thing is to deploy containers with two sample microservices, where each of them would have access to the database. Here as well, we may leverage two methods of resource creation: by CLI or via a web console. Here are some CLI commands for creating deployment on OpenShift.
$ oc new-app --docker-image microservices/customer-vertx-service:1.0
$ oc new-app --docker-image microservices/account-vertx-service:1.0
The commands visible above create not only deployment, but also creates pods, and exposes each of them as a service. Now you may easily scale the number of running pods by executing the following command.
$ oc scale --replicas=2 dc customer-vertx-service
$ oc scale --replicas=2 dc account-vertx-service
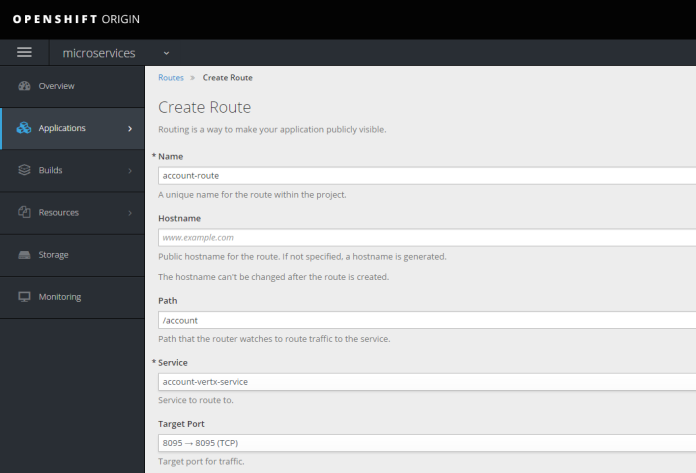
The next step is to expose your service outside a container to make it publicly visible. We can achieve it by creating a route. OpenShift route is similar to the Kubernetes Ingress. OpenShift web console provides an interface for creating routes available under section Applications -> Routes. When defining a new route you should enter its name, a name of a service, and a path on the basis of which requests are proxied. If the hostname is not specified, it is automatically generated by OpenShift.
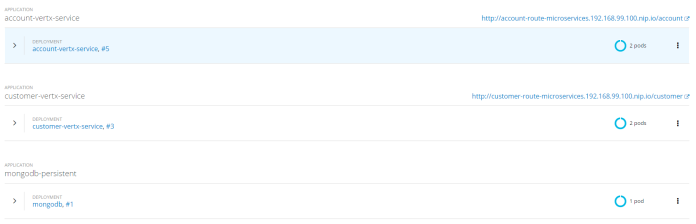
Now, let’s take a look on web console dashboard. There are three applications deployed: mongodb-persistent, account-vertx-service and customer-vertx-service. Both Vert.x microservices are scaled up with two running instances (Kubernetes pods), and are exposed under automatically generated hostname with given context path, for example http://account-route-microservices.192.168.99.100.nip.io/account.
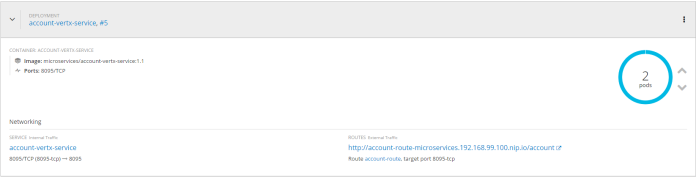
You may check the details of every deployment by expanding it on the list view.
HTTP API is available outside and can be easily tested. Here’s the source code with REST API implementation for account-vertx-service.
AccountRepository repository = AccountRepository.createProxy(vertx, "account-service");
Router router = Router.router(vertx);
router.route("/account/*").handler(ResponseContentTypeHandler.create());
router.route(HttpMethod.POST, "/account").handler(BodyHandler.create());
router.get("/account/:id").produces("application/json").handler(rc -> {
   repository.findById(rc.request().getParam("id"), res -> {
      Account account = res.result();
      LOGGER.info("Found: {}", account);
      rc.response().end(account.toString());
   });
});
router.get("/account/customer/:customer").produces("application/json").handler(rc -> {
   repository.findByCustomer(rc.request().getParam("customer"), res -> {
      List accounts = res.result();
      LOGGER.info("Found: {}", accounts);
      rc.response().end(Json.encodePrettily(accounts));
   });
});
router.get("/account").produces("application/json").handler(rc -> {
   repository.findAll(res -> {
      List accounts = res.result();
      LOGGER.info("Found all: {}", accounts);
      rc.response().end(Json.encodePrettily(accounts));
   });
});
router.post("/account").produces("application/json").handler(rc -> {
   Account a = Json.decodeValue(rc.getBodyAsString(), Account.class);
   repository.save(a, res -> {
      Account account = res.result();
      LOGGER.info("Created: {}", account);
      rc.response().end(account.toString());
   });
});
router.delete("/account/:id").handler(rc -> {
   repository.remove(rc.request().getParam("id"), res -> {
      LOGGER.info("Removed: {}", rc.request().getParam("id"));
      rc.response().setStatusCode(200);
   });
});
vertx.createHttpServer().requestHandler(router::accept).listen(8095);
Vertx inter-service communication on Kubernetes
All the microservices are deployed and exposed outside the container. The last thing that we still have to do is provide a communication between them. In our sample system customer-vertx-service calls endpoint exposed by account-vertx-service. Thanks to Kubernetes services mechanism we may easily call another service from application’s container, for example using simple HTTP client implementation. Let’s take a look on the list of services exposed by Kubernetes.

Here’s client’s implementation responsible for communication with account-vertx-service. Vert.x WebClient takes three parameters when calling the GET method: port, hostname, and path. We should set a Kubernetes service name as a hostname parameter, and the default container’s port as a port.
public class AccountClient {

   private static final Logger LOGGER = LoggerFactory.getLogger(AccountClient.class);
   private Vertx vertx;

   public AccountClient(Vertx vertx) {
      this.vertx = vertx;
   }

   public AccountClient findCustomerAccounts(String customerId, Handler<AsyncResult<List>> resultHandler) {
      WebClient client = WebClient.create(vertx);
      client.get(8095, "account-vertx-service", "/account/customer/" + customerId).send(res2 -> {
         LOGGER.info("Response: {}", res2.result().bodyAsString());
         List accounts = res2.result().bodyAsJsonArray().stream().map(it -> Json.decodeValue(it.toString(), Account.class)).collect(Collectors.toList());
         resultHandler.handle(Future.succeededFuture(accounts));
      });
      return this;
   }

}
AccountClient is invoked inside customer-vertx-service GET /customer/:id endpoint’s implementation.
router.get("/customer/:id").produces("application/json").handler(rc -> {
   repository.findById(rc.request().getParam("id"), res -> {
      Customer customer = res.result();
      LOGGER.info("Found: {}", customer);
      new AccountClient(vertx).findCustomerAccounts(customer.getId(), res2 -> {
         customer.setAccounts(res2.result());
         rc.response().end(customer.toString());
      });
   });
});
Summary
It is no coincidence that OpenShift is considered as the leading enterprise distribution of Kubernetes. It adds several helpful features to Kubernetes that simplify adopting it for developers and operation teams. You can easily try such features as CI/CD for DevOps, multiple projects with collaboration, networking, log aggregation from multiple pods on your local machine with Minishift. As you see you can easily run Vertx microservices on Kubernetes or OpenShift. Enjoy 🙂


Related Posts