Apache Ignite Cluster together with Spring Boot
I have already introduced Apache Ignite in one of my previous articles In-memory data grid with Apache Ignite. Apache Ignite can be easily launched locally together with Spring Boot application. The only thing we have to do is to include artifact org.apache.ignite:ignite-spring-data to the project dependencies and then declare Ignite instance @Bean. Sample @Bean declaration is visible below.
@Bean
public Ignite igniteInstance() {
   IgniteConfiguration cfg = new IgniteConfiguration();
   cfg.setIgniteInstanceName("ignite-cluster-node");
   CacheConfiguration ccfg1 = new CacheConfiguration("PersonCache");
   ccfg1.setIndexedTypes(Long.class, Person.class);
   CacheConfiguration ccfg2 = new CacheConfiguration("ContactCache");
   ccfg2.setIndexedTypes(Long.class, Contact.class);
   cfg.setCacheConfiguration(ccfg1, ccfg2);
   IgniteLogger log = new Slf4jLogger();
   cfg.setGridLogger(log);
   return Ignition.start(cfg);
}
In this article I would like to show you a little more advanced sample where we will start multiple Ignite’s nodes inside the cluster, Ignite’s web console for monitoring cluster, and Ignite’s agent for providing communication between nodes and web console. Let’s begin by looking at the picture with an architecture of our sample solution.
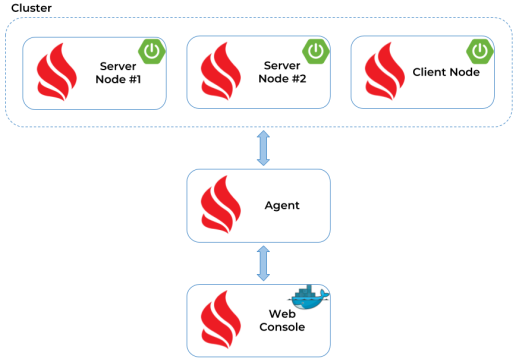
We have three nodes that are part of the cluster. If you carefully take a look at the picture illustrating an architecture you have probably noticed that there are two nodes called Server Node, and one called Client Node. By default, all Ignite nodes are started as server nodes. Client mode needs to be explicitly enabled. Server nodes participate in caching, compute execution, stream processing, while client nodes provide an ability to connect to the servers remotely. However, they allow using the whole set of Ignite APIs, including near caching, transactions, compute, and streaming.
Here’s Ignite’s client instance @Bean declaration.
@Bean
public Ignite igniteInstance() {
   IgniteConfiguration cfg = new IgniteConfiguration();
   cfg.setIgniteInstanceName("ignite-cluster-node");
   cfg.setClientMode(true);
   CacheConfiguration ccfg1 = new CacheConfiguration("PersonCache");
   ccfg1.setIndexedTypes(Long.class, Person.class);
   CacheConfiguration ccfg2 = new CacheConfiguration("ContactCache");
   ccfg2.setIndexedTypes(Long.class, Contact.class);
   cfg.setCacheConfiguration(ccfg1, ccfg2);
   return Ignition.start(cfg);
}
The fact is that we don’t have to do anything more to make our nodes working together within the cluster. Every new node is automatically detected by all other cluster nodes using multicast communication. When starting our sample application we only have to guarantee that each instance’s server would listen of a different port by overriding server.port Spring Boot property. Here’s command that starts the sample application, which is available on GitHub (https://github.com/piomin/sample-ignite-jpa.git) under branch cluster (https://github.com/piomin/sample-ignite-jpa/tree/cluster). Each node exposes the same REST API, which may be easily tested using Swagger2 just by opening its dashboard available under address http://localhost:port/swagger-ui.html.
$ java -jar -Dserver.port=8901 -Xms512m -Xmx1024m -XX:+UseG1GC -XX:+DisableExplicitGC -XX:MaxDirectMemorySize=256m target/ignite-rest-service-1.0-SNAPSHOT.jar
If you have successfully started a new node you should see the similar information in your application logs.
>>> +----------------------------------------------------------------------+
>>> Ignite ver. 2.4.0#20180305-sha1:aa342270b13cc1f4713382a8eb23b2eb7edaa3a5
>>> +----------------------------------------------------------------------+
>>> OS name: Windows 10 10.0 amd64
>>> CPU(s): 4
>>> Heap: 1.0GB
>>> VM name: 14132@piomin
>>> Ignite instance name: ignite-cluster-node
>>> Local node [ID=9DB1296A-7EEC-4564-BAAD-14E5D4A3A08D, order=2, clientMode=false]
>>> Local node addresses: [piomin/0:0:0:0:0:0:0:1, piomin/127.0.0.1, piomin/192.168.1.102, piomin/192.168.116.1, /192.168.226.1, /192.168.99.1]
>>> Local ports: TCP:8082 TCP:10801 TCP:11212 TCP:47101 UDP:47400 TCP:47501
Let’s move back for a moment to the source code of our sample application. I assume you have already cloned a given repository from GitHub. There are two Maven modules available. The module ignite-rest-service is responsible for starting Ignite’s cluster node in server mode, while ignite-client-service for starting node in client mode. Because we run only a single instance of the client’s node, we would not override its default port set inside application.yml file. You can build the project using mvn clean install command and then start with java -jar or just run the main class IgniteClientApplication from your IDE.
There is also JUnit test class inside module ignite-client-service, which defines one test responsible for calling HTTP endpoints (POST /person, POST /contact) that put data into Ignite’s cache. This test performs two operations. It puts some data to the Ignite’s in-memory cluster by calling endpoints exposed by the client node, and then check if that data has been propagated through the cluster by calling GET /person/{id}/withContacts endpoint exposed by one of the selected server nodes.
public class TestCluster {

   TestRestTemplate template = new TestRestTemplate();
   Random r = new Random();
   int[] clusterPorts = new int[] {8901, 8902};

   @Test
   public void testCluster() throws InterruptedException {
      for (int i=0; i<1000; i++) {
         Person p = template.postForObject("http://localhost:8090/person", createPerson(), Person.class);
         Assert.notNull(p, "Create person failed");
         Contact c1 = template
            .postForObject("http://localhost:8090/contact", createContact(p.getId(), 0), Contact.class);
         Assert.notNull(c1, "Create contact failed");
         Contact c2 = template
            .postForObject("http://localhost:8090/contact", createContact(p.getId(), 1), Contact.class);
         Assert.notNull(c2, "Create contact failed");
         Thread.sleep(10);
         Person result = template.getForObject("http://localhost:{port}/person/{id}/withContacts",
            Person.class, clusterPorts[r.nextInt(2)], p.getId());
         Assert.notNull(result, "Person not found");
         Assert.notEmpty(result.getContacts(), "Contacts not found");
      }
   }

   private Contact createContact(Long personId, int index) {
      ...
   }

   private Person createPerson() {
      ...
   }

}
Before running any tests, we should launch two additional elements being a part of our architecture: Ignite’s web console and agent. The most suitable way to run Ignite’s web console on the local machine is through its Docker image apacheignite/web-console-standalone. Here’s a Docker command that starts Ignite’s web console and exposes it on port 80. Because I run Docker on Windows, it is now available under default VM address http://192.168.99.100/.
$ docker run -d -p 80:80 -p 3001:3001 -v /var/data:/var/lib/mongodb --name ignite-web-console apacheignite/web-console-standalone
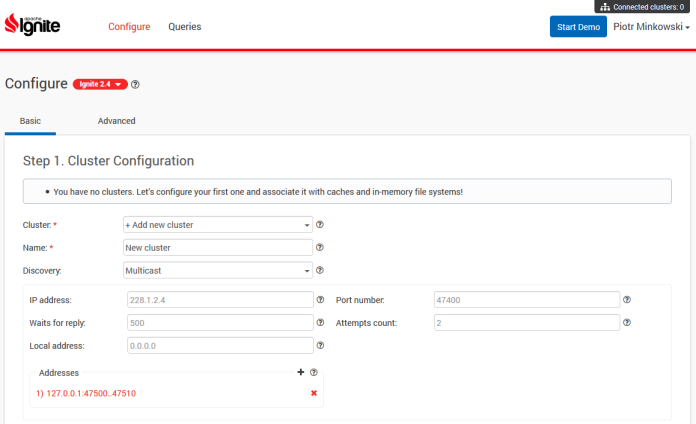
In order to access it you should first register your user. Although the mail server is not available on the Docker container, you would be logged in after it. You can configure your cluster using Ignite’s web console, and also run some SQL queries on that cluster. Of course, we still need to connect our cluster consisting of three nodes with the instance of web console started on Docker container. To achieve it you have to download a web agent. Probably it is not very intuitive, but you have to click button Start Demo, which is located on the right corner of Ignite’s web console. Then you would be redirected to the download page, where you can accept the download of ignite-web-agent-2.4.0.zip file, which contains all needed libraries and configuration to start web agent locally.
After downloading and unpacking web agent go to its main directory and change property server-uri to http://192.168.99.100 inside default.properties file. Then you may run script ignite-web-agent.bat (or .sh if you are testing it on Linux), which starts web agent. Unfortunately, it’s not all that has to be done. Every server node’s application should include artifact ignite-rest-http in order to be able to communicate with the agent. It is responsible for exposing the HTTP endpoint that is accessed by a web agent. It is based on the Jetty server, which causes some problems in conjunction with Spring Boot. Spring Boot sets default versions of Jetty libraries used inside the project. The problem is that ignite-rest-http requires older versions of that libraries, so we also have to override some default managed versions in pom.xml file according to the sample visible below.
<dependencyManagement>
   <dependencies>
      <dependency>
         <groupId>org.eclipse.jetty</groupId>
         <artifactId>jetty-http</artifactId>
         <version>9.2.11.v20150529</version>
      </dependency>
      <dependency>
         <groupId>org.eclipse.jetty</groupId>
         <artifactId>jetty-server</artifactId>
         <version>9.2.11.v20150529</version>
      </dependency>
      <dependency>
         <groupId>org.eclipse.jetty</groupId>
         <artifactId>jetty-io</artifactId>
         <version>9.2.11.v20150529</version>
      </dependency>
      <dependency>
         <groupId>org.eclipse.jetty</groupId>
         <artifactId>jetty-continuation</artifactId>
         <version>9.2.11.v20150529</version>
      </dependency>
      <dependency>
         <groupId>org.eclipse.jetty</groupId>
         <artifactId>jetty-util</artifactId>
         <version>9.2.11.v20150529</version>
      </dependency>
      <dependency>
         <groupId>org.eclipse.jetty</groupId>
         <artifactId>jetty-xml</artifactId>
         <version>9.2.11.v20150529</version>
      </dependency>
   </dependencies>
</dependencyManagement>
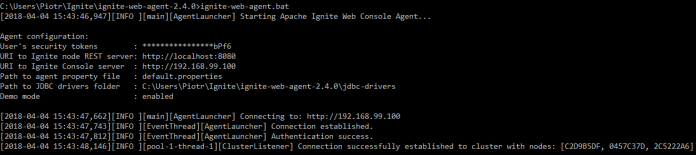
After implementing the changes described above, we may finally proceed to run all the elements being a part of our sample system. If you start Ignite Web Agent locally it should automatically detect all running cluster nodes. Here’s the screen with the logs displayed by the agent after startup.
At the same time, you should see that a new cluster has been detected by Ignite Web Console.
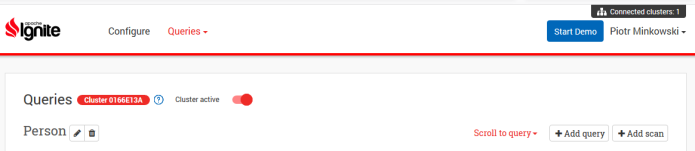
You can configure a new or a currently existing cluster using the web console, or just run a test query on the selected managed cluster. You have to include the name of the cache as a prefix to the table name when defining a query.
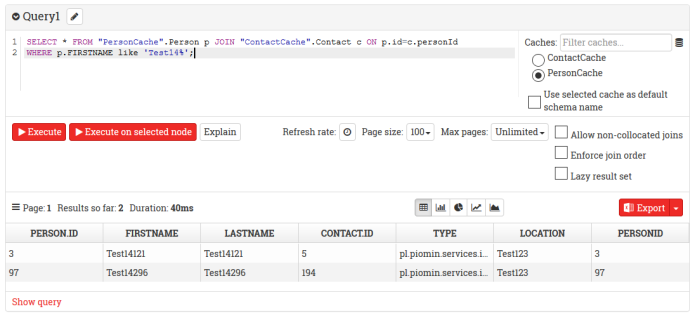
Similar queries have been declared inside a repository interface. Here are additional methods used for finding entities stored in PersonCache. If you would like to include results stored in another cache, you have to explicitly declare its name together with the table name.
@RepositoryConfig(cacheName = "PersonCache")
public interface PersonRepository extends IgniteRepository {

   List findByFirstNameAndLastName(String firstName, String lastName);

   @Query("SELECT p.id, p.firstName, p.lastName, c.id, c.type, c.location FROM Person p JOIN \"ContactCache\".Contact c ON p.id=c.personId WHERE p.id=?")
   List<List> findByIdWithContacts(Long id);

   @Query("SELECT c.* FROM Person p JOIN \"ContactCache\".Contact c ON p.id=c.personId WHERE p.firstName=? and p.lastName=?")
   List selectContacts(String firstName, String lastName);

   @Query("SELECT p.id, p.firstName, p.lastName, c.id, c.type, c.location FROM Person p JOIN \"ContactCache\".Contact c ON p.id=c.personId WHERE p.firstName=? and p.lastName=?")
   List<List> selectContacts2(String firstName, String lastName);
}
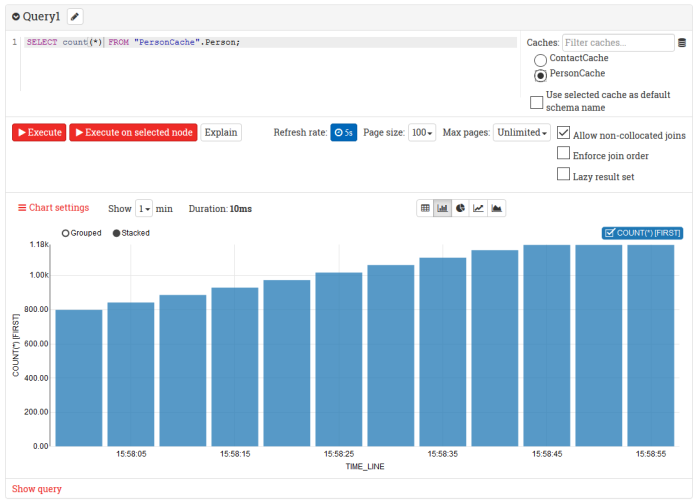
We are nearing the end. Now, let’s run our JUnit test TestCluster in order to generate some test data and put it into the clustered cache. You can monitor the size of a cache using the web console. All you have to do is to run SELECT COUNT(*) query, and set graph mode as a default mode for result display. The chart visible below illustrates the number of entities stored inside Ignite’s cluster at 5s intervals.


Related Posts