Testing microservices on OpenShift using Arquillian Cube
I had a touch with the Arquillian framework for the first time when I was building the automated end-to-end tests for JavaEE based applications. At that time testing applications deployed on JavaEE servers was not very comfortable. Arquillian came with a nice solution for that problem. It has been providing useful mechanisms for testing EJBs deployed on an embedded application server.
Currently, Arquillian provides multiple modules dedicated for different technologies and use cases. One of these modules is Arquillian Cube. With this extension you can create integration/functional tests running on Docker containers or even more advanced orchestration platforms like Kubernetes or OpenShift.
In this article I’m going to show you how to use the Arquillian Cube for building integration tests for applications running on the OpenShift platform. All the examples would be deployed locally on Minishift. Here’s the full list of topics covered in this article:
- Using Arquillian Cube for deploying, and running applications on Minishift
- Testing applications deployed on Minishift by calling their REST API exposed using OpenShift routes
- Testing inter-service communication between deployed applications basing on Kubernetes services
Before reading this article it is worth to consider reading two of my previous articles about Kubernetes and OpenShift:
- Running Vert.x Microservices on Kubernetes/OpenShift – describes how to run Vert.x microservices on Minishift, integrate them with Mongo database, and provide inter-service communication between them
- Quick guide to deploying Java apps on OpenShift – describes further steps of running Minishift and deploying applications on that platform
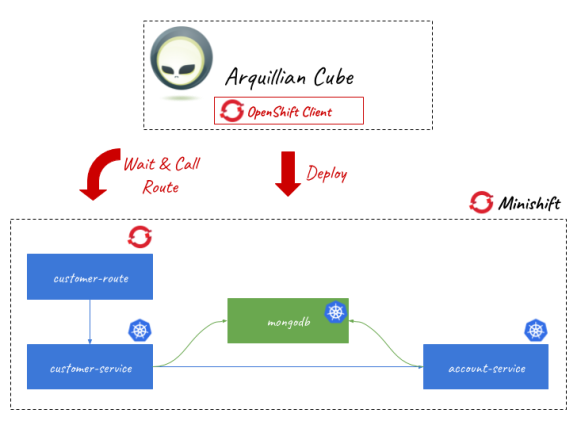
The following picture illustrates the architecture of the currently discussed solution. We will build and deploy two sample applications on Minishift. They integrate with NoSQL database, which is also run as a service on OpenShift platform.
Now, we may proceed to the development.
1. Including Arquillian Cube dependencies
Before including dependencies to Arquillian Cube libraries we should define the dependency management section in our pom.xml. It should contain a BOM of Arquillian framework and also of its Cube extension.
<dependencyManagement>
     <dependencies>
          <dependency>
                <groupId>org.arquillian.cube</groupId>
                <artifactId>arquillian-cube-bom</artifactId>
                <version>1.15.3</version>
                <scope>import</scope>
                <type>pom</type>
          </dependency>
          <dependency>
                <groupId>org.jboss.arquillian</groupId>
                <artifactId>arquillian-bom</artifactId>
                <version>1.4.0.Final</version>
                <scope>import</scope>
                <type>pom</type>
          </dependency>
     </dependencies>
</dependencyManagement>
Here’s the list of libraries used in my sample project. The most important thing is to include a starter for Arquillian Cube OpenShift extension, which contains all required dependencies. It is also worth to include arquillian-cube-requirement artifact if you would like to annotate test class with @RunWith(ArquillianConditionalRunner.class), and openshift-client in case you would like to use Fabric8 OpenShiftClient.
<dependency>
     <groupId>org.jboss.arquillian.junit</groupId>
     <artifactId>arquillian-junit-container</artifactId>
     <version>1.4.0.Final</version>
     <scope>test</scope>
</dependency>
<dependency>
     <groupId>org.arquillian.cube</groupId>
     <artifactId>arquillian-cube-requirement</artifactId>
     <scope>test</scope>
</dependency>
<dependency>
     <groupId>org.arquillian.cube</groupId>
     <artifactId>arquillian-cube-openshift-starter</artifactId>
     <scope>test</scope>
</dependency>
<dependency>
     <groupId>io.fabric8</groupId>
     <artifactId>openshift-client</artifactId>
     <version>3.1.12</version>
     <scope>test</scope>
</dependency>
2. Running Minishift
I gave you a detailed instruction how to run Minishift locally in my previous articles about OpenShift. Here’s the full list of commands that should be executed in order to start Minishift, reuse Docker daemon managed by Minishift and create test namespace (project).
$ minishift start --vm-driver=virtualbox --memory=2G
$ minishift docker-env
$ minishift oc-env
$ oc login -u developer -p developer
$ oc new-project sample-deployment
We also have to create a Mongo database service on OpenShift. OpenShift platform provides an easy way of deploying built-in services via a web console available at https://192.168.99.100:8443. You can select the required service on the main dashboard, and just confirm the installation using default properties. Otherwise, you would have to provide a YAML template with deployment configuration, and apply it to Minishift using oc command. YAML file will be also required if you decide to recreate namespace on every single test case (explained in the subsequent text in Step 3). I won’t paste here the content of the template with configuration for creating MongoDB service on Minishift. This file is available in my GitHub repository in the /openshift/mongo-deployment.yaml file. To access that file you need to clone repository sample-vertx-kubernetes and switch to branch openshift (https://github.com/piomin/sample-vertx-kubernetes/tree/openshift-tests). It contains definitions of secret, persistentVolumeClaim, deploymentConfig and service.

3. Configuring connection with Minishift for Arquillian
All the Arquillian configuration settings should be provided in the arquillian.xml file located in src/test/resources directory. When running Arquillian tests on Minishift you generally have two approaches that may be applied. You can create a new namespace per every test suite and then remove it after the test or just use the existing one, and then remove all the created components within the selected namespace. First approach is set by default for every test until you modify it inside the Arquillian configuration file using namespace.use.existing and namespace.use.current properties.
<extension qualifier="openshift">
	<property name="namespace.use.current">true</property>
	<property name="namespace.use.existing">sample-deployment</property>
	<property name="kubernetes.master">https://192.168.99.100:8443</property>
	<property name="cube.auth.token">EMNHP8QIB4A_VU4kE_vQv8k9he_4AV3GTltrzd06yMU</property>
</extension>
You also have to set Kubernetes master address and API token. In order to obtain a token just run the following command.
$ oc whoami -t
EMNHP8QIB4A_VU4kE_vQv8k9he_4AV3GTltrzd06yMU
4. Building Arquillian JUnit test
Every JUnit test class should be annotated with @RequiresOpenshift. It should also have a runner set. In this case it is ArquillianConditionalRunner. The test method testCustomerRoute applies the configuration passed inside file deployment.yaml, which is assigned to the method using @Template annotation.
The important part of this unit test is route’s URL declaration. We have to annotate it with the following annotation:
@RouteURL– it searches for a route with a name defined usingvalueparameter and inject it into URL object instance@AwaitRoute– if you do not declare this annotation the test will finish just after running, because deployment on OpenShift is processed asynchronously.@AwaitRoutewill force test to wait until the route is available on Minishift. We can set the timeout of waiting for route (in this case it is 2 minutes) and route’s path. Especially route’s path is very important here, without it our test won’t locate the route and finished with 2 minutes timeout.
The test method is very simple. In fact, I only send the POST request with JSON object to the endpoint assigned to the customer-route route and verify if HTTP status code is 200. Because I had a problem with injecting route’s URL (in fact it doesn’t work for my sample with Minishift v3.9.0, while it works with Minishift v3.7.1) I needed to prepare it manually in the code. If it works properly we could use URL url instance for that.
@Category(RequiresOpenshift.class)
@RequiresOpenshift
@RunWith(ArquillianConditionalRunner.class)
public class CustomerServiceApiTest {

    private static final Logger LOGGER = LoggerFactory.getLogger(CustomerServiceApiTest.class);

    @ArquillianResource
    OpenShiftAssistant assistant;
    @ArquillianResource
    OpenShiftClient client;

    @RouteURL(value = "customer-route")
    @AwaitRoute(timeoutUnit = TimeUnit.MINUTES, timeout = 2, path = "/customer")
    private URL url;

    @Test
    @Template(url = "classpath:deployment.yaml")
    public void testCustomerRoute() {
        OkHttpClient httpClient = new OkHttpClient();
        RequestBody body = RequestBody.create(MediaType.parse("application/json"), "{\"name\":\"John Smith\", \"age\":33}");
        Request request = new Request.Builder().url("https://customer-route-sample-deployment.192.168.99.100.nip.io/customer").post(body).build();
        try {
            Response response = httpClient.newCall(request).execute();
            LOGGER.info("Test: response={}", response.body().string());
            Assert.assertNotNull(response.body());
            Assert.assertEquals(200, response.code());
        } catch (IOException e) {
            e.printStackTrace();
        }
    }
}
5. Preparing deployment configuration
Before running the test we have to prepare a template with configuration, which is loaded by Arquillian Cube using @Template annotation. We need to create deploymentConfig, inject there MongoDB credentials stored in secret object, and finally expose the service outside the container using route object.
kind: Template
apiVersion: v1
metadata:
  name: customer-template
objects:
  - kind: ImageStream
    apiVersion: v1
    metadata:
      name: customer-image
    spec:
      dockerImageRepository: piomin/customer-vertx-service
  - kind: DeploymentConfig
    apiVersion: v1
    metadata:
      name: customer-service
    spec:
      template:
        metadata:
          labels:
            name: customer-service
        spec:
          containers:
          - name: customer-vertx-service
            image: piomin/customer-vertx-service
            ports:
            - containerPort: 8090
              protocol: TCP
            env:
            - name: DATABASE_USER
              valueFrom:
                secretKeyRef:
                  key: database-user
                  name: mongodb
            - name: DATABASE_PASSWORD
              valueFrom:
                secretKeyRef:
                  key: database-password
                  name: mongodb
            - name: DATABASE_NAME
              valueFrom:
                secretKeyRef:
                  key: database-name
                  name: mongodb
      replicas: 1
      triggers:
      - type: ConfigChange
      - type: ImageChange
        imageChangeParams:
          automatic: true
          containerNames:
          - customer-vertx-service
          from:
            kind: ImageStreamTag
            name: customer-image:latest
      strategy:
        type: Rolling
      paused: false
      revisionHistoryLimit: 2
      minReadySeconds: 0
  - kind: Service
    apiVersion: v1
    metadata:
      name: customer-service
    spec:
      ports:
      - name: "web"
        port: 8090
        targetPort: 8090
      selector:
        name: customer-service
  - kind: Route
    apiVersion: v1
    metadata:
      name: customer-route
    spec:
      path: "/customer"
      to:
        kind: Service
        name: customer-service
6. Testing inter-service communication
In the sample project the communication with other microservices is realized by Vert.x WebClient. It takes Kubernetes service name and its container port as parameters. It is implemented inside customer-service by AccountClient, which is then invoked inside Vert.x HTTP route implementation. Here’s AccountClient implementation.
public class AccountClient {

	private static final Logger LOGGER = LoggerFactory.getLogger(AccountClient.class);

	private Vertx vertx;

	public AccountClient(Vertx vertx) {
		this.vertx = vertx;
	}

	public AccountClient findCustomerAccounts(String customerId, Handler>> resultHandler) {
		WebClient client = WebClient.create(vertx);
		client.get(8095, "account-service", "/account/customer/" + customerId).send(res2 -> {
			LOGGER.info("Response: {}", res2.result().bodyAsString());
			List accounts = res2.result().bodyAsJsonArray().stream().map(it -> Json.decodeValue(it.toString(), Account.class)).collect(Collectors.toList());
			resultHandler.handle(Future.succeededFuture(accounts));
		});
		return this;
	}

}
Endpoint GET /account/customer/:customerId exposed by account-service is called within implementation of method GET /customer/:id exposed by customer-service. This time we create a new namespace instead using the existing one. That’s why we have to apply MongoDB deployment configuration before applying configuration of sample services. We also need to upload configuration of account-service that is provided inside account-deployment.yaml file. The rest part of JUnit test is pretty similar to the test described in Step 4. It waits until customer-route is available on Minishift. The only differences are in calling URL and dynamic injection of namespace into route’s URL.
@Category(RequiresOpenshift.class)
@RequiresOpenshift
@RunWith(ArquillianConditionalRunner.class)
@Templates(templates = {
        @Template(url = "classpath:mongo-deployment.yaml"),
        @Template(url = "classpath:deployment.yaml"),
        @Template(url = "classpath:account-deployment.yaml")
})
public class CustomerCommunicationTest {

    private static final Logger LOGGER = LoggerFactory.getLogger(CustomerCommunicationTest.class);

    @ArquillianResource
    OpenShiftAssistant assistant;

    String id;

    @RouteURL(value = "customer-route")
    @AwaitRoute(timeoutUnit = TimeUnit.MINUTES, timeout = 2, path = "/customer")
    private URL url;

    // ...

    @Test
    public void testGetCustomerWithAccounts() {
        LOGGER.info("Route URL: {}", url);
        String projectName = assistant.getCurrentProjectName();
        OkHttpClient httpClient = new OkHttpClient();
        Request request = new Request.Builder().url("https://customer-route-" + projectName + ".192.168.99.100.nip.io/customer/" + id).get().build();
        try {
            Response response = httpClient.newCall(request).execute();
            LOGGER.info("Test: response={}", response.body().string());
            Assert.assertNotNull(response.body());
            Assert.assertEquals(200, response.code());
        } catch (IOException e) {
            e.printStackTrace();
        }
    }

}
You can run the test using your IDE or just by executing command mvn clean install.
Conclusion
Arquillian Cube comes with a gentle solution for integration testing over Kubernetes and OpenShift platforms. It is not difficult to prepare and upload configuration with database and microservices and then deploy it on OpenShift node. You can even test communication between microservices just by deploying a dependent application with OpenShift template.


Related Posts