Running Jenkins Server with Configuration-As-Code
Some days ago I came across a newly created Jenkins plugin called Configuration as Code (in short Jenkins casc). This plugin allows you to define Jenkins configuration in a very popular format these days – YAML notation. It is interesting that such a plugin has not been created before but better late than never. Of course, we could have used some other Jenkins plugins for that, like Job DSL Plugin, but it is based on Groovy language.
If you have any experience with Jenkins, you probably know how many plugins and other configuration settings it requires to have in order to work in your organization as a main CI server. With the Jenkins casc plugin, you can store such a configuration in human-readable declarative YAML files. In this article, I’m going to show you how to create and run Jenkins with configuration as code letting you build a Java application using such tools like declarative pipelines, Git, Maven. I’ll also show how to manage sensitive data using the Vault server.
1. Using Vault server with Jenkins casc plugin
We will begin by running the Vault server on the local machine. The easiest way to do that is with a Docker image. By default, the official Vault image is started in development mode. The following command runs an in-memory server, which listens on address 0.0.0.0:8200
$ docker run -d --name=vault --cap-add=IPC_LOCK -p 8200:8200 vault:0.9.0
There is one thing that should be clarified here. I do not run the newest version of Vault, because it forces us to call endpoints from version 2 of the KV (Key-Value Secrets Engine) HTTP API, which is used for manipulating secrets. This version, in turn, is not supported by JcasC plugin that can communicate only with endpoints from version 1 of KV HTTP API. It does not apply to an older version of Vault, for example 0.9.0, which allows calling KV in version 1. After running the container we should obtain the token used for authentication against Vault from the console logs. To do that just run command docker logs vault and find the following fragment in the logs.

Now, using this authentication token we may add credentials required for accessing Jenkins web dashboard and our account on Git repository host. Jenkins account will be identified by rootPassword key, while GitHub account by githubPassword key.
$ curl -H "X-Vault-Token: 5bcab13b-6cf5-2f58-8b37-34dca31bebde" --request POST -d '{"rootPassword":"your_root_password", "githubPassword":"your_github_password"}' https://192.168.99.100:8200/v1/secret/jenkins
To check out if the parameters have been saved on Vault just call the GET method with the same context path.
$ curl -H "X-Vault-Token: 5bcab13b-6cf5-2f58-8b37-34dca31bebde" https://192.168.99.100:8200/v1/secret/jenkins
2. Building Jenkins image with Casc plugin
The same as for Vault server we also run Jenkins on a Docker container. However, we need to add some configuration settings to Jenkins official image before running it. Jenkins casc plugin requires setting an environment variable that points to location of the current YAML configuration files. This variable can point to the following:
- Path to a folder containing a set of config files
- A full path to a single file
- A URL pointing to a file served on the web, or for example your internal configuration server
The next step is to set some configuration settings required for establishing connection to Vault server. We have to pass the authentication token, the path of the created key and the URL of the running server. All these configuration settings are set as environment variables and may be overridden on container startup. The same rule applies to the location of the JcasC configuration file. The following Dockerfile definition extends Jenkins base image, and add all the required parameters for running it using Jenkins casc plugin and with secrets taken from Vault.
FROM jenkins/jenkins:lts

ENV CASC_JENKINS_CONFIG="/var/jenkins_home/jenkins.yml"

ENV CASC_VAULT_TOKEN=5bcab13b-6cf5-2f58-8b37-34dca31bebde

ENV CASC_VAULT_PATH=/secret/jenkins

ENV CASC_VAULT_URL=http://192.168.99.100:8200

COPY jenkins.yml ${CASC_JENKINS_CONFIG}

USER jenkins

RUN /usr/local/bin/install-plugins.sh configuration-as-code configuration-as-code-support git workflow-cps-global-lib
Now, let’s build the Docker image using Dockerfile visible above. Alternatively, you can just pull the image stored in my Docker Hub repository.
$ docker build -t piomin/jenkins-casc:1.0 .
Finally, you can run the container based on the built image with the following command. Of course, before that we need to prepare the YAML configuration file for Jenkins casc plugin.
$ docker run -d --name jenkins-casc -p 8080:8080 -p 50000:50000 piomin/jenkins-casc:1.0 .
3. Preparing configuration
Jenkins casc plugin provides many configuration settings that allows you to configure various components of your jenkins master installation. However, I will limit myself to defining the basic configuration used for building my sample Java application. We need the following Jenkins components to be configured after startup:
- A set of Jenkins plugins allowing to create declarative pipeline that checkouts source code from Git repository, builds it using Maven, and records JUnit test results
- Basic security realm containing credentials for a single Jenkins user. The user password is read from property
rootPasswordstored on Vault server - JDK location directory
- Maven installation settings – Maven is not installed by default in Jenkins, so we have to set required version and tool name
- Credentials for accessing Git repository containing application source code
plugins: # (1)
  required:
    git: 3.9.1
    pipeline-model-definition: 1.3.2
    pipeline-stage-step: 2.3
    pipeline-maven: 3.5.12
    workflow-aggregator: 2.5
    junit: 1.25
  sites:
  - id: "default"
    url: "https://updates.jenkins.io/update-center.json"
jenkins:
  agentProtocols:
  - "JNLP4-connect"
  - "Ping"
  authorizationStrategy:
    loggedInUsersCanDoAnything:
      allowAnonymousRead: false
  crumbIssuer:
    standard:
      excludeClientIPFromCrumb: false
  disableRememberMe: false
  mode: NORMAL
  numExecutors: 2
  primaryView:
    all:
      name: "all"
  quietPeriod: 5
  scmCheckoutRetryCount: 0
  securityRealm: # (2)
    local:
      allowsSignup: false
      enableCaptcha: false
      users:
      - id: "piomin"
        password: ${rootPassword}
  slaveAgentPort: 50000
  views:
  - all:
      name: "all"
tool:
  git:
    installations:
    - home: "git"
      name: "Default"
  jdk: # (3)
    installations:
    - home: "/docker-java-home"
      name: "jdk"
  maven: # (4)
    installations:
    - name: "maven"
      properties:
      - installSource:
          installers:
          - maven:
              id: "3.5.4"
credentials: # (5)
  system:
    domainCredentials:
      - domain :
          name: "github.com"
          description: "GitHub"
        credentials:
          - usernamePassword:
              scope: SYSTEM
              id: github-piomin
              username: piomin
              password: ${githubPassword}
4. Exporting configuration
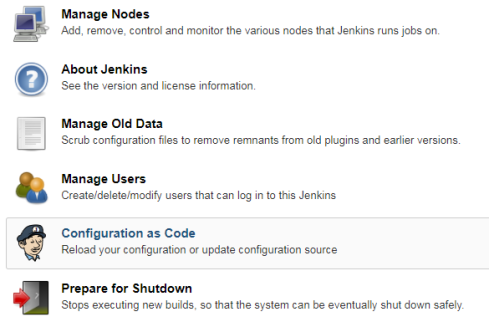
After running Jenkins with the Configuration as Code plugin installed you can easily export the current configuration to the file. First, navigate to section Manage Jenkins -> Configuration as Code.
Then, after choosing the Export Configuration button, the YAML file with Jenkins configuration will be downloaded to your machine. But following the comment visible below you cannot rely on that file, because this feature is still not stable. For my configuration it didn’t export Maven tool settings and list of Jenkins plugins. However, the JcasC plugin is probably still under active development, so I hope that feature will work succesfully soon.

5. Running sample pipeline
Finally you can create and run a pipeline for your sample application. Here’s the definition of my pipeline.
pipeline {
    agent any
    tools {
        maven 'maven'
    }
    stages {
        stage('Checkout') {
            steps {
                git url: 'https://github.com/piomin/sample-spring-boot-autoscaler.git', credentialsId: 'github-piomin', branch: 'master'
            }
        }
		stage('Test') {
            steps {
                dir('example-service') {
                    sh 'mvn clean test'
                }
            }
        }
        stage('Build') {
            steps {
                dir('example-service') {
                    sh 'mvn clean install'
                }
            }
        }
    }
    post {
        always {
            junit '**/target/reports/**/*.xml'
        }
    }
}
Summary
The idea around Jenkins Configuration as Code Plugin is the step in the right direction. I’ll be following the development of this product with great interest. There are still some features that need to be added to make it more useful, and some bugs that need to be fixed. But after that, I’ll definitely consider using this plugin for maintaining the current Jenkins master server inside my organization.


Related Posts