Kotlin Microservices with Ktor
Ktor is a framework for building asynchronous applications on the server and client side. It is fully written in Kotlin. The main goal of Ktor is to provide an end-to-end multiplatform application framework for connected applications. It allows us to easily build web applications and HTTP services, so we can use it for building microservices-based architecture. Let’s discuss the main features of the Ktor framework by the example of a simple system consisting of two microservices.
1. Setting up an environment
We can use Gradle or Maven for setting up our build environment. The first goal is to add some dedicated Maven repositories, because Ktor dependencies are not available in central repo.
<repositories>
    <repository>
        <id>ktor</id>
        <url>http://dl.bintray.com/kotlin/ktor</url>
    </repository>
    <repository>
        <id>kotlinx</id>
        <url>http://dl.bintray.com/kotlin/kotlinx</url>
    </repository>
    <repository>
        <id>jcenter</id>
        <url>http://jcenter.bintray.com</url>
    </repository>
</repositories>
The current version of Ktor framework is 0.9.5.
<properties>
    <ktor.version>0.9.5</ktor.version>
</properties>
Before adding any dependencies we should also configure kotlin-maven-plugin, and the compiler to avoid warnings when using Kotlin coroutines. They are still an experimental feature in Kotlin.
<plugin>
   <groupId>org.jetbrains.kotlin</groupId>
   <artifactId>kotlin-maven-plugin</artifactId>
   <version>${kotlin.version}</version>
   <executions>
      <execution>
         <id>compile</id>
         <phase>compile</phase>
         <goals>
            <goal>compile</goal>
         </goals>
      </execution>
      <execution>
         <id>test-compile</id>
         <phase>test-compile</phase>
         <goals>
            <goal>test-compile</goal>
         </goals>
      </execution>
   </executions>
   <configuration>
      <jvmTarget>1.8</jvmTarget>
      <args>
         <arg>-Xcoroutines=enable</arg>
      </args>
   </configuration>
</plugin>
2. Sample applications
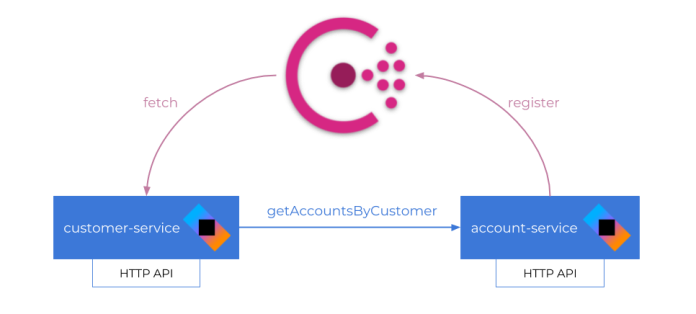
We will create two microservices built on top of Ktor Framework: account-service and customer-service. The application customer-service calls endpoint exposed by account-service for searching all accounts of a given customer. Both microservices expose some other endpoints for adding or finding objects. There is also a third element in our architecture: discovery server. We will use HashiCorp’s Consul for that. Every instance of account-service would register itself in the discovery server, while customer-service would fetch the list of register instances to obtain their addresses and ports. In summary, that is a typical example of communication between microservices presented in some of my previous articles on this blog. The sample system architecture is visualized on the following diagram.
3. The Basics
First, we will add some dependencies required for running Ktor on the server side. Our application will be launched on Netty server, and will use Jackson library for JSON serialization.
<dependency>
   <groupId>io.ktor</groupId>
   <artifactId>ktor-server-core</artifactId>
   <version>${ktor.version}</version>
</dependency>
<dependency>
   <groupId>io.ktor</groupId>
   <artifactId>ktor-server-netty</artifactId>
   <version>${ktor.version}</version>
</dependency>
<dependency>
   <groupId>io.ktor</groupId>
   <artifactId>ktor-jackson</artifactId>
   <version>${ktor.version}</version>
</dependency>
After that we can create the main method that initializes the embedded server based on Netty. Because we would like to set the server listen port dynamically during application startup, we use a method that takes command line arguments as a parameter. Thanks to that we will use parameter -port=TARGET_PORT, when starting every single instance of application.
fun main(args: Array<String>) {
   val server = embeddedServer(Netty, commandLineEnvironment(args))
   server.start(wait = true)
}
It is possible to implement different configuration strategies with Ktor, but the recommended way is through a configuration file, called a HOCON file. Here’s the application.conf file for customer-service.
ktor {
  deployment {
    port: 8095
  }
  application {
    modules = [ pl.piomin.services.CustomerApplicationModuleKt.main ]
  }
}
Each application takes a list of required Ktor modules as a parameter. In fact, modules are the vital part of your application. These are user-defined functions receiving the Application class that is in charge of configuring the server pipeline, install features, registering routes, handling requests, etc. For the configuration visible above, the method main that defines our module is available inside file CustomerApplicationModule.kt located inside package pl.piomin.services.
Inside that method you can find the declarations of features provided by the Ktor framework and used by the application. This is the most important part of our code, because it contains almost all the logic implemented by the application. The most commonly used feature is Routing. It defines all the HTTP API endpoints exposed by our application. In the following fragment of code I have defined four endpoints: a single POST method for adding a new account, and three GET endpoints providing different find methods.
package pl.piomin.services
fun Application.main() {
   val repository = AccountRepository()
   //...
   routing {
      get("/accounts") {
         call.respond(message = repository.accounts)
      }
      get("/accounts/{id}") {
         val id: String? = call.parameters["id"]
         if (id != null)
            call.respond(message = repository.accounts.filter { it.id == id.toInt() })
      }
      get("/accounts/customer/{customerId}") {
         val customerId: String? = call.parameters["customerId"]
         if (customerId != null)
            call.respond(message = repository.accounts.filter { it.customerId == customerId.toInt() })
      }
      post("/accounts") {
         var account: Account = call.receive()
         account.id = repository.accounts.size + 1
         repository.addAccount(account)
         log.info("$account")
         call.respond(message = account)
      }
   }
}
4. Using built-in features
A Ktor application typically consists of a series of features. You can think of features as functionality that is injected into the request and response pipeline. Usually, an application would have a series of features such as DefaultHeaders which add headers to every outgoing response or Routing which allows us to define routes to handle requests, etc. We can create our own custom features, but there is also a set of built-in features implemented as Ktor modules. We can install any of the built-in features just by passing the class name inside the install statement. Here’s the list of features I used in the sample applications:
- ContentNegotation – it provides automatic content conversion according to Content-Type and Accept headers. I have used Jackson library for converting between objects and JSON content
- Metrics – it provides implementation for generating metrics with useful information about the server and the requests. We can use different exporters by selecting from modules provided by Dropwizard Metrics library. I decided to use
Slf4jReporterthat prints metric values to the log destination. But you could also use, for exampleInfluxReporterfor sending metrics to InfluxDB - CallLogging – it is used for logging the incoming client requests. It leverages the
ApplicationEnvironment.logthat uses slf4j, so you can easily configure the output - CallId – this feature allows identifying a request/call by generating request id and can work along the CallLogging feature. The CallLogging feature add generated value to MDC by calling method
callIdMdc with MDC field name as a parameter
Here’s the fragment of code responsible for defining Ktor features used by the application.
install(ContentNegotiation) {
   jackson {
   }
}
install(Metrics) {
   Slf4jReporter.forRegistry(registry).outputTo(log).build().start(10, TimeUnit.SECONDS)
}
install(CallLogging) {
   level = Level.TRACE
   callIdMdc("X-Request-ID")
}
install(CallId) {
   generate(10)
}
To be able to work with the Metrics feature we first need to include the following dependency to pom.xml file.
<dependency>
   <groupId>io.ktor</groupId>
   <artifactId>ktor-metrics</artifactId>
   <version>${ktor.version}</version>
</dependency>
5. Configure logging
The logging configuration for the Ktor framework is based on SLF4J. You just need to include dependency of the logging provider to pom.xml. It can be Logback.
<dependency>
    <groupId>ch.qos.logback</groupId>
    <artifactId>logback-classic</artifactId>
    <version>1.2.3</version>
</dependency>
Then you need to create logback.xml configuration file, and place it in src/main/resources directory. The following configuration forces SLF4J to print logs only to the console. It includes the MDC field X-Request-ID generated using CallId feature.
<configuration>
    <appender name="STDOUT" class="ch.qos.logback.core.ConsoleAppender">
        <encoder>
            <pattern>%d{YYYY-MM-dd HH:mm:ss.SSS} [%thread] [%X{X-Request-ID}] %-5level %logger{36} - %msg%n</pattern>
        </encoder>
    </appender>

    <root level="trace">
        <appender-ref ref="STDOUT"/>
    </root>

    <logger name="org.eclipse.jetty" level="INFO"/>
    <logger name="io.netty" level="INFO"/>
</configuration>
Now, you are able to use a logger in your application just by calling io.ktor.application.log instance.
import io.ktor.application.log
// ...
post("/accounts") {
   var account: Account = call.receive()
   account.id = repository.accounts.size + 1
   repository.addAccount(account)
   log.info("$account")
   call.respond(message = account)
}
6. Running Consul server
The implementation of our applications is almost finished. We just need to add the communication between two sample microservices. To achieve it we first need to run a discovery server. Running Consul on the local machine is pretty easily using a Docker container. Here’s the command that runs Consul in standalone mode, and exposes API on port 8500.
$ docker run -d --name=consul -e CONSUL_BIND_INTERFACE=eth0 -p 8500:8500 -p 8600:8600 consul
Consul provides a web interface, which is available under address http://192.168.99.100:8500.
7. Custom Ktor feature for service discovery with Consul
Ktor Framework does not provide any components that implement typical microservice patterns like service discovery or distributed configuration. This library is in the early stage of development (still the current version is below 1.0), so such features will probably be implemented in the future. However, with Ktor we may easily implement a custom feature that is able to communicate with Consul. There are two types of features available for applications that use Ktor: server-side and client-side features. In that case we will implement a feature on the client side. It is responsible for intercepting an event of sending a message by HTTP client, and including communication with Consul to the pipeline.
Before starting any implementation we need to include a set of Ktor client libraries and also a library providing methods for calling Consul API.
<dependency>
   <groupId>io.ktor</groupId>
   <artifactId>ktor-client-apache</artifactId>
   <version>${ktor.version}</version>
</dependency>
<dependency>
   <groupId>io.ktor</groupId>
   <artifactId>ktor-client-json</artifactId>
   <version>${ktor.version}</version>
</dependency>
<dependency>
   <groupId>io.ktor</groupId>
   <artifactId>ktor-client-jackson</artifactId>
   <version>${ktor.version}</version>
</dependency>
<dependency>
   <groupId>com.orbitz.consul</groupId>
   <artifactId>consul-client</artifactId>
   <version>1.2.3</version>
</dependency>
Let’s take a look on the implementation of ConsulFeature. It uses Consul client provided by consul-client. The default Consul address is http://localhost:8500, but it can be overridden on the calling side. I would not like to get into the implementation details of the Ktor client feature. The most important thing is the code inside install method. It is executed during Render phase, which is fired before Send phase. Our custom feature replaces an address provided as a hostname in the client’s URL by the address and port taken from Consul.
class ConsulFeature(var consulUrl: String) {

    class Config {
        var consulUrl: String = "http://localhost:8500"
        fun build(): ConsulFeature = ConsulFeature(consulUrl)
    }

    companion object Feature : HttpClientFeature<Config, ConsulFeature> {
        var currentNodeIndex: Int = 0

        override val key = AttributeKey<ConsulFeature>("ConsulFeature")

        override fun prepare(block: Config.() -> Unit): ConsulFeature = Config().apply(block).build()

        override fun install(feature: ConsulFeature, scope: HttpClient) {
            scope.requestPipeline.intercept(HttpRequestPipeline.Render) {
                var consulClient = Consul.builder().withUrl(feature.consulUrl).build()
                val nodes = consulClient.healthClient().getHealthyServiceInstances(context.url.host).response
                val selectedNode = nodes[currentNodeIndex]
                context.url.host = selectedNode.service.address
                context.url.port = selectedNode.service.port
                currentNodeIndex = (currentNodeIndex + 1) % nodes.size
                println("Calling ${selectedNode.service.id}: ${context.url.buildString()}")
            }
        }
    }
}
How it works? Everything should be clear for you after looking at that fragment of code containing HTTP client declaration, and usage of that client inside customer-service endpoint implementation. Instead of setting an IP address in the client’s URL I used the name of the calling service – in that case account-service. This name is then replaced by ConsulFeature with an address and port taken for Consul server. If there is more than one instance of account-service registered in Consul server, the feature performs load balancing using the typical Round Robin method.
val client = HttpClient(Apache) {
   install(ConsulFeature) {
      consulUrl = "http://192.168.99.100:8500"
   }
   install(JsonFeature)
}
// ...
routing {
   get("/customers/{id}") {
      val id: String? = call.parameters["id"]
      if (id != null) {
         val accounts = client.get<Accounts>("http://account-service/accounts/customer/$id")
         val customerRet = customer.copy(id = customer.id, name = customer.name)
         customerRet.accounts.addAll(accounts)
         call.respond(message = customerRet)
      }
   }
}
And the last thing. The application needs to register itself in Consul after startup. Here’s the main function of account-service. It uses the register method of Consul client. An unique id is automatically generated using application listen port number.
fun main(args: Array<String>) {
    val server = embeddedServer(Netty, commandLineEnvironment(args))
    val consulClient = Consul.builder().withUrl("https://192.168.99.100:8500").build()
    val service = ImmutableRegistration.builder()
            .id("account-${server.environment.connectors[0].port}")
            .name("account-service")
            .address("localhost")
            .port(server.environment.connectors[0].port)
            .build()
    consulClient.agentClient().register(service)

    server.start(wait = true)
}
8. How it works?
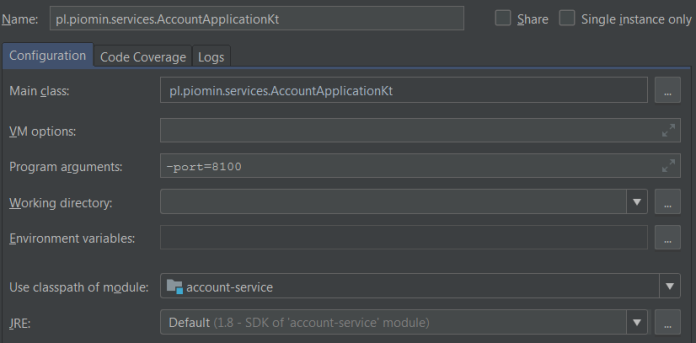
Ok, let’s run two instances of account-service and a single instance of customer-service. When running two instances of account-service we need to override default port number by declaring an application running parameter -port=PORT_NUMBER.
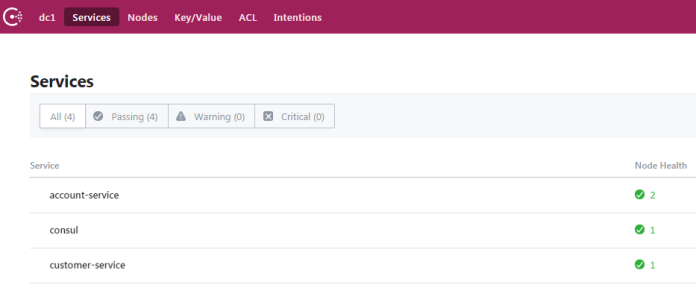
Every instance of microservice should be registered in Consul after startup.
We are running instances of account-service. Here are the details.
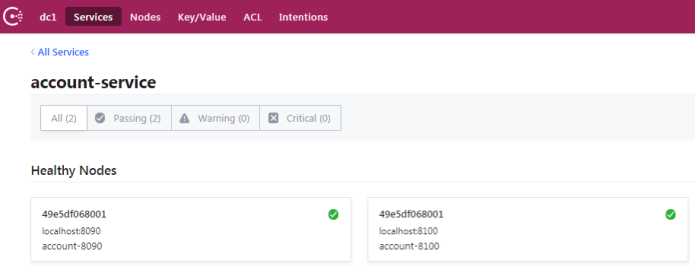
Now, let’s add some test data by calling POST endpoints exposed by our microservices. As you can see I added new accounts only on the first instance of account-service. Because all the microservices store data in-memory, those objects will be stored only by instance running on port 8090.
$ curl -d '{"name":"John Smith"}' -H "Content-Type: application/json" -X POST http://localhost:8095/customers
$ curl -d '{"number":"1234567890", "balance":5000, "customerId":1}' -H "Content-Type: application/json" -X POST http://localhost:8090/accounts
$ curl -d '{"number":"1234567891", "balance":10000, "customerId":1}' -H "Content-Type: application/json" -X POST http://localhost:8090/accounts
If you call endpoint http://localhost:8095/customers/1 it tries to connect with running instances of account-service. Once it returns response {"id":1,"name":"John Smith","accounts":[{"id":1,"balance":5000,"number":"1234567890","customerId":1},{"id":2,"balance":10000,"number":"1234567891","customerId":1}]}, while the second time {"id":1,"name":"John Smith","accounts":[]}. That is the expected result. Because ConsulFeature load balances between two instances of account-service, when only the first instance stores data. Here’s the fragment of application logs.

Conclusion
In this article I presented how to use the Ktor framework for building microservices architecture with Consul server. We have used some basic Ktor features like mechanisms for routing, logging, metrics, and some more advanced solutions for building our own feature that interacts with Consul during inter-service communication. Ktor seems to be a very interesting framework. I will definitely follow the progress in development of this framework.


Related Posts