Microservices Integration Tests with Hoverfly and Testcontainers
Building good integration tests of a system consisting of several microservices may be quite a challenge. Today I’m going to show you how to use such tools like Hoverfly and Testcontainers to implement such tests. I have already written about Hoverfly in my previous articles, as well as about Testcontainers. If you are interested in some intro to these framework you may take a look on the following articles:
- Testing REST API with Hoverfly
- Testing Spring Boot Integration with Vault and Postgres using Testcontainers Framework
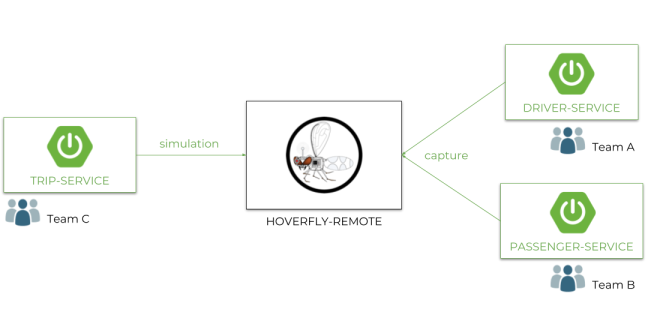
Today we will consider the system consisting of three microservices, where each microservice is developed by the different team. One of these microservices trip-management is integrating with two others: driver-management and passenger-management. The question is how to organize integration tests under these assumptions. In that case we can use one of the interesting features provided by Hoverfly – an ability to run it as a remote proxy. What does it mean in practice? It is illustrated in the picture below. The same external instance of Hoverfly proxy is shared between all microservices during JUnit tests. Microservice driver-management and passenger-management are testing their own methods exposed for use by trip-management, but all the requests are sent through Hoverfly remote instance acts as a proxy. Hoverfly will capture all the requests and responses sent during the tests. On the other hand trip-management is also testing its methods, but the communication with other microservices is simulated by the remote Hoverfly instance based on previously captured HTTP traffic.
We will use Docker for running remote instances of Hoverfly proxy. We will also use Docker images of microservices during the tests. That’s why we need the Testcontainers framework, which is responsible for running an application container before starting integration tests. So, the first step is to build a Docker image of driver-management and passenger-management microservices.
1. Building Docker Image
Assuming you have successfully installed Docker on your machine, and you have set environment variables DOCKER_HOST and DOCKER_CERT_PATH, you may use io.fabric:docker-maven-plugin for it. It is important to execute the build goal of that plugin just after package Maven phase, but before integration-test phase. Here’s the appropriate configuration inside Maven pom.xml.
<plugin>
   <groupId>io.fabric8</groupId>
   <artifactId>docker-maven-plugin</artifactId>
   <configuration>
      <images>
         <image>
            <name>piomin/driver-management</name>
            <alias>dockerfile</alias>
            <build>
               <dockerFileDir>${project.basedir}</dockerFileDir>
            </build>
         </image>
      </images>
   </configuration>
   <executions>
      <execution>
         <phase>pre-integration-test</phase>
         <goals>
            <goal>build</goal>
         </goals>
      </execution>
   </executions>
</plugin>
2. Application Integration Tests
Our integration tests should be run during the integration-test phase, so they must not be executed during test, before building application fat jar and Docker image. Here’s the appropriate configuration with maven-surefire-plugin.
<plugin>
   <groupId>org.apache.maven.plugins</groupId>
   <artifactId>maven-surefire-plugin</artifactId>
   <configuration>
      <excludes>
         <exclude>pl.piomin.services.driver.contract.DriverControllerIntegrationTests</exclude>
      </excludes>
   </configuration>
   <executions>
      <execution>
         <id>integration-test</id>
         <goals>
            <goal>test</goal>
         </goals>
         <phase>integration-test</phase>
         <configuration>
            <excludes>
               <exclude>none</exclude>
            </excludes>
            <includes>
               <include>pl.piomin.services.driver.contract.DriverControllerIntegrationTests</include>
            </includes>
         </configuration>
      </execution>
   </executions>
</plugin>
3. Running Hoverfly
Before running any tests we need to start an instance of Hoverfly in proxy mode. To achieve it we use Hoverfly Docker image. Because Hoverfly has to forward requests to the downstream microservices by host name, we create Docker network and then run Hoverfly in this network.
$ docker network create tests
$ docker run -d --name hoverfly -p 8500:8500 -p 8888:8888 --network tests spectolabs/hoverfly
Hoverfly proxy is now available for me (I’m using Docker Toolbox) under address 192.168.99.100:8500. We can also take a look at the admin web console available under address http://192.168.99.100:8888. Under that address you can also access HTTP API, what is described later in the next section.
4. Including test dependencies
To enable Hoverfly and Testcontainers for our test we first need to include some dependencies to Maven pom.xml. Our sample applications are built on top of Spring Boot, so we also include the Spring Test project.
<dependency>
   <groupId>org.springframework.boot</groupId>
   <artifactId>spring-boot-starter-test</artifactId>
   <scope>test</scope>
</dependency>
<dependency>
   <groupId>org.testcontainers</groupId>
   <artifactId>testcontainers</artifactId>
   <version>1.10.6</version>
   <scope>test</scope>
</dependency>
<dependency>
   <groupId>io.specto</groupId>
   <artifactId>hoverfly-java</artifactId>
   <version>0.11.1</version>
   <scope>test</scope>
</dependency>
5. Building integration tests on the provider site
Now, we can finally proceed to JUnit test implementation. Here’s the full source code of the test for driver-management microservice, but some things need to be explained. Before running our test methods we first start a Docker container of application using Testcontainers. We use GenericContainer annotated with @ClassRule for that. Testcontainers provides api for interaction with containers, so we can easily set target Docker network and container hostname. We will also wait until the application container is ready for use by calling method waitingFor on GenericContainer.
The next step is to enable the Hoverfly rule for our test. We will run it in capture mode. By default Hoverfly is trying to start a local proxy instance, that’s why we provide remote addresses of an existing instance already started using Docker container.
The tests are pretty simple. We will call endpoints using Spring TestRestTemplate. Because the request must finally be proxied to the application container we use its hostname as the target address. The whole traffic is captured by Hoverfly.
public class DriverControllerIntegrationTests {

    private TestRestTemplate template = new TestRestTemplate();

    @ClassRule
    public static GenericContainer appContainer = new GenericContainer<>("piomin/driver-management")
            .withCreateContainerCmdModifier(cmd -> cmd.withName("driver-management").withHostName("driver-management"))
            .withNetworkMode("tests")
            .withNetworkAliases("driver-management")
            .withExposedPorts(8080)
            .waitingFor(Wait.forHttp("/drivers"));

    @ClassRule
    public static HoverflyRule hoverflyRule = HoverflyRule
            .inCaptureMode("driver.json", HoverflyConfig.remoteConfigs().host("192.168.99.100"))
            .printSimulationData();

    @Test
    public void testFindNearestDriver() {
        Driver driver = template.getForObject("http://driver-management:8080/drivers/{locationX}/{locationY}", Driver.class, 40, 20);
        Assert.assertNotNull(driver);
        driver = template.getForObject("http://driver-management:8080/drivers/{locationX}/{locationY}", Driver.class, 10, 20);
        Assert.assertNotNull(driver);
    }

    @Test
    public void testUpdateDriver() {
        HttpHeaders headers = new HttpHeaders();
        headers.setContentType(MediaType.APPLICATION_JSON);
        DriverInput input = new DriverInput();
        input.setId(2L);
        input.setStatus(DriverStatus.UNAVAILABLE);
        HttpEntity<DriverInput> entity = new HttpEntity<>(input, headers);
        template.put("http://driver-management:8080/drivers", entity);
        input.setId(1L);
        input.setStatus(DriverStatus.AVAILABLE);
        entity = new HttpEntity<>(input, headers);
        template.put("http://driver-management:8080/drivers", entity);
    }

}
Now, you can execute the tests during application build using mvn clean verify command. The sample application source code is available on GitHub in repository sample-testing-microservices under branch remote.
6. Building integration tests on the consumer site
In the previous we have discussed the integration tests implemented on the consumer site. There are two microservices driver-management and passenger-management, that expose endpoints invoked by the third microservice trip-management. The traffic generated during the tests has already been captured by Hoverfly. It is a very important thing in that sample, because each time you will build the newest version of microservice Hoverfly is refreshing the structure of previously recorded requests. Now, if we run the tests for a consumer application (trip-management) it fully bases on the newest version of requests generated during tests by microservices on the provider site. You can check out the list of all requests captured by Hoverfly by calling endpoint http://192.168.99.100:8888/api/v2/simulation.
Here are the integration tests implemented inside trip-management. They also use a remote Hoverfly proxy instance. The only difference is in running mode, which is simulation. It tries to simulate requests sent to driver-management and passenger-management basing on the traffic captured by Hoverfly.
@SpringBootTest
@RunWith(SpringRunner.class)
@AutoConfigureMockMvc
@FixMethodOrder(MethodSorters.NAME_ASCENDING)
public class TripIntegrationTests {

    ObjectMapper mapper = new ObjectMapper();

    @ClassRule
    public static HoverflyRule hoverflyRule = HoverflyRule
            .inSimulationMode(HoverflyConfig.remoteConfigs().host("192.168.99.100"))
            .printSimulationData();

    @Autowired
    MockMvc mockMvc;

    @Test
    public void test1CreateNewTrip() throws Exception {
        TripInput ti = new TripInput("test", 10, 20, "walker");
        mockMvc.perform(MockMvcRequestBuilders.post("/trips")
                .contentType(MediaType.APPLICATION_JSON_UTF8)
                .content(mapper.writeValueAsString(ti)))
                .andExpect(MockMvcResultMatchers.status().isOk())
                .andExpect(MockMvcResultMatchers.jsonPath("$.id", Matchers.any(Integer.class)))
                .andExpect(MockMvcResultMatchers.jsonPath("$.status", Matchers.is("NEW")))
                .andExpect(MockMvcResultMatchers.jsonPath("$.driverId", Matchers.any(Integer.class)));
    }

    @Test
    public void test2CancelTrip() throws Exception {
        mockMvc.perform(MockMvcRequestBuilders.put("/trips/cancel/1")
                .contentType(MediaType.APPLICATION_JSON_UTF8)
                .content(mapper.writeValueAsString(new Trip())))
                .andExpect(MockMvcResultMatchers.status().isOk())
                .andExpect(MockMvcResultMatchers.jsonPath("$.id", Matchers.any(Integer.class)))
                .andExpect(MockMvcResultMatchers.jsonPath("$.status", Matchers.is("IN_PROGRESS")))
                .andExpect(MockMvcResultMatchers.jsonPath("$.driverId", Matchers.any(Integer.class)));
    }

    @Test
    public void test3PayTrip() throws Exception {
        mockMvc.perform(MockMvcRequestBuilders.put("/trips/payment/1")
                .contentType(MediaType.APPLICATION_JSON_UTF8)
                .content(mapper.writeValueAsString(new Trip())))
                .andExpect(MockMvcResultMatchers.status().isOk())
                .andExpect(MockMvcResultMatchers.jsonPath("$.id", Matchers.any(Integer.class)))
                .andExpect(MockMvcResultMatchers.jsonPath("$.status", Matchers.is("PAYED")));
    }

}
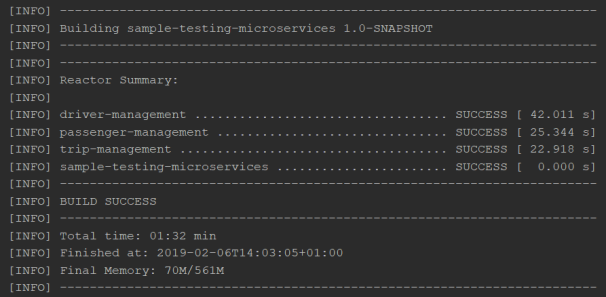
Now, you can run command mvn clean verify on the root module. It runs the tests in the following order: driver-management, passenger-management and trip-management.


Related Posts