Introduction to Spring Data Redis

Redis is an in-memory data structure store with optional durability, used as a database, cache, and message broker. Currently, it is the most most popular tool in the key/value stores category: https://db-engines.com/en/ranking/key-value+store. The easiest way to integrate your application with Redis is through the Spring Data Redis project. You can use Spring RedisTemplate directly for that or you might as well use Spring Data Redis repositories. There are some limitations when you integrate with Redis via Spring Data Redis repositories. They require at least Redis Server version 2.8.0 and do not work with transactions. Therefore you need to disable transaction support for RedisTemplate, which is leveraged by Redis repositories.
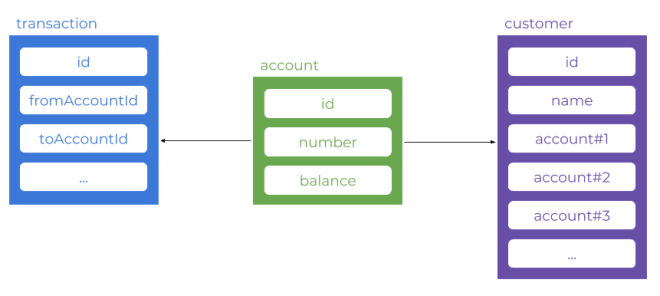
Redis is usually used for caching data stored in a relational database. In the current example, it will be treated as a primary database – just for simplification. Spring Data repositories do not require any deeper knowledge about Redis from a developer. You just need to annotate your domain class properly. As usual, we will examine the main features of Spring Data Redis based on the sample application. Supposing we have the system, which consists of three domain objects: Customer, Account and Transaction, here’s the picture that illustrates relationships between elements of that system. Transaction is always related with two accounts: sender (fromAccountId) and receiver (toAccountId). Each customer may have many accounts.

Although the picture visible above shows three independent domain models, customer and account are stored in the same, single structure. All customer’s accounts are stored as a list inside a customer object. Before proceeding to the sample application implementation details let’s begin by starting the Redis database.
1. Running Redis on Docker
We will run Redis standalone instance locally using its Docker container. You can start it in in-memory mode or with a persistence store. Here’s the command that runs a single, in-memory instance of Redis on a Docker container. It is exposed outside on default 6379 port.
$ docker run -d --name redis -p 6379:6379 redis
2. Enabling Spring Data Redis Repositories and Configuring Connection
I’m using Docker Toolbox, so each container is available for me under address 192.168.99.100. Here’s the only one property that I need to override inside configuration settings (application.yml).
spring:
  application:
    name: sample-spring-redis
  redis:
    host: 192.168.99.100
To enable Redis repositories for Spring Boot application we just need to include the single starter <code>spring-boot-starter-data-redis</code>.
<dependency>
   <groupId>org.springframework.boot</groupId>
   <artifactId>spring-boot-starter-data-redis</artifactId>
</dependency>
<dependency>
   <groupId>org.springframework.boot</groupId>
   <artifactId>spring-boot-starter-web</artifactId>
</dependency>
We may choose between two supported connectors: Lettuce and Jedis. For Jedis I had to include one additional client’s library to dependencies, so I decided to use a simpler option – Lettuce, that does not require any additional libraries to work properly. To enable Spring Data Redis repositories we also need to annotate the main or the configuration class with @EnableRedisRepositories and declare RedisTemplate bean. Although we do not use RedisTemplate directly, we still need to declare it, while it is used by CRUD repositories for integration with Redis.
@Configuration
@EnableRedisRepositories
public class SampleSpringRedisConfiguration {

    @Bean
    public LettuceConnectionFactory redisConnectionFactory() {
        return new LettuceConnectionFactory();
    }

    @Bean
    public RedisTemplate<?, ?> redisTemplate() {
        RedisTemplate<byte[], byte[]> template = new RedisTemplate<>();
        template.setConnectionFactory(redisConnectionFactory());
        return template;
    }

}
3. Implementing domain entities
Each domain entity has at least to be annotated with @RedisHash, and contains property annotated with @Id. Those two items are responsible for creating the actual key used to persist the hash. Besides identifier properties annotated with @Id you may also use secondary indices. The good news about it is that it can be not only with dependent single objects, but also on lists and maps. Here’s the definition of Customer entity. It is available on Redis under customer key. It contains a list of Account entities.
@RedisHash("customer")
public class Customer {

    @Id private Long id;
    @Indexed private String externalId;
    private String name;
    private List<Account> accounts = new ArrayList<>();

    public Customer(Long id, String externalId, String name) {
        this.id = id;
        this.externalId = externalId;
        this.name = name;
    }

    public Long getId() {
        return id;
    }

    public void setId(Long id) {
        this.id = id;
    }

    public String getExternalId() {
        return externalId;
    }

    public void setExternalId(String externalId) {
        this.externalId = externalId;
    }

    public String getName() {
        return name;
    }

    public void setName(String name) {
        this.name = name;
    }

    public List<Account> getAccounts() {
        return accounts;
    }

    public void setAccounts(List<Account> accounts) {
        this.accounts = accounts;
    }

    public void addAccount(Account account) {
        this.accounts.add(account);
    }

}
Account does not have its own hash. It is contained by Customer has a list of objects. The property id is indexed on Redis in order to speed-up the search based on the property.
public class Account {

    @Indexed private Long id;
    private String number;
    private int balance;

    public Account(Long id, String number, int balance) {
        this.id = id;
        this.number = number;
        this.balance = balance;
    }

    public Long getId() {
        return id;
    }

    public void setId(Long id) {
        this.id = id;
    }

    public String getNumber() {
        return number;
    }

    public void setNumber(String number) {
        this.number = number;
    }

    public int getBalance() {
        return balance;
    }

    public void setBalance(int balance) {
        this.balance = balance;
    }

}
Finally, let’s take a look on Transaction entity implementation. It uses only account ids, not the whole object.
@RedisHash("transaction")
public class Transaction {

    @Id
    private Long id;
    private int amount;
    private Date date;
    @Indexed
    private Long fromAccountId;
    @Indexed
    private Long toAccountId;

    public Transaction(Long id, int amount, Date date, Long fromAccountId, Long toAccountId) {
        this.id = id;
        this.amount = amount;
        this.date = date;
        this.fromAccountId = fromAccountId;
        this.toAccountId = toAccountId;
    }

    public Long getId() {
        return id;
    }

    public void setId(Long id) {
        this.id = id;
    }

    public int getAmount() {
        return amount;
    }

    public void setAmount(int amount) {
        this.amount = amount;
    }

    public Date getDate() {
        return date;
    }

    public void setDate(Date date) {
        this.date = date;
    }

    public Long getFromAccountId() {
        return fromAccountId;
    }

    public void setFromAccountId(Long fromAccountId) {
        this.fromAccountId = fromAccountId;
    }

    public Long getToAccountId() {
        return toAccountId;
    }

    public void setToAccountId(Long toAccountId) {
        this.toAccountId = toAccountId;
    }

}
4. Implementing Spring Data Redis repositories
The implementation of repositories is the most pleasant part of our exercise. As usual with Spring Data projects, the most common methods like save, delete or findById are already implemented. So we only have to create our custom find methods if needed. Since usage and implementation of findByExternalId method is rather obvious, the method findByAccountsId may be not. Let’s move back to a model definition to clarify usage of that method. Transaction contains only account ids, it does not have direct relationship with Customer. What if we need to know the details about customers being a side of a given transaction? We can find a customer by one of its accounts from the list.
public interface CustomerRepository extends CrudRepository<Customer, Long> {

    Customer findByExternalId(String externalId);
    List<Customer> findByAccountsId(Long id);

}
Here’s implementation of repository for Transaction entity.
public interface TransactionRepository extends CrudRepository<Transaction, Long> {

    List<Transaction> findByFromAccountId(Long fromAccountId);
    List<Transaction> findByToAccountId(Long toAccountId);

}
5. Building repository tests
We can easily test Redis repositories functionality using Spring Boot Test project with @DataRedisTest. This test assumes you have a running instance of Redis server on the already configured address 192.168.99.100.
@RunWith(SpringRunner.class)
@DataRedisTest
@FixMethodOrder(MethodSorters.NAME_ASCENDING)
public class RedisCustomerRepositoryTest {

    @Autowired
    CustomerRepository repository;

    @Test
    public void testAdd() {
        Customer customer = new Customer(1L, "80010121098", "John Smith");
        customer.addAccount(new Account(1L, "1234567890", 2000));
        customer.addAccount(new Account(2L, "1234567891", 4000));
        customer.addAccount(new Account(3L, "1234567892", 6000));
        customer = repository.save(customer);
        Assert.assertNotNull(customer);
    }

    @Test
    public void testFindByAccounts() {
        List<Customer> customers = repository.findByAccountsId(3L);
        Assert.assertEquals(1, customers.size());
        Customer customer = customers.get(0);
        Assert.assertNotNull(customer);
        Assert.assertEquals(1, customer.getId().longValue());
    }

    @Test
    public void testFindByExternal() {
        Customer customer = repository.findByExternalId("80010121098");
        Assert.assertNotNull(customer);
        Assert.assertEquals(1, customer.getId().longValue());
    }
}
6. More advanced testing with Testcontainers
You may provide some advanced integration tests using Redis as Docker container started during the test by Testcontainer library. I have already published some articles about the Testcontainers framework. If you would like read more details about it please refer to my previous articles: Microservices Integration Tests with Hoverfly and Testcontainers and Testing Spring Boot Integration with Vault and Postgres using Testcontainers Framework.
@SpringBootTest(webEnvironment = SpringBootTest.WebEnvironment.RANDOM_PORT)
@RunWith(SpringRunner.class)
public class CustomerIntegrationTests {

    @Autowired
    TestRestTemplate template;

    @ClassRule
    public static GenericContainer redis = new GenericContainer("redis:5.0.3").withExposedPorts(6379);

    @Before
    public void init() {
        int port = redis.getFirstMappedPort();
        System.setProperty("spring.redis.host", String.valueOf(port));
    }

    @Test
    public void testAddAndFind() {
        Customer customer = new Customer(1L, "123456", "John Smith");
        customer.addAccount(new Account(1L, "1234567890", 2000));
        customer.addAccount(new Account(2L, "1234567891", 4000));
        customer = template.postForObject("/customers", customer, Customer.class);
        Assert.assertNotNull(customer);
        customer = template.getForObject("/customers/{id}", Customer.class, 1L);
        Assert.assertNotNull(customer);
        Assert.assertEquals("123456", customer.getExternalId());
        Assert.assertEquals(2, customer.getAccounts().size());
    }

}
7. Viewing data in Redis
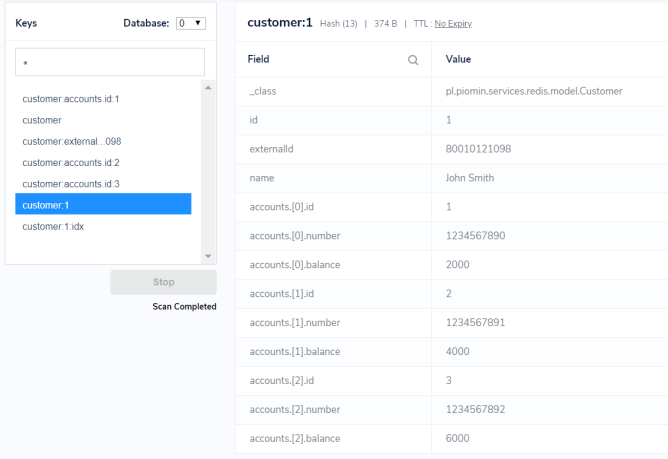
Now, let’s analyze the data stored in Redis after our JUnit tests. We may use one of the GUI tools for that. I decided to install RDBTools available on site https://rdbtools.com. You can easily browse data stored on Redis using this tool. Here’s the result for customer entity with id=1 after running JUnit test.

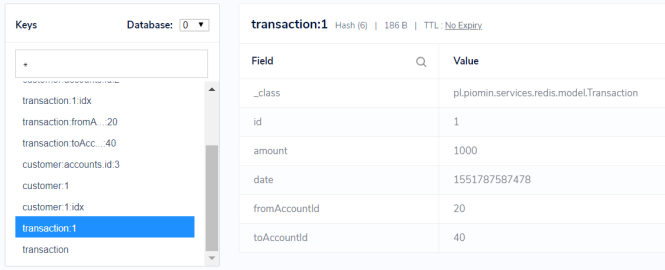
Here’s the similar result for transaction entity with id=1.

Source Code
The sample application source code is available on GitHub in the repository sample-spring-redis
6 COMMENTS