Continuous Delivery with OpenShift and Jenkins: A/B Testing
One of the reasons you could decide to use OpenShift instead of some other containerized platforms (for example Kubernetes) is out-of-the-box support for continuous delivery pipelines. Without proper tools, the process of releasing software in your organization may be really time-consuming and painful. The quickness of that process becoming especially important if you deliver software to production frequently. Currently, the most popular use case for it is microservices-based architecture, where you have many small, independent applications.
CI/CD on OpenShift is built around Jenkins. OpenShift provides a verified Jenkins container for building continuous delivery pipelines and also scales the pipeline execution through on-demand provisioning of Jenkins slaves in containers. Jenkins is still the leading automation server that provides many plugins that support building and deploying. One of that plugins is OpenShift Jenkins Pipeline (DSL) Plugin, which is by default enabled on predefined Jenkins template available inside the Openshift services catalog. There is not the only one plugin enabled on Openshift Jenkins’s image. In fact, Openshift comes with a default set of installed plugins on Jenkins, which are required for building an application from source code and interaction with the cluster. That’s a very useful feature.
We can implement some more advanced deployment strategies on OpenShift: Blue/Green Deployment or A/B Testing. A/B deployments imply running a minimum of two versions of the application code or application configuration at the same time for testing or experimentation purposes. In this article, I’m going to describe an implementation of such A/B Deployment on OpenShift using Jenkins declarative pipelines and OpenShift Routes.
Running OpenShift
For the test purposes, you can run a single-node OpenShift instance locally via Minishift or create a free account on OpenShift Online. The process of installation and configuration of Minishift instance has been already described in some of my previous articles, for example Quick guide to deploying Java apps on OpenShift. OpenShift Online account has a limitation on resources quota. You can use 2GB of RAM and 4 cores of CPU inside a single project (only one is allowed). Those limits are generally enough for our example.
Running Jenkins
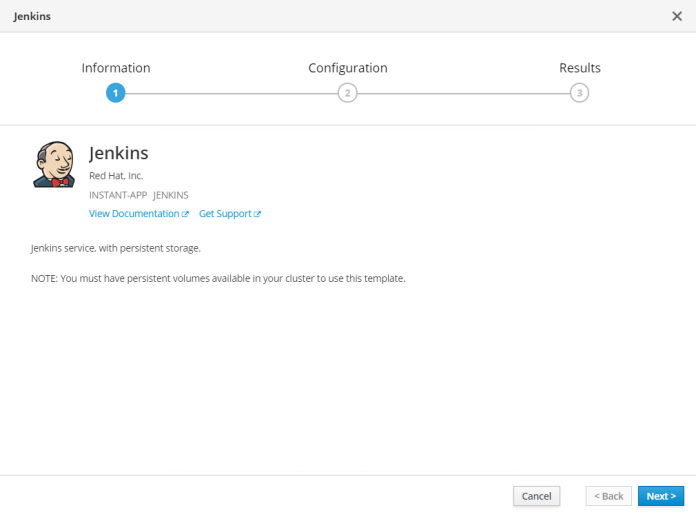
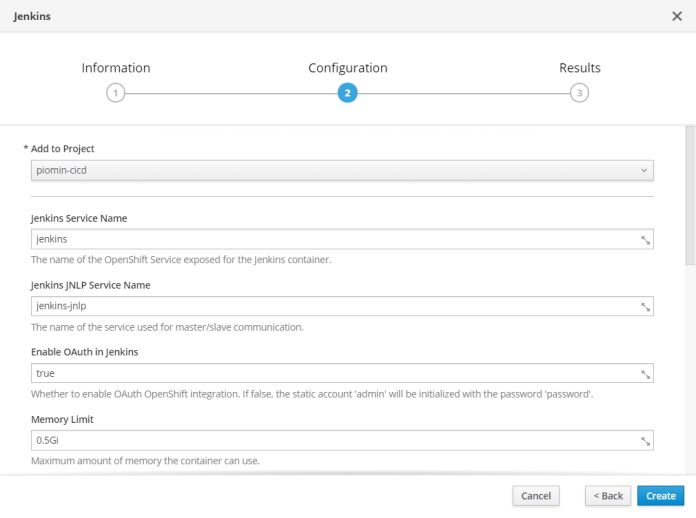
You can easily run Jenkins on OpenShift by selecting template Jenkins in Service Catalog.
You just need to select the name of the target project. All other properties may have a default value. It is just worth considering changing the memory limit if you have a free account on OpenShift Online.
Sample Application
Our sample application code snippet is as usual available on GitHub: https://github.com/piomin/sample-spring-kotlin-microservice.git. That is a simple Spring Boot application written in Kotlin, that exposes a REST API for a single custom object management with Swagger documentation, and some monitoring endpoints available under path /actuator/*. Swagger definition including not only information about API, but also application version taken from pom.xml and Git commit details taken from git.properties. The same information is also available under /actuator/info endpoint.
@Configuration
@EnableSwagger2
class SwaggerConfig {

   @Autowired
   lateinit var build: Optional<BuildProperties>
   @Autowired
   lateinit var git: Optional<GitProperties>

   @Bean
   fun api(): Docket {
      var version = "1.0"
      if (build.isPresent && git.isPresent) {
         var buildInfo = build.get()
         var gitInfo = git.get()
         version = "${buildInfo.version}-${gitInfo.shortCommitId}-${gitInfo.branch}"
      }
      return Docket(DocumentationType.SWAGGER_2)
         .apiInfo(apiInfo(version))
         .select()
         .apis(RequestHandlerSelectors.any())
         .paths{ it.equals("/persons")}
         .build()
         .useDefaultResponseMessages(false)
         .forCodeGeneration(true)
   }
}
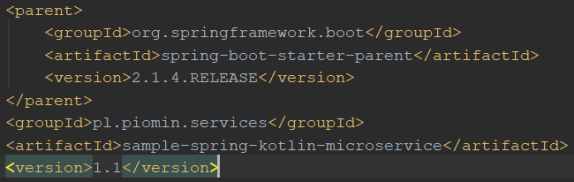
Thanks to that implementation you will be able to easily check out the version of application deployed on OpenShift. It is useful during tests of our sample A/B Deployment pipeline. Each time I deliver new version of application to OpenShift I’m going to increase version number stored inside pom.xml starting from 1.0.
<parent>
   <groupId>org.springframework.boot</groupId>
   <artifactId>spring-boot-starter-parent</artifactId>
   <version>2.1.2.RELEASE</version>
</parent>
<groupId>pl.piomin.services</groupId>
<artifactId>sample-spring-kotlin-microservice</artifactId>
<version>1.0</version>
Deploying application
Before starting development of Jenkins pipeline we will perform an initial deploy of our application on OpenShift. To do that we just need to run the following command using OpenShift client. I’m using S2I builder image provided by fabric8. By default, the name of application is the same as a repository name. It can be overridden using --name parameter. In the command visible below I have overridden to shorter name sample-app.
$ oc new-app fabric8/s2i-java~https://github.com/piomin/sample-spring-kotlin-microservice.git --name sample-app
Then we should expose our application outside using OpenShift route by executing command oc expose:
$ oc expose svc sample-app
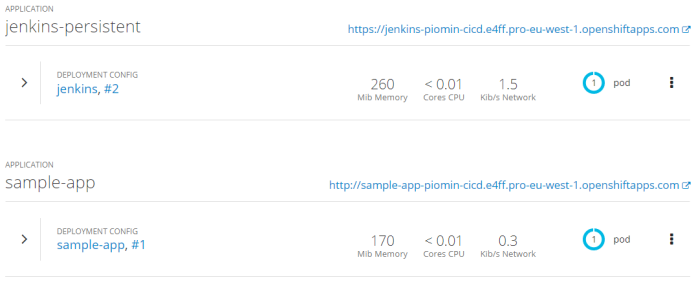
After running that command our project on OpenShift contains a single instance of Jenkins master and a single instance on the sample application as shown below.
Step 1: Deploying and tagging previous version of application
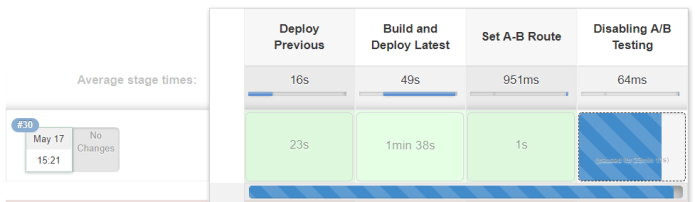
After creating an initial deployment of our sample application we may proceed to build Jenkins pipeline. I’m using OpenShift Online, so my instance of Jenkins is available under URL: https://console.pro-eu-west-1.openshift.com. Each Jenkins pipeline is divided into stages. The first stage of our pipeline is responsible for tagging the old image of the application and deploying it as a new application under the new name containing the version number. The version number is taken from OpenShift deployment number (1). This version is used for tagging the latest version of our application image (2). Basing on the tagged version of the image we are creating a new deployment under a new name containing the deployment version as a suffix (3). Finally, we are waiting while the new deployment is successfully finished (4).
stage('Deploy Previous') {
   steps {
      script {
         openshift.withCluster() {
            openshift.withProject() {
               def appName = "sample-app"
               def ver = openshift.selector('dc', appName).object().status.latestVersion //(1)
               println "Version: ${ver}"
               env.VERSION = ver
               openshift.tag("${appName}:latest", "${appName}:${ver}") //(2)
               def dcNew = openshift.newApp("--image-stream=piomin-cicd/${appName}:${ver}", "--name=${appName}-v${ver}").narrow('dc') //(3)
               def verNew = dcNew.object().status.latestVersion
               println "New deployment: ${verNew}"
               def rc = openshift.selector('rc', "sample-app-v${ver}-1")
               timeout(5) { //(4)
                  rc.untilEach(1) {
                     def rcMap = it.object()
                     return (rcMap.status.replicas.equals(rcMap.status.readyReplicas))
                  }
               }
            }
         }
      }
   }
}
Step 2: Building and Deploying Latest Version
Before running the sample pipeline we should increase the version of our application in pom.xml. The version number after a change is 1.1.
The second stage of our pipeline Build and Deploy Latest is responsible for deploying the newest version of the application by running a build from source code. First, we need to find the concrete build (1) and start it (2). Within the build, OpenShift checks out the newest version of code stored in branch master, run Maven build command and build an image containing application fat JAR. Finally, it rollouts deployment with the latest version of the image. The pipeline waits until the build will be successfully finished.
stage('Build and Deploy Latest') {
   steps {
      script {
         openshift.withCluster() {
            openshift.withProject() {
               def appName = "sample-app"
               def bc = openshift.selector('bc', appName) //(1)
               bc.startBuild() //(2)
               def builds = bc.related("builds")
               timeout(5) { //(3)
                  builds.untilEach(1) {
                     return (it.object().status.phase == "Complete")
                  }
               }
            }
         }
      }
   }
}
After that stage the situation inside our OpenShift projects looks like as shown below. We have the newest version of application under deployment sample-app with number #2 and previous version of application under deployment sample-app-1.

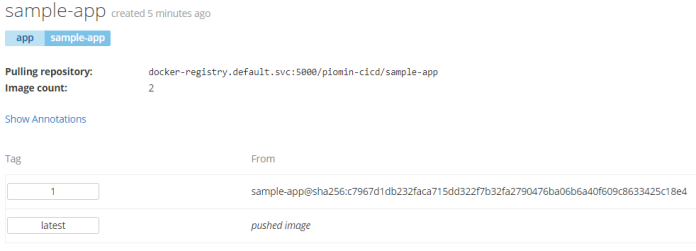
The newest image has been pushed, the older one is tagged with version taken from deployment as shown below.
Step 3: Updating Route to Enable A/B Testing
A/B deployment may be easily realized using OpenShift route. Once we have deployed the newest version of out application and the previous version under new deployment we should update the route sample-app to include the second service as alternative service for the route. After finding the right route (1) we should add alternateBackends field that contains the list of alternate services (2). The name of service is determine by the previous sample-app deployment version. After modifying the object we just need to apply the current configuration (3).
stage('Set A-B Route') {
   steps {
      script {
         openshift.withCluster() {
            openshift.withProject() {
               def route = openshift.selector("routes", "sample-app") //(1)
               println "Route: ${route}"
               def routeObj = route.object()
               println "Route: ${routeObj}"
               routeObj.spec.alternateBackends = []
               routeObj.spec.alternateBackends[0] = ["kind": "Service","name": "sample-app-v${env.VERSION}", "weight": 100] //(2)
               openshift.apply(routeObj) //(3)
            }
         }
      }
   }
}
Here’s current route definition visible in OpenShift console:
<img class=”alignnone size-full wp-image-7154″ src=”https://piotrminkowski.files.wordpress.com/2019/05/jenkins-openshift-6.png” alt=”jenkins-openshift-6″ width=”946″ height=”514″ />
Step 4: Disabling A/B Testing
This is the last stage of our pipeline. It waits for input confirmation (1) before proceeding. After confirmation it disables A/B Testing feature for the route by setting alternateBackends to null (3) and applying configuration (4). Finally, we delete the deployment with previous version of application (5).
stage('Disabling A/B Testing') {
steps {
   script {
      input message: "Continue ?" //(1)
         openshift.withCluster() {
            openshift.withProject() {
               def route = openshift.selector("routes", "sample-app") //(2)
               println "Route: ${route}"
               def routeObj = route.object()
               println "Route: ${routeObj}"
               routeObj.spec.alternateBackends = null //(3)
               openshift.apply(routeObj) //(4)
               openshift.selector("dc", "sample-app-${env.VERSION}").delete() //(5)
            }
         }
      }
   }
}
Testing
Once you have started the pipeline it prepared your environment for A/B Testing. Now, it is waiting for confirmation, which removes the previous version of the application and sets the single target service inside the route. So, before confirmation you can try A/B Testing by calling endpoint /actuator/info exposed within the route. My route is available under URL http://sample-app-piomin-cicd.e4ff.pro-eu-west-1.openshiftapps.com/actuator/info.
Endpoint /actuator/info prints details about Maven version and git commit.
{
  "git":{
    "commit":{
      "time":"2019-05-17T13:36:35Z",
      "id":"7d985a2"
    },
    "branch":"master"
  },
  "build":{
    "version":"1.1",
    "artifact":"sample-spring-kotlin-microservice",
    "name":"sample-spring-kotlin-microservice",
    "group":"pl.piomin.services",
    "time":"2019-05-17T13:38:41.728Z"
  }
}


Related Posts