Kafka In Microservices With Micronaut

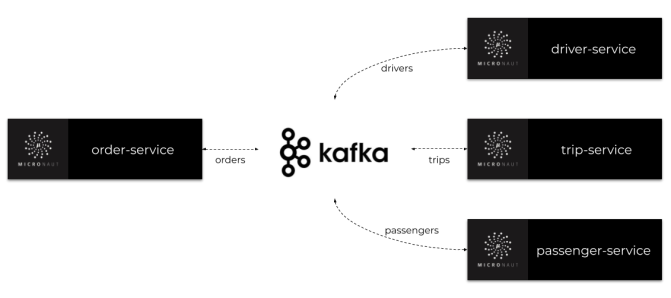
Today we are going to build an example of microservices that communicates with each other asynchronously through Apache Kafka topics. We use the Micronaut Framework, which provides a dedicated library for integration with Kafka. Let’s take a brief look at the architecture of our sample system. We have 4 microservices: order-service, trip-service, driver-service, and passenger-service. The implementation of these applications is very simple. All of them have in-memory storage and connect to the same Kafka instance.
A primary goal of our system is to arrange a trip for customers. The order-service application also acts as a gateway. It is receiving requests from customers, saving history, and sending events to orders topic. All the other microservices are listening on this topic and processing orders sent by order-service. Each microservice has its own dedicated topic, where it sends events with information about changes. Such events are received by some other microservices. The architecture is presented in the picture below.
Before reading this article it is worth familiarizing yourself with Micronaut Framework. You may read one of my previous articles describing a process of building microservices communicating via REST API: Quick Guide to Microservices with Micronaut Framework
1. Running Kafka
To run Apache Kafka on the local machine we may use its Docker image. It seems that the most up-to-date image is shared by https://hub.docker.com/u/wurstmeister. Before starting Kafka containers we have to start the ZooKeeper server, which is used by Kafka. If you run Docker on Windows the default address of its virtual machine is 192.168.99.100. It also has to be set as an environment for a Kafka container.
Both Zookeeper and Kafka containers will be started in the same network kafka. Zookeeper is available under the name zookeeper, and is exposed on port 2181. Kafka container requires that address under env variable KAFKA_ZOOKEEPER_CONNECT.
$ docker network create kafka
$ docker run -d --name zookeeper --network kafka -p 2181:2181 wurstmeister/zookeeper
$ docker run -d --name kafka -p 9092:9092 --network kafka --env KAFKA_ADVERTISED_HOST_NAME=192.168.99.100 --env KAFKA_ZOOKEEPER_CONNECT=zookeeper:2181 wurstmeister/kafka
2. Including Micronaut Kafka
Micronaut example applications built with Kafka can be started with or without the presence of an HTTP server. To enable Micronaut Kafka you need to include the micronaut-kafka library to your dependencies. In case you would like to expose HTTP API you should also include micronaut-http-server-netty:
<dependency>
   <groupId>io.micronaut.configuration</groupId>
   <artifactId>micronaut-kafka</artifactId>
</dependency>
<dependency>
   <groupId>io.micronaut</groupId>
   <artifactId>micronaut-http-server-netty</artifactId>
</dependency>
3. Building microservice order-service
The application order-service as the only one starts embedded HTTP server and exposes REST API. That’s why we may enable built-in Micronaut health checks for Kafka. To do that we should first include micronaut-management dependency:
<dependency>
   <groupId>io.micronaut</groupId>
   <artifactId>micronaut-management</artifactId>
</dependency>
For convenience, we will enable all management endpoints and disable HTTP authentication for them by defining the following configuration inside application.yml:
endpoints:
  all:
    enabled: true
    sensitive: false
Now, a health check is available under address http://localhost:8080/health. Our sample application will also expose a simple REST API for adding new orders and listing all previously created orders. Here’s the Micronaut controller implementation responsible for exposing those endpoints:
@Controller("orders")
public class OrderController {

    @Inject
    OrderInMemoryRepository repository;
    @Inject
    OrderClient client;

    @Post
    public Order add(@Body Order order) {
        order = repository.add(order);
        client.send(order);
        return order;
    }

    @Get
    public Set<Order> findAll() {
        return repository.findAll();
    }

}
Each microservice uses an in-memory repository implementation. Here’s repository implementation inside order-service:
@Singleton
public class OrderInMemoryRepository {

    private Set<Order> orders = new HashSet<>();

    public Order add(Order order) {
        order.setId((long) (orders.size() + 1));
        orders.add(order);
        return order;
    }

    public void update(Order order) {
        orders.remove(order);
        orders.add(order);
    }

    public Optional<Order> findByTripIdAndType(Long tripId, OrderType type) {
        return orders.stream().filter(order -> order.getTripId().equals(tripId) && order.getType() == type).findAny();
    }

    public Optional<Order> findNewestByUserIdAndType(Long userId, OrderType type) {
        return orders.stream().filter(order -> order.getUserId().equals(userId) && order.getType() == type)
                .max(Comparator.comparing(Order::getId));
    }

    public Set<Order> findAll() {
        return orders;
    }

}
In-memory repository stores Order object instances. Order object is also sent to Kafka topic named orders. Here’s an implementation of Order class:
public class Order {

    private Long id;
    private LocalDateTime createdAt;
    private OrderType type;
    private Long userId;
    private Long tripId;
    private float currentLocationX;
    private float currentLocationY;
    private OrderStatus status;

    // ... GETTERS AND SETTERS
}
4. Example of asynchronous communication with Kafka and Micronaut
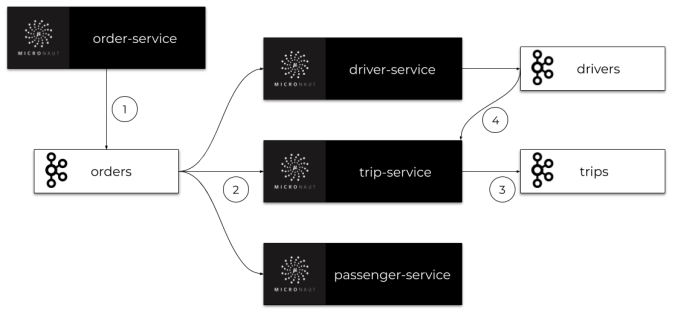
Now, let’s consider one of the use cases possible to realize by our sample system – adding a new trip. In the first step (1) we are adding a new order of type OrderType.NEW_TRIP. After that order-service creates an order and send it to the orders topic. The order is received by three microservices: driver-service, passenger-service and order-service (2). A new order is processed by all these applications. The passenger-service application checks if there are sufficient funds on the passenger account. If not it cancels the trip, otherwise it does not do anything. The driver-service is looking for the nearest available driver, while trip-service creates and stores new trips. Both driver-service and trip-service sends events to their topics (drivers, trips) with information about changes (3) Every event can be accessed by other microservices, for example trip-service listen for event from driver-service in order to assign a new driver to the trip (4). The following picture illustrates the communication between our microservices when adding a new trip.
Now, let’s proceed to the implementation details.
Step 1: Sending order
First we need to create a Kafka client responsible for sending messages to a topic. To achieve that we should create an interface annotated with @KafkaClient and declare one or more methods for sending messages. Every method should have a target topic name set through @Topic annotation. For method parameters we may use three annotations @KafkaKey, @Body or @Header. @KafkaKey is used for partitioning, which is required by our sample applications. In the client implementation visible below we just use @Body annotation.
@KafkaClient
public interface OrderClient {

    @Topic("orders")
    void send(@Body Order order);

}
Step 2: Receiving order
Once an order has been sent by the client it is received by all other microservices listening on the orders topic. Here’s a listener implementation in the driver-service. A listener class should be annotated with @KafkaListener. We may declare groupId as an annotation field to prevent from receiving the same message by more than one instance of a single application. Then we are declaring a method for processing incoming messages. The same as a client method it should be annotated with @Topic, to set the name of a target topic. Because we are listening for Order objects it should be annotated with @Body – the same as the corresponding client method.
@KafkaListener(groupId = "driver")
public class OrderListener {

    private static final Logger LOGGER = LoggerFactory.getLogger(OrderListener.class);

    private DriverService service;

    public OrderListener(DriverService service) {
        this.service = service;
    }

    @Topic("orders")
    public void receive(@Body Order order) {
        LOGGER.info("Received: {}", order);
        switch (order.getType()) {
            case NEW_TRIP -> service.processNewTripOrder(order);
        }
    }

}
Step 3: Sending to other Kafka topic
Now, let’s take a look on the processNewTripOrder method inside driver-service. DriverService injects two different Kafka client beans: OrderClient and DriverClient. When processing a new order it tries to find the available driver, which is the closest to the customer who sent the order. After finding him it changes the status to UNAVAILABLE and sends the message with Driver object to the drivers topic.
@Singleton
public class DriverService {

    private static final Logger LOGGER = LoggerFactory.getLogger(DriverService.class);

    private DriverClient client;
    private OrderClient orderClient;
    private DriverInMemoryRepository repository;

    public DriverService(DriverClient client, OrderClient orderClient, DriverInMemoryRepository repository) {
        this.client = client;
        this.orderClient = orderClient;
        this.repository = repository;
    }

    public void processNewTripOrder(Order order) {
        LOGGER.info("Processing: {}", order);
        Optional<Driver> driver = repository.findNearestDriver(order.getCurrentLocationX(), order.getCurrentLocationY());
        driver.ifPresent(driverLocal -> {
            driverLocal.setStatus(DriverStatus.UNAVAILABLE);
            repository.updateDriver(driverLocal);
            client.send(driverLocal, String.valueOf(order.getId()));
            LOGGER.info("Message sent: {}", driverLocal);
        });
    }

    // ...
}
Here’s an implementation of Kafka client inside driver-service used for sending messages to the drivers topic. Because we need to link the instance of Driver with order we annotate orderId parameter with @Header. There is no sense to include it to Driver class just to assign it to the right trip on the listener side.
@KafkaClient
public interface DriverClient {

    @Topic("drivers")
    void send(@Body Driver driver, @Header("Order-Id") String orderId);

}
Step 4: Inter-service communication example with Micronaut Kafka
The message sent by DriverClient is received by @Listener declared inside trip-service. It listens for messages incoming to the trips topic. The signature of receiving method is pretty similar to the client sending method as shown below:
@KafkaListener(groupId = "trip")
public class DriverListener {

    private static final Logger LOGGER = LoggerFactory.getLogger(OrderListener.class);

    private TripService service;

    public DriverListener(TripService service) {
        this.service = service;
    }

    @Topic("drivers")
    public void receive(@Body Driver driver, @Header("Order-Id") String orderId) {
        LOGGER.info("Received: driver->{}, header->{}", driver, orderId);
        service.processNewDriver(driver);
    }

}
A new driver with given id is being assigned to the trip searched by orderId. That’s a final step of our communication process when adding a new trip.
@Singleton
public class TripService {

    private static final Logger LOGGER = LoggerFactory.getLogger(TripService.class);

    private TripInMemoryRepository repository;
    private TripClient client;

    public TripService(TripInMemoryRepository repository, TripClient client) {
        this.repository = repository;
        this.client = client;
    }


    public void processNewDriver(Driver driver, String orderId) {
        LOGGER.info("Processing: {}", driver);
        Optional<Trip> trip = repository.findByOrderId(Long.valueOf(orderId));
        trip.ifPresent(tripLocal -> {
            tripLocal.setDriverId(driver.getId());
            repository.update(tripLocal);
        });
    }

   // ... OTHER METHODS

}
5. Tracing
We may easily enable distributed tracing with Micronaut Kafka. First, we need to enable and configure Micronaut Tracing. To do that you should first add some dependencies:
<dependency>
    <groupId>io.micronaut</groupId>
    <artifactId>micronaut-tracing</artifactId>
</dependency>
<dependency>
    <groupId>io.zipkin.brave</groupId>
    <artifactId>brave-instrumentation-http</artifactId>
    <scope>runtime</scope>
</dependency>
<dependency>
    <groupId>io.zipkin.reporter2</groupId>
    <artifactId>zipkin-reporter</artifactId>
    <scope>runtime</scope>
</dependency>
<dependency>
    <groupId>io.opentracing.brave</groupId>
    <artifactId>brave-opentracing</artifactId>
</dependency>
<dependency>
    <groupId>io.opentracing.contrib</groupId>
    <artifactId>opentracing-kafka-client</artifactId>
    <version>0.0.16</version>
    <scope>runtime</scope>
</dependency>
We also need to configure some application settings inside application.yml including an address of our tracing tool. In that case, it is Zipkin.
tracing:
  zipkin:
    enabled: true
    http:
      url: http://192.168.99.100:9411
    sampler:
      probability: 1
Before starting our application we have to run Zipkin container:
$ docker run -d --name zipkin -p 9411:9411 openzipkin/zipkin
Conclusion
In this article you were guided through the process of building microservice architecture using asynchronous communication via Apache Kafka. I have shown you ea example with the most important features of the Micronaut Kafka library that allows you to easily declare producer and consumer of Kafka topics, enable health checks, and distributed tracing for your microservices. I have described an implementation of a single scenario for our system, that covers adding a new trip at the customer’s request. In order to see the full implementation of the sample system described in this article please check out the source code available on GitHub: https://github.com/piomin/sample-kafka-micronaut-microservices.git.


Related Posts