Kubernetes Messaging with Java and KubeMQ
Have you ever tried to run any message broker on Kubernetes? KubeMQ is a relatively new solution and is not as popular as competitive tools like RabbitMQ, Kafka, or ActiveMQ. However, it has one big advantage over them – it is Kubernetes native message broker, which may be deployed there using a single command without preparing any additional templates or manifests. This convinced me to take a closer look at KubeMQ.
KubeMQ is an enterprise-grade, scalable, highly available, and secure message broker and message queue, designed as Kubernetes native solution in a lightweight container. It is written in Go. Therefore it is being advertised as a very fast solution running inside a small Docker container, which has about 30MB. It may be easily integrated with some popular third-party tools for observability like Zipkin, Prometheus, or Datadog.
When I’m reading comparison with competitive tools like RabbitMQ or Redis available on KubeMQ site (https://kubemq.io/product-overview/) it looks pretty amazing (for KubeMQ of course). It seems the authors wanted to merge some useful features of RabbitMQ and Kafka in a single product. In fact, KubeMQ provides many interesting mechanisms like delayed delivery, message peeking, message batch sending and receiving for queues, and consumer groups, load balancing and offsetting support for pub/sub.
Ok, when I’m looking at their SDK Java I see that it’s a new product, and there are still some things to do. However, all the features listed above seem to be very useful. Of course, I won’t be able to demonstrate all of them in this article, but I’m going to show you a simple Java application that uses message queue with transactions, and a pub/sub event store. Let’s begin our KubeMQ Java tutorial.
Example
The example application is written in Java 11, and uses Spring Boot. The source code is available as usual on GitHub. The repository address is https://github.com/piomin/sample-java-kubemq.git.
Before start
Before starting with KubeMQ you need to have a running instance of Minikube. I have tested it on version 1.6.1.
$ minikube start --vm-driver=virtualbox
Running KubeMQ on Kubernetes
First, you need to install KubeMQ. For Windows, you just need to download the latest version of CLI available on address https://github.com/kubemq-io/kubemqctl/releases/download/latest/kubemqctl.exe and copy it to the directory under PATH. Before installing KubeMQ on your Minikube instance we need to register on the web site https://account.kubemq.io/login/register. You will receive a token required for the installation. Installation is very easy with CLI. You just need to execute command kubemqctl cluster create with the registration token as shown below.
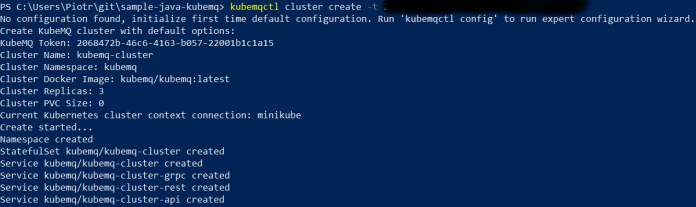
By default, KubeMQ creates a cluster consisting of three instances (pods). It is deployed as Kubernetes StatefulSet. The deployment is available inside the newly created namespace – kubemq. We can easily check the list of running pods with kubectl get pod command.

The list of pods is not very important for us. We can easily scale up and scale down the number of instances in the cluster using command kubemqctl cluster scale. KubeMQ is exposed in the cluster under different interfaces. KubeMQ Java SDK is using GRPC protocol for communication, so we use service kubemq-cluster-grpc available under port 50000.

Since KubeMQ is a native Kubernetes message broker starting with it on Minikube is very simple. After executing a single command, we may now focus on development.
Example Architecture
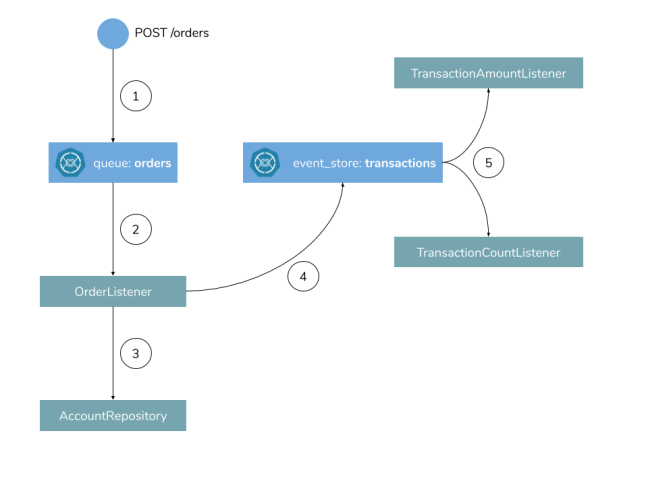
We have an example application deployed on Kubernetes, which integrates with KubeMQ queue and event store. The diagram visible below illustrates an architecture of the application. It exposes REST endpoint POST /orders for creating new orders. Each order signifies a transfer between two in-memory accounts. The incoming order is sent to the queue orders (1). Then it is received by the listener (2), which is responsible for updating account balances using AccountRepository bean (3). If the transaction is finished, the event is sent to the pub/sub topic transactions. Incoming events may be listened to by many subscribers (4). In the example application we have two listeners: TransactionAmountListener and TransactionCountListener (5). They are responsible for adding extra money to the target order’s account based on the different criteria. The first criteria is an amount of a given transaction, while the second is the number of processed transactions per account.
On the described example application I’m going to show you the following features of KubeMQ and its SDK for Java:
- Sending messages to a queue
- Listening for incoming queue messages and handling transactions
- Sending messages to pub/sub via Channel
- Subscribing to pub/sub events and reading older events from a store
- Using Spring Boot for integration with KubeMQ for standalone Java application
Let’s proceed to the implementation.
Implementation with Spring Boot and KubeMQ SDK
We are beginning with configuration. The URL to KubeMQ GRPC has been externalized in the application.yml.
spring:
  application:
    name: sampleapp-kubemq
kubemq:
  address: kubemq-cluster-grpc:50000
In the @Configuration class we are defining all required KubeMQ resources as Spring beans. Each of them requires a KubeMQ cluster address. We need to declare a queue, a channel for sending events and a subscriber for subscribing to the pub/sub events and events store.
@Configuration
@ConfigurationProperties("kubemq")
public class KubeMQConfiguration {

    private String address;

    @Bean
    public Queue queue() throws ServerAddressNotSuppliedException, SSLException {
        return new Queue("transactions", "orders", address);
    }

    @Bean
    public Subscriber subscriber() {
        return new Subscriber(address);
    }

    @Bean
    public Channel channel() {
        return new Channel("transactions", "orders", true, address);
    }

    String getAddress() {
        return address;
    }

    void setAddress(String address) {
        this.address = address;
    }

}
The first component in our architecture is a controller. It exposes HTTP endpoint for placing an order. OrderController injects Queue bean and uses it for sending messages to the KubeMQ queue. After receiving a response that message has been delivered it returns an order with id and status=ACCEPTED.
@RestController
@RequestMapping("/orders")
public class OrderController {

    private static final Logger LOGGER = LoggerFactory.getLogger(OrderController.class);

    private Queue queue;

    public OrderController(Queue queue) {
        this.queue = queue;
    }

    @PostMapping
    public Order sendOrder(@RequestBody Order order) {
        try {
            LOGGER.info("Sending: {}", order);
            final SendMessageResult result = queue.SendQueueMessage(new Message()
                    .setBody(Converter.ToByteArray(order)));
            order.setId(result.getMessageID());
            order.setStatus(OrderStatus.ACCEPTED);
            LOGGER.info("Sent: {}", order);
        } catch (ServerAddressNotSuppliedException | IOException e) {
            LOGGER.error("Error sending", e);
            order.setStatus(OrderStatus.ERROR);
        }
        return order;
    }

}
The message is processed asynchronously. Since the current KubeMQ Java SDK does not provide any message listener for asynchronous processing, we use synchronous methods inside the infinitive loop. The loop is started inside a new thread handled using Spring TaskExecutor. When a new message is received, we are starting a KubeMQ transaction. It may be acknowledged or rejected. A transaction is confirmed if the source account has sufficient funds to perform a transfer to a target account. If a transaction is confirmed it sends an event to KubeMQ transactions pub/sub with information about it using Channel bean.
@Component
public class OrderListener {

	private static final Logger LOGGER = LoggerFactory.getLogger(OrderListener.class);

	private Queue queue;
	private Channel channel;
	private OrderProcessor orderProcessor;
	private TaskExecutor taskExecutor;

	public OrderListener(Queue queue, Channel channel, OrderProcessor orderProcessor, TaskExecutor taskExecutor) {
		this.queue = queue;
		this.channel = channel;
		this.orderProcessor = orderProcessor;
		this.taskExecutor = taskExecutor;
	}

	@PostConstruct
	public void listen() {
		taskExecutor.execute(() -> {
			while (true) {
			    try {
                    Transaction transaction = queue.CreateTransaction();
                    TransactionMessagesResponse response = transaction.Receive(10, 10);
                    if (response.getMessage().getBody().length > 0) {
                        Order order = orderProcessor
                                .process((Order) Converter.FromByteArray(response.getMessage().getBody()));
                        LOGGER.info("Processed: {}", order);
                        if (order.getStatus().equals(OrderStatus.CONFIRMED)) {
                            transaction.AckMessage();
                            Event event = new Event();
                            event.setEventId(response.getMessage().getMessageID());
                            event.setBody(Converter.ToByteArray(order));
							LOGGER.info("Sending event: id={}", event.getEventId());
                            channel.SendEvent(event);
                        } else {
                            transaction.RejectMessage();
                        }
                    } else {
                        LOGGER.info("No messages");
                    }
                    Thread.sleep(10000);
                } catch (Exception e) {
					LOGGER.error("Error", e);
                }
			}
		});

	}

}
OrderListener class is using AccountRepository bean for account balance management. It is a simple in-memory store just for a demo purpose.
@Repository
public class AccountRepository {

    private List<Account> accounts = new ArrayList<>();

    public Account updateBalance(Integer id, int amount) throws InsufficientFundsException {
        Optional<Account> accOptional = accounts.stream().filter(a -> a.getId().equals(id)).findFirst();
        if (accOptional.isPresent()) {
            Account account = accOptional.get();
            account.setBalance(account.getBalance() + amount);
            if (account.getBalance() < 0)
                throw new InsufficientFundsException();
            int index = accounts.indexOf(account);
            accounts.set(index, account);
            return account;
        }
        return null;
    }

    public Account add(Account account) {
        account.setId(accounts.size() + 1);
        accounts.add(account);
        return account;
    }

    public List<Account> getAccounts() {
        return accounts;
    }

    @PostConstruct
    public void init() {
        add(new Account(null, "123456", 2000));
        add(new Account(null, "123457", 2000));
        add(new Account(null, "123458", 2000));
    }
}
And the last components in our architecture – event listeners. Both of them are subscribing to the same EventsStore transactions. The TransactionAmountListener is the simpler one. It is processing only a single event in order transfer percentage bonus counter from transaction amount to a target account. That’s why we have defined it as a listener just for new events (EventsStoreType.StartNewOnly).
@Component
public class TransactionAmountListener implements StreamObserver<EventReceive> {

    private static final Logger LOGGER = LoggerFactory.getLogger(TransactionAmountListener.class);

    private Subscriber subscriber;
    private AccountRepository accountRepository;

    public TransactionAmountListener(Subscriber subscriber, AccountRepository accountRepository) {
        this.subscriber = subscriber;
        this.accountRepository = accountRepository;
    }

    @Override
    public void onNext(EventReceive eventReceive) {
        try {
            Order order = (Order) Converter.FromByteArray(eventReceive.getBody());
            LOGGER.info("Amount event: {}", order);
            accountRepository.updateBalance(order.getAccountIdTo(), (int) (order.getAmount() * 0.1));
        } catch (IOException | ClassNotFoundException | InsufficientFundsException e) {
            LOGGER.error("Error", e);
        }
    }

    @Override
    public void onError(Throwable throwable) {

    }

    @Override
    public void onCompleted() {

    }

    @PostConstruct
    public void init() {
        SubscribeRequest subscribeRequest = new SubscribeRequest();
        subscribeRequest.setChannel("transactions");
        subscribeRequest.setClientID("amount-listener");
        subscribeRequest.setSubscribeType(SubscribeType.EventsStore);
        subscribeRequest.setEventsStoreType(EventsStoreType.StartNewOnly);
        try {
            subscriber.SubscribeToEvents(subscribeRequest, this);
        } catch (ServerAddressNotSuppliedException | SSLException e) {
            e.printStackTrace();
        }
    }
}
The other situation is with TransactionCountListener. It should be able to retrieve a list of all events published on pub/sub after every startup of our application. That’s why we are defining StartFromFirst as EventStoreType for Subscriber. Also a clientId needs to be dynamically generated on apply startup in order to retrieve all stored events. The listener send bonus to a target account after the fifth transaction addressed to that account succesfully processed by the application.
@Component
public class TransactionCountListener implements StreamObserver<EventReceive> {

    private static final Logger LOGGER = LoggerFactory.getLogger(TransactionCountListener.class);
    private Map<Integer, Integer> transactionsCount = new HashMap<>();

    private Subscriber subscriber;
    private AccountRepository accountRepository;

    public TransactionCountListener(Subscriber subscriber, AccountRepository accountRepository) {
        this.subscriber = subscriber;
        this.accountRepository = accountRepository;
    }

    @Override
    public void onNext(EventReceive eventReceive) {
        try {
            Order order = (Order) Converter.FromByteArray(eventReceive.getBody());
            LOGGER.info("Count event: {}", order);
            Integer accountIdTo = order.getAccountIdTo();
            Integer noOfTransactions = transactionsCount.get(accountIdTo);
            if (noOfTransactions == null)
                transactionsCount.put(accountIdTo, 1);
            else {
                transactionsCount.put(accountIdTo, ++noOfTransactions);
                if (noOfTransactions > 5) {
                    accountRepository.updateBalance(order.getAccountIdTo(), (int) (order.getAmount() * 0.1));
                    LOGGER.info("Adding extra to: id={}", order.getAccountIdTo());
                }
            }
        } catch (IOException | ClassNotFoundException | InsufficientFundsException e) {
            LOGGER.error("Error", e);
        }
    }

    @Override
    public void onError(Throwable throwable) {

    }

    @Override
    public void onCompleted() {

    }

    @PostConstruct
    public void init() {
        final SubscribeRequest subscribeRequest = new SubscribeRequest();
        subscribeRequest.setChannel("transactions");
        subscribeRequest.setClientID("count-listener-" + System.currentTimeMillis());
        subscribeRequest.setSubscribeType(SubscribeType.EventsStore);
        subscribeRequest.setEventsStoreType(EventsStoreType.StartFromFirst);
        try {
            subscriber.SubscribeToEvents(subscribeRequest, this);
        } catch (ServerAddressNotSuppliedException | SSLException e) {
            e.printStackTrace();
        }
    }

}
Running on Minikube
The easiest way to run our sample application on Minikube is with Skaffold and Jib. We don’t have to prepare any Dockerfile, only a single deployment manifest in k8s directory. Here’s our deployment.yaml file.
apiVersion: apps/v1
kind: Deployment
metadata:
  name: sampleapp-kubemq
  namespace: kubemq
  labels:
    app: sampleapp-kubemq
spec:
  replicas: 1
  selector:
    matchLabels:
      app: sampleapp-kubemq
  template:
    metadata:
      labels:
        app: sampleapp-kubemq
    spec:
      containers:
        - name: sampleapp-kubemq
          image: piomin/sampleapp-kubemq
          ports:
            - containerPort: 8080
---
apiVersion: v1
kind: Service
metadata:
  name: sampleapp-kubemq
  namespace: kubemq
  labels:
    app: sampleapp-kubemq
spec:
  ports:
    - port: 8080
      protocol: TCP
  selector:
    app: sampleapp-kubemq
  type: NodePort
The source code is prepared to use Skaffold and Jib. It contains the skaffold.yaml file in the project root directory.
apiVersion: skaffold/v2alpha1
kind: Config
build:
  artifacts:
    - image: piomin/sampleapp-kubemq
      jib: {}
  tagPolicy:
    gitCommit: {}
We also need to have a jib-maven-plugin Maven plugin in our pom.xml.
<plugin>
	<groupId>com.google.cloud.tools</groupId>
	<artifactId>jib-maven-plugin</artifactId>
	<version>1.8.0</version>
</plugin>
Now, we only have to execute the following command.
$ skaffold dev
Since our application is deployed on Minikube, we may perform some test calls. Assuming that Minikube node is available under address 192.168.99.100, here’s the example of test request and response from application.
$ curl -s http://192.168.99.100:30833/orders -d '{"type":"TRANSFER","accountIdFrom":1,"accountIdTo":2,"amount":300,"status":"NEW"}' -H 'Content-Type: application/json'
{"type":"TRANSFER","accountIdFrom":1,"accountIdTo":2,"date":null,"amount":300,"id":"10","status":"ACCEPTED"}
We may check a list of queues created on KubeMQ using command kubemqctl queues list as shown below.

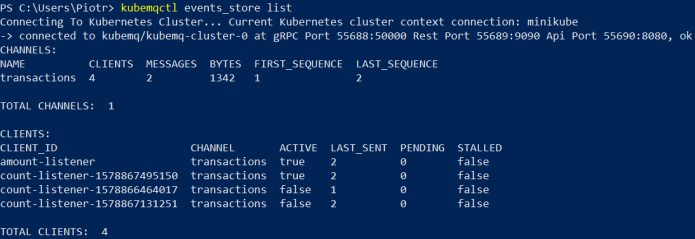
After sending some other test requests and performing some restarts of the application pod we may take a look at the event_store list using command kubemqctl events_store list as shown below. We may see that there are multiple clients with id count-listener* registered, but only the current is active.
Let’s take a look on application logs. They are automatically displayed on the screen after running the skaffold dev command. As you see each message sent to the queue is received by the listener, which performs transfer between accounts and then sends events to pub/sub. Finally both event_store listeners receive the event.
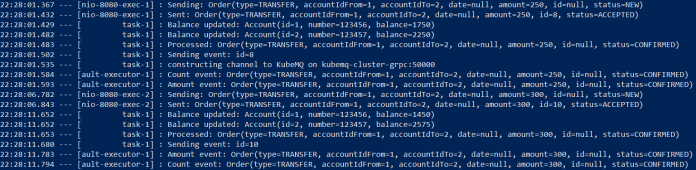
If you restart the pod with the application TransactionCountListener receives all events available inside event_store and counts them for each target account id. If a total number of transactions for a single account extends 5 it sends extra funds to that account.
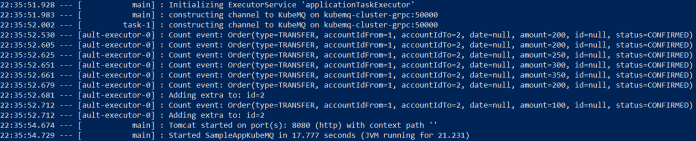
If a transaction is rejected by OrderListener due to lack of funds on source account the message is re-delivered to the queue.
![]()
Conclusion
In this article I show you a sample application that integrates with KubeMQ to realize standard use cases based on queues and topics (pub/sub). Starting with KubeMQ on Kubernetes and management is extremely easy with KubeMQ CLI. It has many interesting features described in quite well prepared documentation available on site https://docs.kubemq.io/. As a modern, cloud-native message broker KubeMQ is able to transfer billions of messages daily. However, we should bear in mind, it is a relatively new product, and features are not completely refined as in competition. For example, you can compare KubeMQ dashboard (available after executing command kubemqctl cluster dashboard) with RabbitMQ Web Admin. Of course, everything takes a little time, and I will follow the progress in KubeMQ development.


Related Posts