A New Era Of Spring Cloud

Almost 1.5 years ago Spring Team announced the decision of moving most of Spring Cloud Netflix components into maintenance mode. It means that new features have no longer been added to these modules beginning from Greenwich Release Train. Currently, they are starting work on Ilford Release Train, which is removing such popular projects like Ribbon, Hystrix, or Zuul from Spring Cloud. The only module that will still be used is a Netflix discovery server — Eureka.
This change is significant for Spring Cloud since from beginning it was recognized by its integration with Netflix components. Moreover, Spring Cloud Netflix is still the most popular Spring Cloud project on GitHub (~4k stars).
Simultaneously with announcing a decision about moving Netflix components into maintenance mode, Spring Team has started working on the replacements. And so, Ribbon will be replaced by Spring Cloud Load Balancer, Hystrix by Spring Cloud Circuit Breaker built on top of Resilience4J library. Spring Cloud Gateway which a competitive solution Zuul is already very popular projects, and since Ilford release would be the only option for API gateway.
The main goal of this article is to guide you through building microservices architecture with new Spring Cloud components without deprecated Netflix projects. This article is a continuation of my first article written about one year ago about future of Spring Cloud: The Future Of Spring Cloud Microservices After Netflix Era. The source code of sample applications is available on GitHub in the repository: https://github.com/piomin/course-spring-microservices.git.
Spring Cloud video course
You may also find a video guide, where I’m showing all the features described here with more details. It is available on my YouTube channel and consists of four parts:
Part 1 – Introduction to Spring Boot (~35 minutes)
Part 2 – Distributed Configuration and Service Discovery (~36 minutes)
Part 3 – Inter-service communication (~34 minutes)
Part 4 – API Gateway (~22 minutes)
Architecture
The diagram visible below illustrates the architecture of our sample system. Here we have the characteristic elements for microservices like API gateway, discovery server, and configuration server. In the next sections of this article, I’ll show how to use Spring Cloud components that provide an implementation of those patterns. Currently, the main component for adding the API gateway to your system is Spring Cloud Gateway.
Spring Cloud provides integrations to several solutions that may be used as a discovery server: Netflix Eureka, HashiCorp Consul, Alibaba Nacos, or Apache ZooKeeper. The most common choice is between the first two of them. While Spring Cloud Netflix Eureka is dedicated just for discovery, Spring Cloud Consul may realize both discovery feature basing on Consul Services, and distributed configuration feature basing on Consul Key/Value engine.
In turn, Spring Cloud Config is responsible just for providing a mechanism for configuration management. However, it may also be integrated with third-party tools like Vault from HashiCorp.
We will figure out how to integrate our applications with discovery and configuration servers on the example of two simple Spring Boot applications callme-service and caller-service. The application caller-service is also calling endpoints exposed by the callme-service. We will enable such mechanisms on the caller-service like client-side load balancer with new Spring Cloud Load Balancer, and circuit breaker with new Spring Cloud Circuit Breaker built on top of Resilience4J.

Service discovery
Switching between discovery servers on the client-side is very easy with Spring Cloud due to the DiscoveryClient abstraction. This switch comes down to the replacement of a single dependency in Maven pom.xml. So if you are using Eureka you should add the following starter in your microservice.
<dependency>
  <groupId>org.springframework.cloud</groupId>
  <artifactId>spring-cloud-starter-netflix-eureka-client</artifactId>
</dependency>
On the other hand, if you are using Consul you should add the following starter in your microservice.
<dependency>
  <groupId>org.springframework.cloud</groupId>
  <artifactId>spring-cloud-starter-consul-discovery</artifactId>
</dependency>
The situation is a little bit more complicated if you are defining some non-default configuration settings for a discovery client. In that case, you need to use properties specific just for Eureka, or just for Consul. For example, if you are running more than one instance of a single application on the same host with dynamic HTTP server port feature enabled (option server.port=0), you have to set a unique id of every instance. Here’s the property used for Eureka’s client.
eureka:
  instance:
    instanceId: ${spring.cloud.client.hostname}:${spring.application.name}:${random.value}
For the Consul client the same configuration looks as shown below.
spring:
  cloud:
    consul:
      discovery:
        instanceId: ${spring.cloud.client.hostname}:${spring.application.name}:${random.value}
You can easily configure and run Eureka discovery in your microservices architecture using Spring Cloud Netflix Eureka Server module. You just need to create the Spring Boot application that includes that module.
<dependency>
  <groupId>org.springframework.cloud</groupId>
  <artifactId>spring-cloud-starter-netflix-eureka-server</artifactId>
</dependency>
We also need to enable Eureka for the application by annotating the main class with @EnableEurekaServer.
@SpringBootApplication
@EnableEurekaServer
class DiscoveryServerApplication

fun main(args: Array<String>) {
    runApplication<DiscoveryServerApplication>(*args)
}
The most convenient way to run Consul on the local machine is by using its Docker image. We can Consul on Docker container in development mode by executing the following command.
$ docker run -d --name=consul -e CONSUL_BIND_INTERFACE=eth0 -p 8500:8500 consul:1.7.2
Distributed configuration with Spring cloud
The next important element in our architecture is a configuration server. The most popular solution in Spring Cloud that provides mechanisms for distributed configuration is Spring Cloud Config. Spring Cloud Config provides server-side and client-side support for externalized configuration in a distributed system.
With the config server, you have a central place to manage external properties for applications across all environments. Some other solutions may be used in microservices-based architecture as a configuration server: Consul, ZooKeeper, or Alibaba Nacos. However, all these solutions are not strictly dedicated to distributed configuration, they can act as a discovery server as well.
Spring Cloud Config may integrate with different tools for storing data. The default implementation of the server storage backend uses git, but we can use some other tools like HashiCorp Vault for managing secrets and protecting sensitive data or just a simple file system. Such different backends may be together in the single config server application. We just need to activate the appropriate profiles in application properties with spring.profiles.active. We may override some default, for example, change the address of a Vault server or set an authentication token.
spring:
  application:
    name: config-server
  profiles:
    active: native,vault
  cloud:
    config:
      server:
        native:
          searchLocations: classpath:/config-repo
        vault:
          host: 192.168.99.100
          authentication: TOKEN
          token: spring-microservices-course
The same as for Consul we should use Docker to run an instance of Vault in development mode. We can set a static root token for authentication using the environment variable VAULT_DEV_ROOT_TOKEN_ID.
$ docker run -d --name vault --cap-add=IPC_LOCK -e 'VAULT_DEV_ROOT_TOKEN_ID=spring-microservices-course' -p 8200:8200 vault:1.4.0
When using Spring Cloud Config together with the discovery we may choose between two available approaches called Config First Bootstrap and Discovery First Bootstrap. In Discovery First Bootstrap a config server is registering itself in discovery service. Thanks to that each microservice can localize a config server basing on its registration id.
Since a configuration is injected in the bootstrap phase we need to use bootstrap.yml for setting properties on the client-side. To enable “discovering” for the config server on the client side we should set the property spring.cloud.config.discovery.enabled to true. We should also override registered service id of config server if it is different from auto-configured configserver (in our case it is config-server). Of course, we can also use Consul as a configuration properties source.
spring:
  application:
    name: callme-service
  cloud:
    config:
      discovery:
        enabled: true
        serviceId: config-server
    consul:
      host: 192.168.99.100
      config:
        format: YAML
Inter-service communication
Currently, there are three Spring components for inter-service communication over HTTP that have integration with service discovery: synchronous RestTemplate, reactive WebClient and declarative REST client OpenFeign. The RestTemplate component is available within the Spring Web module, WebClient within Spring WebFlux. To include Spring Cloud OpenFeign we need to include a dedicated starter.
<dependency>
  <groupId>org.springframework.boot</groupId>
  <artifactId>spring-boot-starter-webflux</artifactId>
</dependency>
<dependency>
  <groupId>org.springframework.cloud</groupId>
  <artifactId>spring-cloud-starter-openfeign</artifactId>
</dependency>
To use RestTemplate or WebClient for communication with discovery support, we need to register the beans and annotate them with @LoadBalanced. It is also worth setting the proper timeouts for such communication, especially if you are not using a circuit breaker.
@SpringBootApplication
@EnableFeignClients
class InterCallerServiceApplication {

    @Bean
    @LoadBalanced
    fun template(): RestTemplate = RestTemplateBuilder()
        .setReadTimeout(Duration.ofMillis(100))
        .setConnectTimeout(Duration.ofMillis(100))
        .build()

    @Bean
    @LoadBalanced
    fun clientBuilder(): WebClient.Builder {
        val tcpClient: TcpClient = TcpClient.create()
            .option(ChannelOption.CONNECT_TIMEOUT_MILLIS, 100)
            .doOnConnected { conn ->
                conn.addHandlerLast(ReadTimeoutHandler(100, TimeUnit.MILLISECONDS))
            }
        val connector = ReactorClientHttpConnector(HttpClient.from(tcpClient))
        return WebClient.builder().clientConnector(connector)
    }

}
Although Ribbon has been moved to maintenance mode almost 1.5 years ago it is still used as a default client-side load balancer in the newest stable version of Spring Cloud. Since Spring Cloud Load Balancer is included in common dependencies it is available in your application. Therefore, the only thing you need to do is to disable Ribbon in the configuration using spring.cloud.loadbalancer.ribbon.enabled property.
Currently, we don’t have many options for load balancer customization. One of them is the ability to configure client cache settings. By default, each client is caching the list of target services and refreshing them every 30 seconds. Such an interval may be too long in your situation.
We can easily change it in the configuration as shown below and set it to for example 1 second. If your load balancer is integrated with Eureka discovery you also need to decrease an interval of the fetching registry, which is by default 30 seconds. After those, both changes your client can refresh the list of currently running services almost immediately.
spring:
  cloud:
    loadbalancer:
      cache:
        ttl: 1s
      ribbon:
        enabled: false
eureka:
  client:
    registryFetchIntervalSeconds: 1
Circuit breaker
The circuit breaker is a popular design pattern used in a microservices architecture. It is designed to detect failures and encapsulates the logic of preventing a failure from constantly recurring. Spring Cloud provides an abstraction for using different circuit breaker implementations. Currently, we may use Netflix Hystrix, Sentinel, Spring Retry, and Resilience4J. To enable Spring Cloud Circuit Breaker based on Resilience4J we need to include the following dependency.
<dependency>
    <groupId>org.springframework.cloud</groupId>
    <artifactId>spring-cloud-starter-circuitbreaker-resilience4j</artifactId>
</dependency>
Here’s the code responsible for registering Customizer bean, that configures a circuit breaker behavior.
@Bean
fun defaultCustomizer(): Customizer<Resilience4JCircuitBreakerFactory> {
  return Customizer { factory: Resilience4JCircuitBreakerFactory ->
    factory.configureDefault { id: String? ->
      Resilience4JConfigBuilder(id)
        .timeLimiterConfig(TimeLimiterConfig.custom()
          .timeoutDuration(Duration.ofMillis(500))
          .build())
        .circuitBreakerConfig(CircuitBreakerConfig.custom()
          .slidingWindowSize(10)
          .failureRateThreshold(33.3F)
          .slowCallRateThreshold(33.3F)
        .build())
      .build()
    }
  }
}
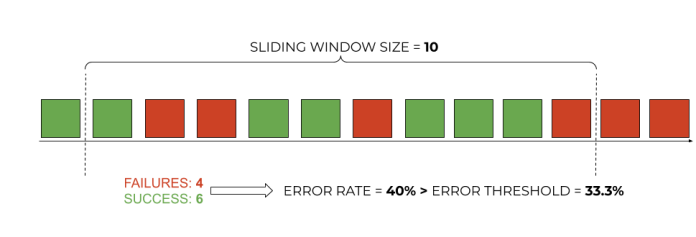
The settings of the circuit breaker have been visualized in the picture below. The sliding window size sets the number of requests which are used for calculating the error rate. If we have more than 3 errors in the window of size 10 a circuit is open.
In the last step, we need to create a circuit breaker instance using Resilience4JCircuitBreakerFactory bean and enable it for the HTTP client as shown below.
@RestController
@RequestMapping("/caller")
class CallerController(private val template: RestTemplate, private val factory: Resilience4JCircuitBreakerFactory) {

  private var id: Int = 0

  @PostMapping("/random-send/{message}")
  fun randomSend(@PathVariable message: String): CallmeResponse? {
    val request = CallmeRequest(++id, message)
    val circuit = factory.create("random-circuit")
    return circuit.run { template.postForObject("http://inter-callme-service/callme/random-call",
      request, CallmeResponse::class.java) }
  }

}
Spring Cloud API gateway
The last missing element in our microservices architecture is an API Gateway. Spring Cloud Gateway is the project that helps us in implementing such a component. Currently, it is the second most popular Spring Cloud project just after Spring Cloud Netflix. It has around 2k stars on GitHub. It is built on top of the Spring WebFlux and Reactor project. It works reactively and requires Netty as a runtime framework.
The main goal of API gateway is to hide the complexity of the microservices system from an external client by providing an effective way of routing to APIs, but it can also solve some problems around security or resiliency. The main component used for configuring Spring Cloud Gateway is a route.
It is defined by an ID, a destination URI, a collection of predicates, and a collection of filters. A route is matched if the aggregate predicate is true. With filters, you can modify requests and responses before or after sending the downstream request.
With a predefined set of gateway filters, we may enable such mechanisms like path rewriting, rate limiting, discovery client, circuit breaking, fallback, or routing metrics. To enable all these features on the gateway we first need to include the following dependencies.
<dependency>
   <groupId>org.springframework.cloud</groupId>
   <artifactId>spring-cloud-starter-gateway</artifactId>
</dependency>
<dependency>
   <groupId>org.springframework.boot</groupId>
   <artifactId>spring-boot-starter-actuator</artifactId>
</dependency>
<dependency>
   <groupId>org.jetbrains.kotlin</groupId>
   <artifactId>kotlin-reflect</artifactId>
</dependency>
<dependency>
   <groupId>org.jetbrains.kotlin</groupId>
   <artifactId>kotlin-stdlib</artifactId>
</dependency>
<dependency>
   <groupId>org.springframework.cloud</groupId>
   <artifactId>spring-cloud-starter-netflix-eureka-client</artifactId>
</dependency>
<dependency>
   <groupId>org.springframework.boot</groupId>
   <artifactId>spring-boot-starter-data-redis-reactive</artifactId>
</dependency>
<dependency>
   <groupId>org.springframework.cloud</groupId>
   <artifactId>spring-cloud-starter-circuitbreaker-reactor-resilience4j</artifactId>
</dependency>
To enable all the previously listed features we don’t have to implement much code. Almost everything is configurable in application properties.
spring:
  application:
    name: api-gateway
  cloud:
    gateway:
      discovery:
        locator:
          enabled: true
          lowerCaseServiceId: true
      routes:
        - id: inter-callme-service
          uri: lb://inter-callme-service
          predicates:
            - Path=/api/callme/**
          filters:
            - RewritePath=/api(?/?.*), $\{path}
            - name: RequestRateLimiter
              args:
                redis-rate-limiter.replenishRate: 20
                redis-rate-limiter.burstCapacity: 40
            - name: CircuitBreaker
              args:
                name: sampleSlowCircuitBreaker
                fallbackUri: forward:/fallback/test
        - id: inter-caller-service
          uri: lb://inter-caller-service
          predicates:
            - Path=/api/caller/**
          filters:
            - StripPrefix=1
            - name: RequestRateLimiter
              args:
                redis-rate-limiter.replenishRate: 20
                redis-rate-limiter.burstCapacity: 40
    loadbalancer:
      ribbon:
        enabled: false
  redis:
    host: 192.168.99.100

management:
  endpoints.web.exposure.include: '*'
  endpoint:
    health:
      show-details: always
Some settings still need to be configured in the code. It is a configuration of the circuit breaker, that is based on Resilience4J project, where we need to register the bean Customizer. We also have to define a key for rate-limiting responsible setting a strategy of choosing requests for counting the limits.
@SpringBootApplication
class ApiGatewayApplication {

  @Bean
  fun keyResolver(): KeyResolver = KeyResolver { _ -> Mono.just("1") }

  @Bean
  fun defaultCustomizer(): Customizer<ReactiveResilience4JCircuitBreakerFactory> {
    return Customizer { factory: ReactiveResilience4JCircuitBreakerFactory ->
      factory.configureDefault { id: String? ->
        Resilience4JConfigBuilder(id)
          .timeLimiterConfig(TimeLimiterConfig.custom()
            .timeoutDuration(Duration.ofMillis(500))
            .build())
          .circuitBreakerConfig(CircuitBreakerConfig.custom()
            .slidingWindowSize(10)
            .failureRateThreshold(33.3F)
            .slowCallRateThreshold(33.3F)
            .build())
          .build()
      }
    }
  }

}

fun main(args: Array<String>) {
   runApplication<ApiGatewayApplication>(*args)
}
Conclusion
In this article, you may take a quick introduction to using the latest Spring Cloud components for building microservices architecture. For more details, you may refer to my video course published on YouTube.


Related Posts