Introduction to event-driven microservices with Spring Cloud Stream

Spring Cloud Stream framework allows us to easily include well-known Spring patterns and best practices to applications while implementing event-driven microservices architecture. It uses the Spring Integration project to provide connectivity to a message broker. It provides built-in support for such features as a persistent publish-subscribe model, consumer grouping, and partitioning. The integration with a specific message broker solution is realized by binder implementations that are hidden behind the middleware-neutral core.
The currently described version of Spring Cloud Stream is 3.0.3.RELEASE within Spring Cloud Release Train Hoxton.SR3.
For a more detailed introduction to a process of building Spring Cloud Stream microservices architecture with you can refer to my video course: Microservices With Spring Boot And Spring Cloud: Part 5 – Event-driven microservices.
Example of Spring Cloud Stream microservices
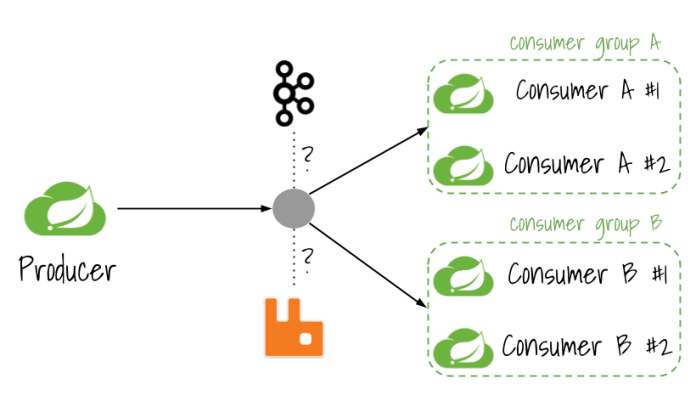
Our sample system consists of three microservices producer-service, consumer-a-service, and consumer-b-service. Each of them is connecting with the RabbitMQ broker. The application producer-service is responsible for sending events to a message broker, while two other microservices are listening for the incoming events. Communication between applications follows a publish-subscribe model, where data is broadcast through shared topics. Our consumer application is enabling such mechanisms like consumer grouping to guarantee that only a single instance of the application is handling the same event, and partitioning for assigning events to the selected instance of application basing on routing key set on the producer side. The following picture is visualizing a currently described architecture.
The source code of sample applications is as usual available on GitHub. You may find it in the repository https://github.com/piomin/course-spring-microservices.git. That repository also contains code snippets of applications used in previous parts of my video course, so you should go to directory event-driven to access the right samples.
Dependencies to Spring Cloud Stream
To enable Spring Cloud Stream for our application we first need to include the right binder implementation library. Because we are integrating with RabbitMQ we have to use spring-cloud-stream-binder-rabbit artifact. It is referencing to all other required libraries, so we don’t have to include any other dependencies.
<dependency>
   <groupId>org.springframework.cloud</groupId>
   <artifactId>spring-cloud-stream-binder-rabbit</artifactId>
</dependency>
Messaging between Spring Cloud Stream microservices
Each message that is sent to the message broker is automatically serialized to JSON. Here’s a class that is the object representation of JSON payload exchanged by the applications.
data class CallmeEvent(val id: Int = 0, val message: String = "")
Producer application
Here’s the implementation of Supplier bean responsible for generating a stream of events continuously. By default it is sending CallmeEvent once a second. It is incrementing id field on every new event and set header to_process to true. Basing on the value of this header we are routing messages on the consumer side. The mechanism may be easily disabled by setting property callme.supplier.enabled to false.
@SpringBootApplication
class ProductionApplication {

    var id: Int = 0

    @Value("\${callme.supplier.enabled}")
    val supplierEnabled: Boolean = false

    @Bean
    fun callmeEventSupplier(): Supplier<Message<CallmeEvent>?> = Supplier { createEvent() }

    private fun createEvent(): Message<CallmeEvent>? {
        return if (supplierEnabled)
            MessageBuilder.withPayload(CallmeEvent(++id, "I'm callme event!"))
                    .setHeader("to_process", true)
                    .build()
        else
            null
    }
}
Alternatively we may send an event on demand, for example by calling REST endpoint. To do that we need to use StreamBridge bean. It provides send method that takes a name of binding and message object as parameters. We may set just a payload object or use MessageBuilder to create the whole GenericMessage with headers. Our controller is exposing two POST methods. First of them POST /{message} is used just for setting message body. The second method POST /{message}/process/{process} allows set header to_process.
@RestController
@RequestMapping("/producer")
class ProducerController(val streamBridge: StreamBridge) {

    var id: Int = 0

    @PostMapping("/{message}")
    fun sendEvent(@PathVariable message: String): Boolean {
        return streamBridge.send("callmeEventSupplier-out-0", CallmeEvent(++id, message))
    }

    @PostMapping("/{message}/process/{process}")
    fun sendEventWithHeader(@PathVariable message: String, @PathVariable process: Boolean): Boolean {
        return streamBridge.send("callmeEventSupplier-out-0",
                MessageBuilder.createMessage(CallmeEvent(++id, message),
                        MessageHeaders(mutableMapOf(Pair<String, Any>("to_process", process)))))
    }
}
Here is a configuration file of our application. We need a default name of the destination for our binding (1). By default, it is the same as a binding name, but we are going to change it to callme-events. The same destination will be set on the consumer side. If we are using StreamBridge for sending messages we also need to set property spring.cloud.stream.source with the name that is used as a prefix of the generated binding name. If you would like to use the same output as for Supplier you should set the same name as for method that registers Supplier bean – callmeEventSupplier. We should also increase a level of logging for Spring AMQP library to see the structure of messages sent to message broker (3).
spring.application.name=producer-service
spring.cloud.stream.bindings.callmeEventSupplier-out-0.destination=callme-events #(1)
spring.cloud.stream.source=callmeEventSupplier #(2)
logging.level.org.springframework.amqp=DEBUG #(3)
callme.supplier.enabled=true
Consumer application
There are two different applications that listen for incoming events. Let’s start from implementation of consumer-a-service. It is pretty simple, because it is just logging message that has been consumed from callme-events topic. To consume message from destination we need to define Consumer bean that takes CallmeEvent as an argument.
@SpringBootApplication
class ConsumerAApplication {

    val logger: Logger = LoggerFactory.getLogger(ConsumerAApplication::class.java)

    @Bean
    fun callmeEventConsumer(): Consumer<CallmeEvent> = Consumer { logger.info("Received: {}", it) }
}
In the application properties we also need to override a default name of destination for callmeEventConsumer-in-0 binding. That name is the same as name of output destination configured on the producer side – callme-events. We are also setting a consumer group for all instances of consumer-a-service application. The name of group is a. Consumer group guarantees that only a single instance of application in a group is handling a single incoming event.
spring.application.name=consumer-a-service
spring.cloud.stream.bindings.callmeEventConsumer-in-0.destination=callme-events
spring.cloud.stream.bindings.callmeEventConsumer-in-0.group=a
Message broker
We are running RabbitMQ on Docker container. We need to expose two ports outside container: 5672 for TCP connections from applications and 15672 for web management console. The following command starts the container.
$ docker run -d --name rabbit -h rabbit -p 5672:5672 -p 15672:15672 rabbitmq:3-management
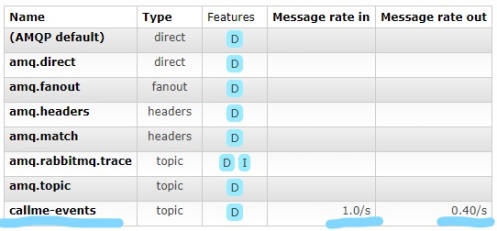
Now, we may run both our applications producer-service and consumer-a-service. We are going to run a single instance of producer-service and two instances of consumer-a-service. After that producer-service is starting to send events continuously to the destination on message broker. We may verify it with Rabbit Management Console. To login use default guest / guest credentials.
Routing function
We can provide some more advanced routing on the consumer side. In Spring Cloud Stream nomenclature event routing is the ability to either route evens to a particular even subscriber or route event produced by an event subscriber to a particular destination. Event routing may be enabled for application by setting property spring.cloud.stream.function.routing.enabled to true. After that the generated name of bindings is automatically set to functionRouter-*.
I enabled event routing feature for consumer-b-service. Here’s the list of configuration properties required to enable routing for consumer listening on callme-events destination. When enabling event routing we also need to set a routing expression. We may use SPeL notation for it. In that case I’m performing routing basing on to_process header value.
spring.application.name=consumer-b-service
spring.cloud.stream.bindings.functionRouter-in-0.destination=callme-events
spring.cloud.stream.bindings.functionRouter-in-0.group=b
spring.cloud.stream.function.routing.enabled=true
spring.cloud.function.routing-expression=(headers['to_process']!=null && headers['to_process']==true) ? 'process':'fireForget'
The name of declared Consumer or Function beans should be the same as the values returned by spring.cloud.function.routing-expression. In that case these are fireForget() and process().
@SpringBootApplication
class ConsumerBApplication {

    val logger: Logger = LoggerFactory.getLogger(ConsumerBApplication::class.java)

    @Bean
    fun fireForget(): Consumer<CallmeEvent> = Consumer { logger.info("Received(fireForget): {}", it) }

    @Bean
    fun process(): Function<CallmeEvent, CallmeResponse> = Function { logAndResponse(it) }

    private fun logAndResponse(callmeEvent: CallmeEvent): CallmeResponse {
        logger.info("Received(process): {}", callmeEvent)
        return CallmeResponse(callmeEvent.id, "I'm callme response")
    }
}
Here’s the list of exchanges used by our system after starting consumer-b-service. Since the name of destination for functionRouter-in-0 is overridden in configuration properties, the name of destination for functionRouter-out-0 is left at its default value.

Partitioning
Partitioning is a critical concept in stateful processing, where it is required to ensure that all related data is handled together. So, thanks to partitioning we may implement an algorithm responsible for distributing messages across multiple instances of applications in a determined way.
To enable partitioning on the producer side we need to set two properties related to a given binding. It is producer’s partitionKeyExpression, which in that case the id field of CallmeEvent, and producer’s partitionCount with a number of partitions. This number should be the same as a number of running instances of the application, since each partition is assigned to the selected instance of that application. Because we are planning to run two instances, we are setting such a value.
spring.cloud.stream.bindings.callmeEventSupplier-out-0.producer.partitionKeyExpression=payload.id
spring.cloud.stream.bindings.callmeEventSupplier-out-0.producer.partitionCount=2
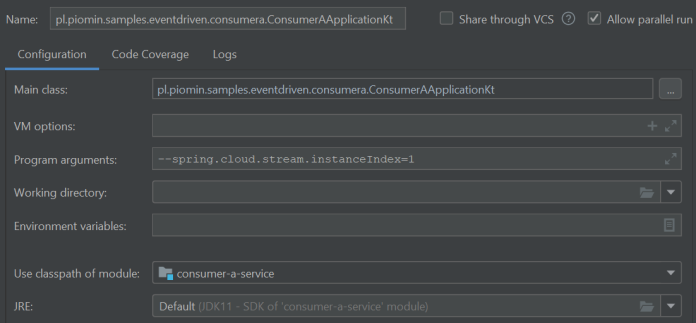
To enable partitioning on the consumer side we need to enable a single property on a given binding. We
also need to set a property spring.cloud.stream.instanceCount using the static number that represents a number of deployed instances of an application. While Kafka supports a more flexible way of partitioning configuration, RabbitMQ requires a static value, so we can’t scale up numbers dynamically without changing these properties. We also need to set property spring.cloud.stream.instanceIndex for a single instance. It needs to 0 or 1 if we have two running instances as shown below.
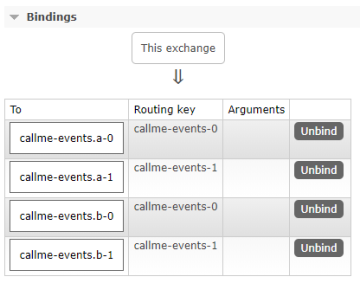
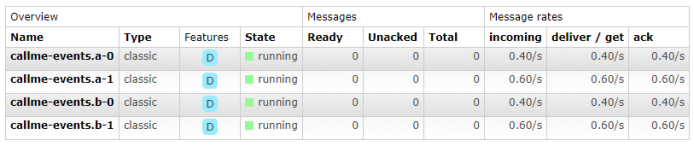
Now we take a look on structure of routing inside callme-events exchange created on RabbitMQ. Two consumers are listening for incoming events per a single consumer group. So if we have to different consumer groups defined there 4 consumers in total. Within each group, we have two different routing keys set for each target queue.
We can also verify that four queues receive incoming events.
Testing
Spring Cloud Stream provides an easy way of testing your microservice applications without need to connecting to an external messaging system. To enable that support we need to include the following dependency to Maven pom.xml.
<dependency>
   <groupId>org.springframework.cloud</groupId>
   <artifactId>spring-cloud-stream</artifactId>
   <version>3.0.3.RELEASE</version>
   <type>test-jar</type>
   <scope>test</scope>
   <classifier>test-binder</classifier>
</dependency>
In JUnit test class we should import TestChannelBinderConfiguration class. after that we may use InputDestination for sending test messages, and OutputDestination for receiving them during a test. The following testRouter is created for consumer-b-service, and it verifies that RouterFunction is working properly by receiving and validating message sent to an output destination.
@SpringBootTest(classes = [ConsumerBApplication::class])
@Import(TestChannelBinderConfiguration::class)
class RouterFunctionTest {

    @Autowired
    lateinit var inputDestination: InputDestination
    @Autowired
    lateinit var outputDestination: OutputDestination

    @Test
    fun testRouter() {
        inputDestination.send(MessageBuilder.withPayload(CallmeEvent(1, "I'm callme event"))
                .setHeader("to_process", true)
                .build())
        val response = outputDestination.receive()
        Assertions.assertNotNull(response)
        Assertions.assertTrue(response.payload.isNotEmpty())
        val payload = String(response.payload)
        val payloadObject = ObjectMapper().readValue(payload, CallmeResponse::class.java)
        Assertions.assertEquals(1, payloadObject.id)
        Assertions.assertEquals("I'm callme response", payloadObject.message)
    }

}


Related Posts