Guide to Quarkus with Kotlin

Quarkus is a lightweight Java framework developed by RedHat. It is dedicated for cloud-native applications that require a small memory footprint and a fast startup time. Its programming model is built on top of proven standards like Eclipse MicroProfile. Recently it is growing in popularity. It may be considered as an alternative to Spring Boot framework, especially if you are running your applications on Kubernetes or OpenShift.
In this guide, you will learn how to implement a simple Quarkus Kotlin application, that exposes REST endpoints and connects to a database. We will discuss the following topics:
- Implementation of REST endpoints
- Integration with H2 with Hibernate and Panache project
- Generating and exposing OpenAPI/Swagger documentation
- Exposing health checks
- Exposing basic metrics
- Logging request and response
- Testing REST endpoints with RestAssured library
 Source code
The source code with the sample Quarkus Kotlin applications is available on GitHub. First, you need to clone the following repository: https://github.com/piomin/sample-quarkus-applications.git. Then, you need to go to the employee-service directory.
1. Enable Quarkus Kotlin support
To enable Kotlin support in Quarkus we need to include quarkus-kotlin module. We also have to add kotlin-stdlib library.
<dependency>
   <groupId>io.quarkus</groupId>
   <artifactId>quarkus-kotlin</artifactId>
</dependency>
<dependency>
   <groupId>org.jetbrains.kotlin</groupId>
   <artifactId>kotlin-stdlib</artifactId>
</dependency>
In the next step we need to include kotlin-maven-plugin. Besides standard configuration, we have to use all-open Kotlin compiler plugin. The all-open compiler plugin makes classes annotated with a specific annotation and their members open without the explicit open keyword. Since classes annotated with @Path, @ApplicationScoped, or @QuarkusTest should not be final, we need to add all those annotations to the pluginOptions section.
<build>
   <sourceDirectory>src/main/kotlin</sourceDirectory>
   <testSourceDirectory>src/test/kotlin</testSourceDirectory>
   <plugins>
      <plugin>
         <groupId>io.quarkus</groupId>
         <artifactId>quarkus-maven-plugin</artifactId>
         <version>${quarkus-plugin.version}</version>
         <executions>
            <execution>
               <goals>
                  <goal>build</goal>
               </goals>
            </execution>
         </executions>
      </plugin>
      <plugin>
         <groupId>org.jetbrains.kotlin</groupId>
         <artifactId>kotlin-maven-plugin</artifactId>
         <version>${kotlin.version}</version>
         <executions>
            <execution>
               <id>compile</id>
               <goals>
                  <goal>compile</goal>
               </goals>
            </execution>
            <execution>
               <id>test-compile</id>
               <goals>
                  <goal>test-compile</goal>
               </goals>
            </execution>
         </executions>
         <dependencies>
            <dependency>
               <groupId>org.jetbrains.kotlin</groupId>
               <artifactId>kotlin-maven-allopen</artifactId>
               <version>${kotlin.version}</version>
            </dependency>
         </dependencies>
         <configuration>
            <javaParameters>true</javaParameters>
            <jvmTarget>11</jvmTarget>
            <compilerPlugins>
               <plugin>all-open</plugin>
            </compilerPlugins>
            <pluginOptions>
               <option>all-open:annotation=javax.ws.rs.Path</option>
               <option>all-open:annotation=javax.enterprise.context.ApplicationScoped</option>
               <option>all-open:annotation=io.quarkus.test.junit.QuarkusTest</option>
            </pluginOptions>
         </configuration>
      </plugin>
   </plugins>
</build>
2. Implement REST endpoint
In Quarkus support for REST is built on top of Resteasy and JAX-RS libraries. You can choose between two available extentions for JSON serialization/deserialization: JsonB and Jackson. Since I decided to use Jackson I need to include quarkus-resteasy-jackson dependency. It also includes quarkus-resteasy module.
<dependency>
   <groupId>io.quarkus</groupId>
   <artifactId>quarkus-resteasy-jackson</artifactId>
</dependency>
We mostly use JAX-RS annotations for mapping controller methods and fields into HTTP endpoints. We may also use Resteasy annotations like @PathParam, that does not require to set any fields. In order to interact with database, we are injecting a repository bean.
@Path("/employees")
@Produces(MediaType.APPLICATION_JSON)
@Consumes(MediaType.APPLICATION_JSON)
class EmployeeResource(val repository: EmployeeRepository) {

    @POST
    @Transactional
    fun add(employee: Employee): Response {
        repository.persist(employee)
        return Response.ok(employee).status(201).build()
    }

    @DELETE
    @Path("/{id}")
    @Transactional
    fun delete(@PathParam id: Long) {
        repository.deleteById(id)
    }

    @GET
    fun findAll(): List<Employee> = repository.listAll()

    @GET
    @Path("/{id}")
    fun findById(@PathParam id: Long): Employee? = repository.findById(id)

    @GET
    @Path("/first-name/{firstName}/last-name/{lastName}")
    fun findByFirstNameAndLastName(@PathParam firstName: String, @PathParam lastName: String): List<Employee>
            = repository.findByFirstNameAndLastName(firstName, lastName)

    @GET
    @Path("/salary/{salary}")
    fun findBySalary(@PathParam salary: Int): List<Employee> = repository.findBySalary(salary)

    @GET
    @Path("/salary-greater-than/{salary}")
    fun findBySalaryGreaterThan(@PathParam salary: Int): List<Employee>
            = repository.findBySalaryGreaterThan(salary)

}
3. Integration with database
Quarkus provides Panache JPA extension to simplify work with Hibernate ORM. It also provides driver extensions for the most popular SQL databases like Postgresql, MySQL, or H2. To enable both these features for H2 in-memory database we need to include the following dependencies.
<dependency>
   <groupId>io.quarkus</groupId>
   <artifactId>quarkus-hibernate-orm-panache-kotlin</artifactId>
</dependency>
<dependency>
   <groupId>io.quarkus</groupId>
   <artifactId>quarkus-jdbc-h2</artifactId>
</dependency>
We should also configure connection settings inside application.properties file.
quarkus.datasource.db-kind=h2
quarkus.datasource.username=sa
quarkus.datasource.password=password
quarkus.datasource.jdbc.url=jdbc:h2:mem:testdb
Panache extension allows to use well-known repository pattern. To use it we should first define entity that extends PanacheEntity class.
@Entity
data class Employee(var firstName: String = "",
                    var lastName: String = "",
                    var position: String = "",
                    var salary: Int = 0,
                    var organizationId: Int? = null,
                    var departmentId: Int? = null): PanacheEntity()
In the next step, we are defining repository bean that implements PanacheRepository interface. It comes with some basic methods like persist, deleteById or listAll. We may also use those basic methods to implement more advanced queries or operations.
@ApplicationScoped
class EmployeeRepository: PanacheRepository<Employee> {
    fun findByFirstNameAndLastName(firstName: String, lastName: String): List<Employee> =
           list("firstName = ?1 and lastName = ?2", firstName, lastName)

    fun findBySalary(salary: Int): List<Employee> = list("salary", salary)

    fun findBySalaryGreaterThan(salary: Int): List<Employee> = list("salary > ?1", salary)
}
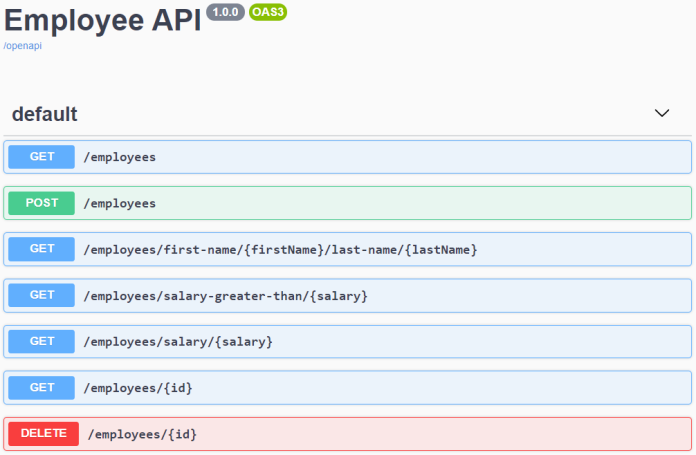
4. Enable OpenAPI documentation for Quarkus Kotlin
It is possible to generate OpenAPI v3 specification automatically. To do that we need to include SmallRye OpenAPI extension. The specification is available under path /openapi.
<dependency>
   <groupId>io.quarkus</groupId>
   <artifactId>quarkus-smallrye-openapi</artifactId>
</dependency>
We may provide some additional informations to the generated OpenAPI specification like description or version number. To do that we need to create application class that extends javax.ws.rs.core.Application, and annotate it with @OpenAPIDefinition, as shown below.
@OpenAPIDefinition(info = Info(title = "Employee API", version = "1.0"))
class EmployeeApplication: Application()
Usually, we want to expose OpenAPI specification using Swagger UI. Such a feature may be enabled using configuration property quarkus.swagger-ui.always-include=true.
5. Health checks
We may expose built-in health checks implementation by including SmallRye Health extension.
<dependency>
   <groupId>io.quarkus</groupId>
   <artifactId>quarkus-smallrye-health</artifactId>
</dependency>
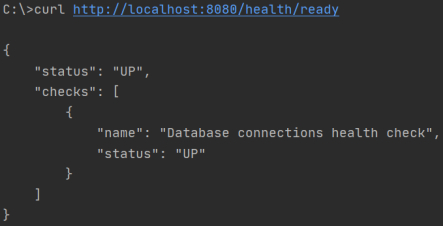
It exposes three REST endpoints compliant with Kubernetes health checks pattern:
/health/live– The application is up and running (Kubernetes liveness probe)./health/ready– The application is ready to serve requests (Kubernetes readiness probe)./health– Accumulating all health check procedures in the application.
The default implementation of readiness health check verifies database connection status, while liveness just determines if the application is running.
6. Expose metrics
We may enable metrics collection by adding SmallRye Metrics extension. By default, it collects only JVM, CPU and processes metrics.
<dependency>
   <groupId>io.quarkus</groupId>
   <artifactId>quarkus-smallrye-metrics</artifactId>
</dependency>
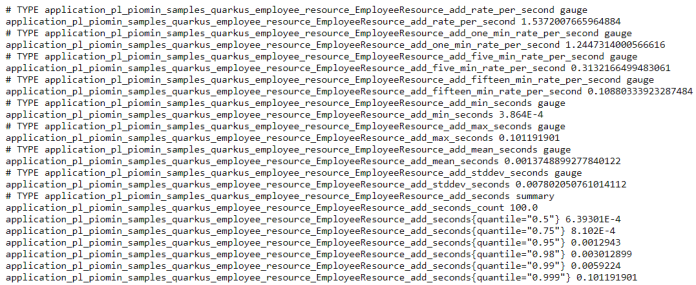
We may force the library to collect metrics from JAX-RS endpoints. To do that we need to annotate the selected endpoints with @Timed.
@POST
@Transactional
@Timed(name = "add", unit = MetricUnits.MILLISECONDS)
fun add(employee: Employee): Response {
   repository.persist(employee)
   return Response.ok(employee).status(201).build()
}
Now, we may call endpoint POST /employee 100 times in a row. Here’s the list of metrics generated for the single endpoint. If you would like to ensure compatibility with Micrometer metrics format you need to set the following configuration property: quarkus.smallrye-metrics.micrometer.compatibility=true.
7. Logging request and response for Quarkus Kotlin application
There is no built-in mechanism for logging HTTP requests and responses. We may implement custom logging filter that implements interfaces ContainerRequestFilter, and ContainerResponseFilter.
@Provider
class LoggingFilter: ContainerRequestFilter, ContainerResponseFilter {

    private val logger: Logger = LoggerFactory.getLogger(LoggingFilter::class.java)

    @Context
    lateinit var info: UriInfo
    @Context
    lateinit var request: HttpServerRequest

    override fun filter(ctx: ContainerRequestContext) {
        logger.info("Request {} {}", ctx.method, info.path)
    }

    override fun filter(r: ContainerRequestContext, ctx: ContainerResponseContext) {
        logger.info("Response {} {}: {}", r.method, info.path, ctx.status)
    }

}
8. Testing
The module quarkus-junit5 is required for testing, as it provides the @QuarkusTest annotation that controls the testing framework. The extension rest-assured is not required, but is a convenient way to test HTTP endpoints.
<dependency>
   <groupId>io.quarkus</groupId>
   <artifactId>quarkus-junit5</artifactId>
   <scope>test</scope>
</dependency>
<dependency>
   <groupId>io.rest-assured</groupId>
   <artifactId>kotlin-extensions</artifactId>
   <scope>test</scope>
</dependency>
We are adding new Employee in the first test. Then the second test verifies if there is a single Employee stored inside in-memory database.
@QuarkusTest
class EmployeeResourceTest {

    @Test
    fun testAddEmployee() {
        val emp = Employee(firstName = "John", lastName = "Smith", position = "Developer", salary = 20000)
        given().body(emp).contentType(ContentType.JSON)
                .post("/employees")
                .then()
                .statusCode(201)
    }

    @Test
    fun testGetAll() {
        given().get("/employees")
                .then()
                .statusCode(200)
                .assertThat().body("size()", `is`(1))
    }

}
Conclusion
In this guide, I showed you how to build a Quarkus Kotlin application that connects to a database and follows some best practices like exposing health checks, metrics, or logging incoming requests and outgoing responses. The last step is to run our sample application. To do that in development mode we just need to execute command mvn compile quarkus:dev. Here’s my start screen. You can see there, for example, the list of included Quarkus modules.

If you are interested in Quarkus framework the next useful article for you is Guide to Quarkus on Kubernetes.


Related Posts