Redis in Microservices Architecture
Redis can be widely used in microservices architecture. It is probably one of the few popular software solutions that may be leveraged by your application in such many different ways. Depending on the requirements it can act as a primary database, cache, message broker. While it is also a key/value store we can use it as a configuration server or discovery server in your microservices architecture. Although it is usually defined as an in-memory data structure, we can also run it in persistent mode.
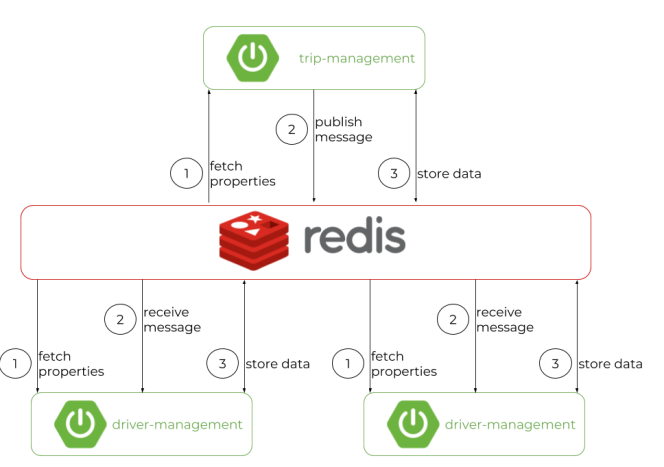
Today, I’m going to show you some examples of using Redis with microservices built on top of Spring Boot and Spring Cloud frameworks. These applications will communicate between each other asynchronously using Redis Pub/Sub, using Redis as a cache or primary database, and finally using Redis as a configuration server. Here’s the picture that illustrates the described architecture.
Redis as Configuration Server
If you have already built microservices with Spring Cloud, you probably have a touch with Spring Cloud Config. It is responsible for providing distributed configuration patterns for microservices. Unfortunately Spring Cloud Config does not support Redis as a property sources backend repository. That’s why I decided to fork the Spring Cloud Config project and implement this feature. I hope my implementation will soon be included into the official Spring Cloud release, but for now you may use my forked repo to run it. It is available on my GitHub account piomin/spring-cloud-config. How to use it? Very simple. Let’s see.
The current SNAPSHOT version of Spring Boot is 2.2.0.BUILD-SNAPSHOT, the same as for Spring Cloud Config. While building Spring Cloud Config Server we need to include only those two dependencies as shown below.
<parent>
   <groupId>org.springframework.boot</groupId>
   <artifactId>spring-boot-starter-parent</artifactId>
   <version>2.2.0.BUILD-SNAPSHOT</version>
</parent>
<artifactId>config-service</artifactId>
<groupId>pl.piomin.services</groupId>
<version>1.0-SNAPSHOT</version>

<dependencies>
   <dependency>
      <groupId>org.springframework.cloud</groupId>
      <artifactId>spring-cloud-config-server</artifactId>
      <version>2.2.0.BUILD-SNAPSHOT</version>
   </dependency>
</dependencies>
By default, Spring Cloud Config Server uses the Git repository backend. We need to activate the redis profile to force it using Redis as a backend. If your Redis instance listens on another address than localhost:6379 you need to overwrite auto-configured connection settings with spring.redis.* properties. Here’s our bootstrap.yml file.
spring:
  application:
    name: config-service
  profiles:
    active: redis
  redis:
    host: 192.168.99.100
The application main class should be annotated with @EnableConfigServer.
@SpringBootApplication
@EnableConfigServer
public class ConfigApplication {

   public static void main(String[] args) {
      new SpringApplicationBuilder(ConfigApplication.class).run(args);
   }

}
Before running the application we need to start the Redis instance. Here’s the command that runs it as a Docker container and exposes on port 6379.
$ docker run -d --name redis -p 6379:6379 redis
The configuration for every application has to be available under the key ${spring.application.name} or ${spring.application.name}-${spring.profiles.active[n]}.
We have to create hash with the keys corresponding to the names of configuration properties. Our sample application driver-management uses three configuration properties: server.port for setting HTTP listening port, spring.redis.host for changing default Redis address used as a message broker and database, and sample.topic.name for setting name of topic used for asynchronous communication between our microservices. Here’s the structure of Redis hash created for driver-management visualized with RDBTools.
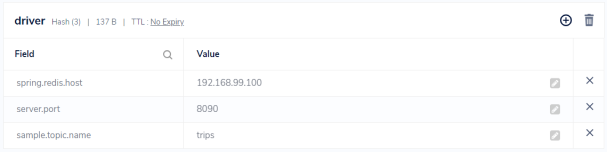
That visualization is an equivalent of running Redis CLI command HGETALL that returns all the fields and values in a hash.
>> HGETALL driver-management
{
  "server.port": "8100",
  "sample.topic.name": "trips",
  "spring.redis.host": "192.168.99.100"
}
After setting keys and values in Redis and running Spring Cloud Config Server with active redis profile, we need to enable distributed configuration feature on the client side. To do that we just need to include spring-cloud-starter-config dependency to pom.xml of every microservice.
<dependency>
   <groupId>org.springframework.cloud</groupId>
   <artifactId>spring-cloud-starter-config</artifactId>
</dependency>
We use the newest stable version of Spring Cloud.
<dependencyManagement>
   <dependencies>
      <dependency>
         <groupId>org.springframework.cloud</groupId>
         <artifactId>spring-cloud-dependencies</artifactId>
         <version>Greenwich.SR1</version>
         <type>pom</type>
         <scope>import</scope>
      </dependency>
   </dependencies>
</dependencyManagement>
The name of application is taken from property spring.application.name on startup, so we need to provide the following bootstrap.yml file.
spring:
  application:
    name: driver-management
Redis as Message Broker
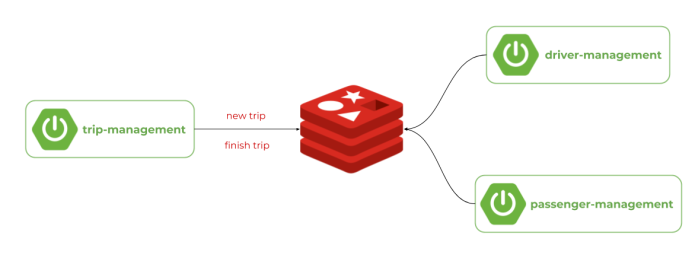
Now we can proceed to the second use case of Redis in microservices-based architecture – message broker. We will implement a typical asynchronous system, which is visible on the picture below. Microservice trip-management send notification to Redis Pub/Sub after creating new trip and after finishing current trip. The notification is received by both driver-management and passenger-management, which are subscribed to the particular channel.
Our application is very simple. We just need to add the following dependencies in order to provide REST API and integrate with Redis Pub/Sub.
<dependency>
   <groupId>org.springframework.boot</groupId>
   <artifactId>spring-boot-starter-web</artifactId>
</dependency>
<dependency>
   <groupId>org.springframework.boot</groupId>
   <artifactId>spring-boot-starter-data-redis</artifactId>
</dependency>
We should register bean with the channel name and publisher. TripPublisher is responsible for sending messages to the target topic.
@Configuration
public class TripConfiguration {

   @Autowired
   RedisTemplate<?, ?> redisTemplate;

   @Bean
   TripPublisher redisPublisher() {
      return new TripPublisher(redisTemplate, topic());
   }

   @Bean
   ChannelTopic topic() {
      return new ChannelTopic("trips");
   }

}
TripPublisher uses RedisTemplate for sending messages to the topic. Before sending it converts every message from object to JSON string using Jackson2JsonRedisSerializer.
public class TripPublisher {

   private static final Logger LOGGER = LoggerFactory.getLogger(TripPublisher.class);

   RedisTemplate<?, ?> redisTemplate;
   ChannelTopic topic;

   public TripPublisher(RedisTemplate<?, ?> redisTemplate, ChannelTopic topic) {
      this.redisTemplate = redisTemplate;
      this.redisTemplate.setValueSerializer(new Jackson2JsonRedisSerializer(Trip.class));
      this.topic = topic;
   }

   public void publish(Trip trip) throws JsonProcessingException {
      LOGGER.info("Sending: {}", trip);
      redisTemplate.convertAndSend(topic.getTopic(), trip);
   }

}
We have already implemented the logic on the publisher side. Now, we can proceed to the implementation on subscriber sides. We have two microservices driver-management and passenger-management that listens for the notifications sent by trip-management microservice. We need to define RedisMessageListenerContainer bean and set a message listener implementation class.
@Configuration
public class DriverConfiguration {

   @Autowired
   RedisConnectionFactory redisConnectionFactory;

   @Bean
   RedisMessageListenerContainer container() {
      RedisMessageListenerContainer container = new RedisMessageListenerContainer();
      container.addMessageListener(messageListener(), topic());
      container.setConnectionFactory(redisConnectionFactory);
      return container;
   }

   @Bean
   MessageListenerAdapter messageListener() {
      return new MessageListenerAdapter(new DriverSubscriber());
   }

   @Bean
   ChannelTopic topic() {
      return new ChannelTopic("trips");
   }

}
The class responsible for handling incoming notification needs to implement MessageListener interface. After receiving message DriverSubscriber deserializes it from JSON to object and change driver status.
@Service
public class DriverSubscriber implements MessageListener {

   private final Logger LOGGER = LoggerFactory.getLogger(DriverSubscriber.class);

   @Autowired
   DriverRepository repository;
   ObjectMapper mapper = new ObjectMapper();

   @Override
   public void onMessage(Message message, byte[] bytes) {
      try {
         Trip trip = mapper.readValue(message.getBody(), Trip.class);
         LOGGER.info("Message received: {}", trip.toString());
         Optional<Driver> optDriver = repository.findById(trip.getDriverId());
         if (optDriver.isPresent()) {
            Driver driver = optDriver.get();
            if (trip.getStatus() == TripStatus.DONE)
               driver.setStatus(DriverStatus.WAITING);
            else
               driver.setStatus(DriverStatus.BUSY);
            repository.save(driver);
         }
      } catch (IOException e) {
         LOGGER.error("Error reading message", e);
      }
   }

}
Redis as Primary Database
Although the main purpose of using Redis is in-memory caching or key/value store it may also act as a primary database for your application. In that case it is worth it to run Redis in persistent mode.
$ docker run -d --name redis -p 6379:6379 redis redis-server --appendonly yes
Entities are stored inside Redis using hash operations and mmap structure. Each entity needs to have a hash key and id.
@RedisHash("driver")
public class Driver {

   @Id
   private Long id;
   private String name;
   @GeoIndexed
   private Point location;
   private DriverStatus status;

   // setters and getters ...
}
Fortunately, Spring Data Redis provides a well-known repositories pattern for Redis integration. To enable it we should annotate configuration or main class with @EnableRedisRepositories. When using the Spring repositories pattern we don’t have to build any queries to Redis by ourselves.
@Configuration
@EnableRedisRepositories
public class DriverConfiguration {
   // logic ...
}
With Spring Data repositories we don’t have to build any Redis queries, but just name methods following Spring Data convention. For more details, you may refer to my previous article Introduction to Spring Data Redis. For our sample purposes we can use default methods implemented inside Spring Data. Here’s declaration of repository interface in driver-management.
public interface DriverRepository extends CrudRepository<Driver, Long> {}
Don’t forget to enable Spring Data repositories by annotating the main application class or configuration class with @EnableRedisRepositories.
@Configuration
@EnableRedisRepositories
public class DriverConfiguration {
   ...
}
Conclusion
As I have mentioned in the preface there are various use cases for Redis in microservices architecture. I have just presented how you can easily use it together with Spring Cloud and Spring Data to provide configuration server, message broker and database. Redis is commonly considered as a cache, but I hope that after reading this article you will change your mind about it. The sample applications source code is as usual available on GitHub: https://github.com/piomin/sample-redis-microservices.git.


Related Posts