Elasticsearch with Spring Boot

Elasticsearch is a full-text search engine especially designed for working with large data sets. Following this description, it is a natural choice to use it for storing and searching application logs. Together with Logstash and Kibana, it is a part of a powerful solution called Elastic Stack, which has already been described in some of my previous articles.
Keeping application logs is not the only use case for Elasticsearch. It is often used as a secondary database for the application, that has a primary relational database. Such an approach can be especially useful if you have to perform a full-text search over a large data set or just store many historical records that are no longer modified by the application. Of course, there are always questions about the advantages and disadvantages of that approach.
When you are working with two different data sources that contain the same data, you have to first think about synchronization. You have several options. Depending on the relational database vendor, you can leverage binary or transaction logs, which contain the history of SQL updates. This approach requires some middleware that reads logs and then puts data to Elasticsearch. You can always move the whole responsibility to the database side (trigger) or into the Elasticsearch side (JDBC plugins).
No matter how you will import your data into Elasticsearch, you have to consider another problem. The data structure. You probably have data distributed between a few tables in your relational database. If you would like to take advantage of Elasticsearch you should store it as a single type. It forces you to keep redundant data, which results in larger disc space usage. Of course, that effect is acceptable if the queries would work faster than equivalent queries in relational databases.
Ok, let’s proceed to the example after that long introduction. Spring Boot provides an easy way to interact with Elasticsearch through Spring Data repositories.
1. Enabling Elasticsearch support in Spring Boot
As is customary with Spring Boot we don’t have to provide any additional beans in the context to enable support for Elasticsearch. We just need to include the following dependency to our pom.xml:
<dependency>
	<groupId>org.springframework.boot</groupId>
	<artifactId>spring-boot-starter-data-elasticsearch</artifactId>
</dependency>
By default, the application tries to connect with Elasticsearch on localhost. If we use another target URL we need to override it in configuration settings. Here’s the fragment of our application.yml file that overrides default cluster name and address to the address of Elasticsearch started on Docker container:
spring:
  data:
    elasticsearch:
      cluster-name: docker-cluster
      cluster-nodes: 192.168.99.100:9300
The health status of Elasticsearch connection may be exposed by the application through Spring Boot Actuator health endpoint. First, you need to include the following Maven dependency:
<dependency>
	<groupId>org.springframework.boot</groupId>
	<artifactId>spring-boot-starter-actuator</artifactId>
</dependency>
Healthcheck is enabled by default, and Elasticsearch check is auto-configured. However, this verification is performed via Elasticsearch Rest API client. In that case, we need to override property spring.elasticsearch.rest.uris responsible for setting address used by REST client:
spring:
  elasticsearch:
    rest:
      uris: http://192.168.99.100:9200
2. Running Elasticsearch on Docker
For our tests we need a single node Elasticsearch instance running in development mode. As usual we will use Docker containers. Here’s the command that starts the Docker container and exposes it on ports 9200 and 9300.
$ docker run -d --name elasticsearch -p 9200:9200 -p 9300:9300 -e "discovery.type=single-node" elasticsearch:6.6.2
3. Building Spring Data Repositories
To enable Elasticsearch repositories we just need to annotate the main or configuration class with @EnableElasticsearchRepositories:
@SpringBootApplication
@EnableElasticsearchRepositories
public class SampleApplication { ... }
The next step is to create a repository interface that extends CrudRepository. It provides some basic operations like save or findById. If you would like to have some additional find methods you should define new methods inside the interface following Spring Data naming convention.
public interface EmployeeRepository extends CrudRepository<Employee, Long> {

    List<Employee> findByOrganizationName(String name);
    List<Employee> findByName(String name);

}
4. Building Document with Spring Data Elasticsearch
Our relational structure of entities is flattened into the single Employee object that contains related objects (Organization, Department). You can compare this approach to creating a view for a group of related tables in RDBMS. In Spring Data Elasticsearch nomenclature a single object is stored as a document. So, you need to annotate your object with @Document. You should also set the name of Elasticsearch target index, type and id. Additional mappings can be configured with @Field annotation.
@Document(indexName = "sample", type = "employee")
public class Employee {

    @Id
    private Long id;
    @Field(type = FieldType.Object)
    private Organization organization;
    @Field(type = FieldType.Object)
    private Department department;
    private String name;
    private int age;
    private String position;

    // Getters and Setters ...

}
5. Initial import to Elasticsearch
As I have mentioned in the preface the main reason you may decide to use Elasticsearch is the need for working with large data. Therefore it is desirable to fill our test Elasticsearch node with many documents. If you would like to insert many documents in one step you should definitely use Bulk API. The bulk API makes it possible to perform many index/delete operations in a single API call. This can greatly increase the indexing speed.
The bulk operations may be performed with Spring Data ElasticsearchTemplate bean. It is also auto-configured on Spring Boot. The template provides a bulkIndex method that takes a list of index queries as an input parameter. Here’s the implementation of bean that inserts sample test data on application startup:
public class SampleDataSet {

    private static final Logger LOGGER = LoggerFactory.getLogger(SampleDataSet.class);
    private static final String INDEX_NAME = "sample";
    private static final String INDEX_TYPE = "employee";

    @Autowired
    EmployeeRepository repository;
    @Autowired
    ElasticsearchTemplate template;

    @PostConstruct
    public void init() {
        for (int i = 0; i < 10000; i++) {
            bulk(i);
        }
    }

    public void bulk(int ii) {
        try {
            if (!template.indexExists(INDEX_NAME)) {
                template.createIndex(INDEX_NAME);
            }
            ObjectMapper mapper = new ObjectMapper();
            List<IndexQuery> queries = new ArrayList<>();
            List<Employee> employees = employees();
            for (Employee employee : employees) {
                IndexQuery indexQuery = new IndexQuery();
                indexQuery.setId(employee.getId().toString());
                indexQuery.setSource(mapper.writeValueAsString(employee));
                indexQuery.setIndexName(INDEX_NAME);
                indexQuery.setType(INDEX_TYPE);
                queries.add(indexQuery);
            }
            if (queries.size() > 0) {
                template.bulkIndex(queries);
            }
            template.refresh(INDEX_NAME);
            LOGGER.info("BulkIndex completed: {}", ii);
        } catch (Exception e) {
            LOGGER.error("Error bulk index", e);
        }
    }

	// sample data set implementation ...

}
If you don’t need to insert data on startup you can disable that process by setting property initial-import.enabled to false. Here’s declaration of SampleDataSet bean:
@Bean
@ConditionalOnProperty("initial-import.enabled")
public SampleDataSet dataSet() {
	return new SampleDataSet();
}
6. Viewing data and running queries
Assuming that you have already started the sample application, the bean responsible for bulking index was not disabled, and you had enough patience to wait some hours until all data has been inserted into your Elasticsearch node, now it contains 100M documents of employee type. It is worth displaying some information about your cluster. You can do it using Elasticsearch queries or you can download one of the available GUI tools, for example ElasticHQ. Fortunately, ElasticHQ is also available as a Docker container. You have to execute the following command to start container with ElasticHQ:
$ docker run -d --name elastichq -p 5000:5000 elastichq/elasticsearch-hq
After starting ElasticHQ GUI can be accessed via web browser on port 5000. Its web console provides basic information about the cluster, index and allows to perform queries. You only need to put Elasticsearch node address and you will be redirected into the main dashboard with statistics. Here’s the main dashboard of ElasticHQ.
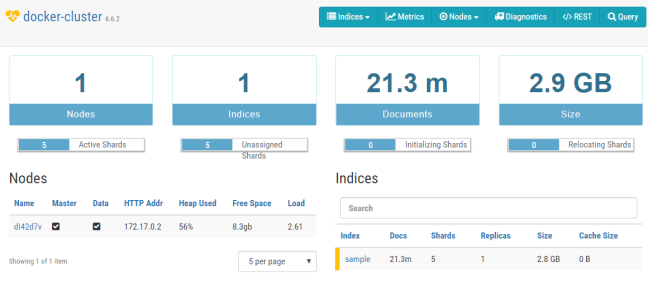
As you can see we have a single index called sample divided into 5 shards. That is the default value provided by Spring Data @Document, which can be overridden with field shards. We can navigate to the index management panel after clicking on it. You can perform some operations on indexes like clear cache or refresh index. You can also take a look at statistics for all shards.
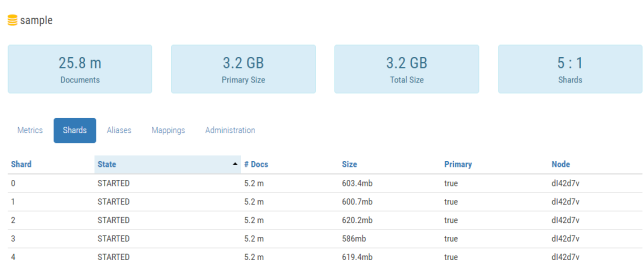
For the current test purposes, I have around 25M (around ~3GB of space) documents of Employee type. We can execute some test queries. I have exposed two endpoints for searching: by employee name GET /employees/{name} and by organization name GET /employees/organization/{organizationName}. The results are not overwhelming. I think we could have the same results for relational databases using the same amount of data.
7. Testing of Spring Boot Elasticseaech application
Ok, we have already finished development and performed some manual tests on the large data set. Now, it’s time to create some integration tests running on built time. We can use the library that allows us to automatically start Docker containers with databases during JUnit tests – Testcontainers. For more about this library you may refer to its site https://www.testcontainers.org or to one of my previous articles: Testing Spring Boot Integration with Vault and Postgres using Testcontainers Framework. Fortunately, Testcontainers supports Elasticsearch. To enable it on test scope you first need to include the following dependency to your pom.xml:
<dependency>
	<groupId>org.testcontainers</groupId>
	<artifactId>elasticsearch</artifactId>
	<version>1.11.1</version>
	<scope>test</scope>
</dependency>
The next step is to define @ClassRule or @Rule bean that points to the Elasticsearch container. It is automatically started before test class or before each depending on the annotation you use. The exposed port number is generated automatically, so you need to retrieve it and set as value for spring.data.elasticsearch.cluster-nodes property. Here’s the full implementation of our JUnit integration test:
@RunWith(SpringRunner.class)
@SpringBootTest
@FixMethodOrder(MethodSorters.NAME_ASCENDING)
public class EmployeeRepositoryTest {

    @ClassRule
    public static ElasticsearchContainer container = new ElasticsearchContainer();
    @Autowired
    EmployeeRepository repository;

    @BeforeClass
    public static void before() {
        System.setProperty("spring.data.elasticsearch.cluster-nodes", container.getContainerIpAddress() + ":" + container.getMappedPort(9300));
    }

    @Test
    public void testAdd() {
        Employee employee = new Employee();
        employee.setId(1L);
        employee.setName("John Smith");
        employee.setAge(33);
        employee.setPosition("Developer");
        employee.setDepartment(new Department(1L, "TestD"));
        employee.setOrganization(new Organization(1L, "TestO", "Test Street No. 1"));
        employee = repository.save(employee);
        Assert.assertNotNull(employee);
    }

    @Test
    public void testFindAll() {
        Iterable<Employee> employees = repository.findAll();
        Assert.assertTrue(employees.iterator().hasNext());
    }

    @Test
    public void testFindByOrganization() {
        List<Employee> employees = repository.findByOrganizationName("TestO");
        Assert.assertTrue(employees.size() > 0);
    }

    @Test
    public void testFindByName() {
        List<Employee> employees = repository.findByName("John Smith");
        Assert.assertTrue(employees.size() > 0);
    }

}
Summary
In this article you have learned how to:
- Run your local instance of Elasticsearch with Docker
- Integrate Spring Boot application with Elasticsearch
- Use Spring Data Repositories for saving data and performing simple queries
- User Spring Data ElasticsearchTemplate to perform bulk operations on index
- Use ElasticHQ for monitoring your cluster
- Build automatic integration tests for Elasticsearch with Testcontainers
The sample application source code is as usual available on GitHub in repository sample-spring-elasticsearch.


Related Posts