Guide To Micronaut Kubernetes

Micronaut provides a library that eases the development of applications deployed on Kubernetes or on a local single-node cluster like Minikube. The project Micronaut Kubernetes is relatively new in the Micronaut family, its current release version is 1.0.3. It allows you to integrate a Micronaut application with Kubernetes discovery, and use Micronaut Configuration Client to read Kubernetes ConfigMap and Secret as a property sources. Additionally, it provides a health check indicator based on communication with Kubernetes API.
Thanks to that module you can simplify and speed up your Micronaut application deployment on Kubernetes during development. In this article I’m going to show how to use Micronaut Kubernetes together with some other interesting tools to simplify local development with Minikube. The topics covered in this article are:
- Using Skaffold together with Jib Maven Plugin to automatically publish application to Minikube after source code change
- Providing communication between applications using Micronaut HTTP Client basing on Kubernetes
Endpointsname - Enabling Kubernetes
ConfigMapandSecretas Micronaut Property Sources - Using application health check
- Integrating application with MongoDB running on Minikube
Micronaut Kubernetes example on GitHub
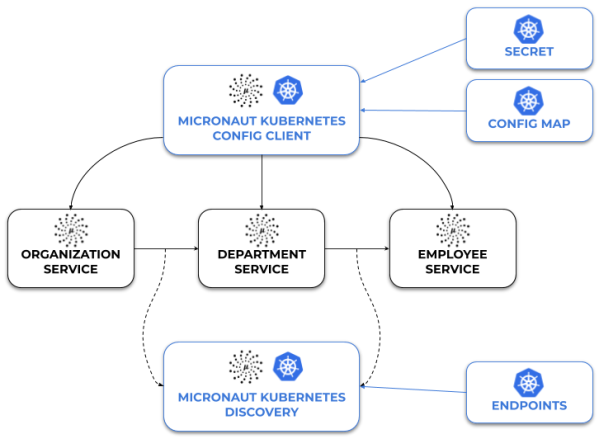
The source code with Micronaut Kubernetes example is as usual available on GitHub: https://github.com/piomin/sample-micronaut-kubernetes.git. Here’s the architecture of our example system consisting of three microservices built on top of Micronaut Framework.
Using Skaffold and Jit
Development with Minikube may be a little bit complicated in comparison to the standard approach when you are testing an application locally without running it on the platform. First you need to build your application from source code, then build its Docker image and finally redeploy application on Kubernetes using the newest image. Skaffold performs all these steps automatically for you. The only thing you need to do is to install it on a machine and enable it for your maven project using command skaffold init. The command skaffold init just creates a file skaffold.yaml in the root of the project. Of course, you can create such a manifest by yourself, especially if you would like to use Skaffold together with Jib. Here’s my skaffold.yaml manifest. We set the name of Docker image, tagging policy to Git commit id and also enabled Jib.
apiVersion: skaffold/v2alpha1
kind: Config
build:
  artifacts:
    - image: piomin/employee
      jib: {}
  tagPolicy:
    gitCommit: {}
Why do we need to use Jib? By default, Skaffold is based on Dockerfile, so each change will be published to Kubernetes only after the JAR file changes. With Jib it is watching for changes in the source code and first automatically rebuilding your Maven projects.
<plugin>
   <groupId>com.google.cloud.tools</groupId>
   <artifactId>jib-maven-plugin</artifactId>
   <version>1.8.0</version>
</plugin>
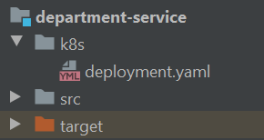
Now you just need to run command skaffold dev on a selected Maven project, and your application will be automatically deployed to Kubernetes on every change in the source code. Additionally, Skaffold may apply Kubernetes manifest file if it is located in k8s directory.
Implementation of Micronaut Kubernetes example
Let’s begin from implementation. Each of our applications uses MongoDB as a backend store. We are using a synchronous Java client for integration with MongoDB. Micronaut comes with project micronaut-mongo-reactive that provides auto-configuration for both reactive and non-reactive drivers.
<dependency>
   <groupId>io.micronaut.configuration</groupId>
   <artifactId>micronaut-mongo-reactive</artifactId>
</dependency>
<dependency>
   <groupId>org.mongodb</groupId>
   <artifactId>mongo-java-driver</artifactId>
</dependency>
It is based on mongodb.uri property and allows you to inject preconfigured MongoClient bean. Then, we use MongoClient for save and find operations. When using it we first need to set a current database and collection name. All required parameters uri, database and collection are taken from external configuration.
@Singleton
public class EmployeeRepository {

   private MongoClient mongoClient;

   @Property(name = "mongodb.database")
   private String mongodbDatabase;
   @Property(name = "mongodb.collection")
   private String mongodbCollection;

   EmployeeRepository(MongoClient mongoClient) {
      this.mongoClient = mongoClient;
   }

   public Employee add(Employee employee) {
      employee.setId(repository().countDocuments() + 1);
      repository().insertOne(employee);
      return employee;
   }

   public Employee findById(Long id) {
      return repository().find().first();
   }

   public List<Employee> findAll() {
      final List<Employee> employees = new ArrayList<>();
      repository()
            .find()
            .iterator()
            .forEachRemaining(employees::add);
      return employees;
   }

   public List<Employee> findByDepartment(Long departmentId) {
      final List<Employee> employees = new ArrayList<>();
      repository()
            .find(Filters.eq("departmentId", departmentId))
            .iterator()
            .forEachRemaining(employees::add);
      return employees;
   }

   public List<Employee> findByOrganization(Long organizationId) {
      final List<Employee> employees = new ArrayList<>();
      repository()
            .find(Filters.eq("organizationId", organizationId))
            .iterator()
            .forEachRemaining(employees::add);
      return employees;
   }

   private MongoCollection<Employee> repository() {
      return mongoClient.getDatabase(mongodbDatabase).getCollection(mongodbCollection, Employee.class);
   }

}
Each application exposes REST endpoints for CRUD operations. Here’s controller implementation for employee-service.
@Controller("/employees")
public class EmployeeController {

   private static final Logger LOGGER = LoggerFactory.getLogger(EmployeeController.class);

   @Inject
   EmployeeRepository repository;

   @Post
   public Employee add(@Body Employee employee) {
      LOGGER.info("Employee add: {}", employee);
      return repository.add(employee);
   }

   @Get("/{id}")
   public Employee findById(Long id) {
      LOGGER.info("Employee find: id={}", id);
      return repository.findById(id);
   }

   @Get
   public List<Employee> findAll() {
      LOGGER.info("Employees find");
      return repository.findAll();
   }

   @Get("/department/{departmentId}")
   public List<Employee> findByDepartment(Long departmentId) {
      LOGGER.info("Employees find: departmentId={}", departmentId);
      return repository.findByDepartment(departmentId);
   }

   @Get("/organization/{organizationId}")
   public List<Employee> findByOrganization(Long organizationId) {
      LOGGER.info("Employees find: organizationId={}", organizationId);
      return repository.findByOrganization(organizationId);
   }

}
We may use Micronaut declarative HTTP client for communication with REST endpoints. We just need to create an interface annotated with @Client that declares calling methods.
@Client(id = "employee", path = "/employees")
public interface EmployeeClient {

   @Get("/department/{departmentId}")
   List<Employee> findByDepartment(Long departmentId);

}
It allows you to integrate Micronaut HTTP Clients with Kubernetes discovery in order to use the name of Kubernetes Endpoints as a service id. Then the client is injected into the controller. In the following code you may see the implementation of a controller in the department-service that uses EmployeeClient.
@Controller("/departments")
public class DepartmentController {

   private static final Logger LOGGER = LoggerFactory.getLogger(DepartmentController.class);

   private DepartmentRepository repository;
   private EmployeeClient employeeClient;

   DepartmentController(DepartmentRepository repository, EmployeeClient employeeClient) {
      this.repository = repository;
      this.employeeClient = employeeClient;
   }

   @Post
   public Department add(@Body Department department) {
      LOGGER.info("Department add: {}", department);
      return repository.add(department);
   }

   @Get("/{id}")
   public Department findById(Long id) {
      LOGGER.info("Department find: id={}", id);
      return repository.findById(id);
   }

   @Get
   public List<Department> findAll() {
      LOGGER.info("Department find");
      return repository.findAll();
   }

   @Get("/organization/{organizationId}")
   public List<Department> findByOrganization(Long organizationId) {
      LOGGER.info("Department find: organizationId={}", organizationId);
      return repository.findByOrganization(organizationId);
   }

   @Get("/organization/{organizationId}/with-employees")
   public List<Department> findByOrganizationWithEmployees(Long organizationId) {
      LOGGER.info("Department find: organizationId={}", organizationId);
      List<Department> departments = repository.findByOrganization(organizationId);
      departments.forEach(d -> d.setEmployees(employeeClient.findByDepartment(d.getId())));
      return departments;
   }

}
Discovery with Micronaut Kubernetes
Using serviceId for communication with Micronaut HTTP Client requires integration with service discovery. Since we are running our applications on Kubernetes we are going to use its service registry. Here comes Micronaut Kubernetes. It integrates Micronaut application and Kubernetes discovery via Endpoints object. First, let’s add the required dependency.
<dependency>
   <groupId>io.micronaut.kubernetes</groupId>
   <artifactId>micronaut-kubernetes-discovery-client</artifactId>
</dependency>
In fact we don’t have to do anything else, because after adding the required dependency integration with Kubernetes discovery is enabled. We may proceed to the deployment. In Kubernetes Service definition the field metadata.name should be the same as field id inside @Client annotation.
apiVersion: v1
kind: Service
metadata:
  name: employee
  labels:
    app: employee
spec:
  ports:
    - port: 8080
      protocol: TCP
  selector:
    app: employee
  type: NodePort
Here’s a YAML deployment manifest for Service employee. The container is exposed on port 8080 and uses the latest tag of image piomin/employee, which is set in Skaffold manifest.
apiVersion: apps/v1
kind: Deployment
metadata:
  name: employee
  labels:
    app: employee
spec:
  replicas: 1
  selector:
    matchLabels:
      app: employee
  template:
    metadata:
      labels:
        app: employee
    spec:
      containers:
        - name: employee
          image: piomin/employee
          ports:
            - containerPort: 8080
We can also increase log level for Kubernetes API client calls and for the whole Micronaut Kubernetes project to DEBUG. Here’s the fragment of our logback.xml.
<logger name="io.micronaut.http.client" level="DEBUG"/>
<logger name="io.micronaut.kubernetes" level="DEBUG"/>
Micronaut Kubernetes Discovery additionally allows us to filter the list of registered services. We may define the list of included or excluded services using property kubernetes.client.discovery.includes or kubernetes.client.discovery.excludes. Assuming we have many services registered in the same namespace, this feature may be applicable. Here’s the list of services registered in the default namespace after deploying all our sample microservices and MongoDB.

Since one of our applications department-service is communicating only with employee-service we may reduce the list of discovered services only to employee.
kubernetes:
  client:
    discovery:
      includes:
        - employee
Configuration Client
The Configuration client is reading Kubernetes ConfigMaps and Secrets, and making them available as PropertySources for your application. Since configuration parsing happens in the bootstrap phase, we need to define the following property in bootstrap.yml in order to enable distributed configuration clients.
micronaut:
  application:
    name: employee
  config-client:
    enabled: true
By default, the configuration client is reading all the ConfigMaps and Secrets for the configured namespace. You can filter the list of config map names by defining kubernetes.client.config-maps.includes or kubernetes.client.config-maps.excludes. Alternatively we may use Kubernetes labels, which give us more flexibility. This configuration also needs to be provided in the bootstrap phase. Reading Secrets is disabled by default. Therefore, we also need to enable it. Here’s the configuration for department-service, which is similar for all other apps.
kubernetes:
  client:
    config-maps:
      labels:
        - app: department
    secrets:
      enabled: true
      labels:
        - app: department
Kubernetes ConfigMap and Secret also need to be labeled with app=department.
apiVersion: v1
kind: ConfigMap
metadata:
  name: department
  labels:
    app: department
data:
  application.yaml: |-
    mongodb:
      collection: department
      database: admin
    kubernetes:
      client:
        discovery:
          includes:
            - employee
Here’s Secret definition for department-service. We configure there mongodb.uri property, which contains sensitive data like username or password. It is used by MongoClient for establishing connection with the server.
apiVersion: v1
kind: Secret
metadata:
  name: department
  labels:
    app: department
type: Opaque
data:
  mongodb.uri: bW9uZ29kYjovL21pY3JvbmF1dDptaWNyb25hdXRfMTIzQG1vbmdvZGI6MjcwMTcvYWRtaW4=
Running sample applications
Before running any application in default namespace we need to set the appropriate permissions. Micronaut Kubernetes requires read access to pods, endpoints, secrets, services and config maps. For development needs we may set the highest level of permissions by creating ClusterRoleBinding pointing to cluster-admin role.
$ kubectl create clusterrolebinding admin --clusterrole=cluster-admin --serviceaccount=default:default
One of useful Skaffold features is an ability to print standard output of the started container to a console. Thanks to that you don’t have to execute command kubectl logs on a pod. Let’s take a closer look on the logs during application startup. After increasing a level of logging we may find here some interesting information, for example client calls od Kubernetes API. As you see on the screen below our application tries to find ConfigMap and Secret with the label departament following configuration provided in bootstrap.yaml.

Let’s add some test data to our database by calling endpoints exposed by our applications running on Kubernetes. Each of them is exposed outside the node thanks to NodePort service type.
$ curl http://192.168.99.100:32356/employees -d '{"name":"John Smith","age":30,"position":"director","departmentId":2,"organizationId":2}' -H "Content-Type: application/json"
{"id":1,"organizationId":2,"departmentId":2,"name":"John Smith","age":30,"position":"director"}
$ curl http://192.168.99.100:32356/employees -d '{"name":"Paul Walker","age":50,"position":"director","departmentId":2,"organizationId":2}' -H "Content-Type: application/json"
{"id":2,"organizationId":2,"departmentId":2,"name":"Paul Walker","age":50,"position":"director"}
$ curl http://192.168.99.100:31144/departments -d '{"name":"Test2","organizationId":2}' -H "Content-Type: application/json"
{"id":2,"organizationId":2,"name":"Test2"}
Now, we can test HTTP communication between department-service and employee by calling method GET /organization/{organizationId}/with-employees that finds all departments with employees belonging to a given organization.
$ curl http://192.168.99.100:31144/departments/organization/2/with-employees
Here’s the current list of endpoints registered in the namespace default.

Let’s take a look on the Micronaut HTTP Client logs from department-service. As you see below when it tries to call endpoint GET /employees/department/{departmentId} it finds the container under IP 172.17.0.11.

Health checks
To enable health checks for Micronaut applications we first need to add the following dependency to Maven pom.xml.
<dependency>
    <groupId>io.micronaut</groupId>
    <artifactId>micronaut-management</artifactId>
</dependency>
Micronaut configuration module provides a health check that probes communication with the Kubernetes API, and shows some information about the pod and application. To enable a detailed view for unauthenticated users we need to set the following property.
endpoints:
  health:
    details-visible: ANONYMOUS
After that we can take advantage of quite detailed information about an application including MongoDB connection status or HTTP Client status as shown below. By default, a health check is available under path /health.

Conclusion
Our Micronaut Kubernetes example integrates with Kubernetes API in order to allow applications to read components responsible for discovery and configuration. Integration between Micronaut HTTP Client and Kubernetes Endpoints or between Micronaut Configuration Client and Kubernetes ConfigMap or Secret are useful features. I’m looking for some other interesting features which may be included in Micronaut Kubernetes, since it is a relatively new project within Micronaut. Before starting with Micronaut Kubernetes example you should learn about Micronaut basics: Micronaut Tutorial – Beans and Scopes.


Related Posts