Service mesh on Kubernetes with Istio and Spring Boot

Istio is currently the leading solution for building service mesh on Kubernetes. Thanks to Istio you can take control of a communication process between microservices. It also lets you secure and observe your services. Spring Boot is still the most popular JVM framework for building microservice applications. In this article, I’m going to show how to use both these tools to build applications and provide communication between them over HTTP on Kubernetes.
Example of Istio Spring Boot
For demonstrating usage of Istio and Spring Boot I created repository on GitHub with two sample applications: callme-service and caller-service. The address of this repository is https://github.com/piomin/sample-istio-services.git. The same repository has been used for my previous article about Istio: Service Mesh on Kubernetes with Istio in 5 steps. I moved this example to branch old_master, so if you for any reason would be interested in traffic management with a previous major version of Istio (0.X) please refer to that branch and article on my blog.
The source code is prepared to be used with Skaffold and Jib tools. Both these tools are simplifying development on local Kubernetes. All you need to do to use them is to download and install Skaffold, because the Jib plugin is already included in Maven pom.xml as shown below. For details about development using both these tools please refer to my article Local Java development on Kubernetes.
<plugin>
   <groupId>com.google.cloud.tools</groupId>
   <artifactId>jib-maven-plugin</artifactId>
   <version>2.1.0</version>
</plugin>
Installing Istio
To install Istio on your Kubernetes cluster you need to run two commands after downloading it. First of them is istioctl command.
$ istioctl manifest apply --set profile=demo
For executing a second command you also need to have kubectl tool. I was running my samples on Kubernetes with Docker Desktop, and I had to set 4 CPUs with 8GB RAM, which are recommended settings for testing Istio. Depending on the namespace, where you are deploying your applications you should run the following command. I’m using namespace default.
$ kubectl label namespace default istio-injection=enabled
Create Spring Boot applications
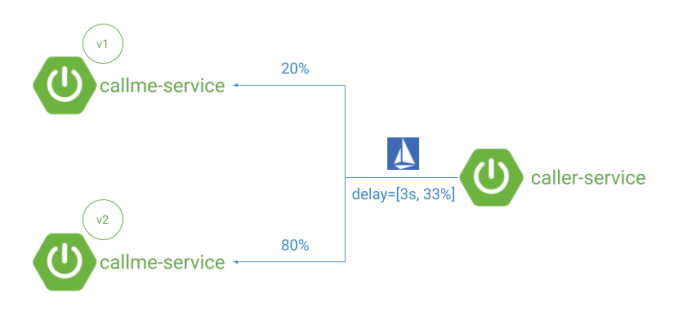
Now, let’s consider the architecture visible in the picture below. There are two running instances of application callme-service. These are two different versions of this application v1 and v2. In our case the only difference is in Deployment – not in the code. Application caller-service is communicating with callme-service. That traffic is managed by Istio, which sends 20% of requests to the v1 version of the application, and 80% to the v2 version. Tt also adds 3s delay to 33% of traffic.
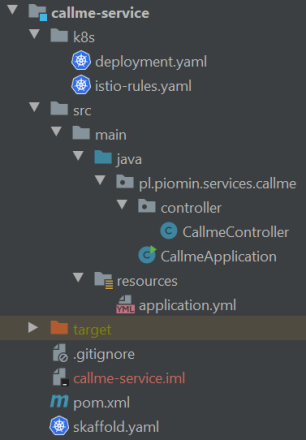
Here’s the structure of application callme-service.
Like I mentioned before there is no difference in the code, there is just a difference in the environment variables injected into the application. The implementation of Spring @Controller responsible for handling incoming HTTP requests is very simple. It just injects the value of environment variable VERSION and returns it a response from GET /ping endpoint.
@RestController
@RequestMapping("/callme")
public class CallmeController {

    private static final Logger LOGGER = LoggerFactory.getLogger(CallmeController.class);
    private static final String INSTANCE_ID = UUID.randomUUID().toString();
    private Random random = new Random();

    @Autowired
    BuildProperties buildProperties;
    @Value("${VERSION}")
    private String version;

    @GetMapping("/ping")
    public String ping() {
        LOGGER.info("Ping: name={}, version={}", buildProperties.getName(), version);
        return "I'm callme-service " + version;
    }

}
On the other side there is caller-service with the similar GET /ping endpoint that calls endpoint exposed by callme-service using Spring RestTemplate. It uses the name of Kubernetes Service as the address of the target application.
@RestController
@RequestMapping("/caller")
public class CallerController {

    private static final Logger LOGGER = LoggerFactory.getLogger(CallerController.class);

    @Autowired
    BuildProperties buildProperties;
    @Autowired
    RestTemplate restTemplate;
    @Value("${VERSION}")
    private String version;

    @GetMapping("/ping")
    public String ping() {
        LOGGER.info("Ping: name={}, version={}", buildProperties.getName(), version);
        String response = restTemplate.getForObject("http://callme-service:8080/callme/ping", String.class);
        LOGGER.info("Calling: response={}", response);
        return "I'm caller-service " + version + ". Calling... " + response;
    }

}
Deploy Spring Boot application on Kubernetes
We are creating two Deployment on Kubernetes for two different versions of the same application with names callme-service-v1 and callme-service-v2. For the fist of them we are injecting env to the container VERSION=v1, while for the second VERSION=v2.
apiVersion: apps/v1
kind: Deployment
metadata:
  name: callme-service-v1
spec:
  replicas: 1
  selector:
    matchLabels:
      app: callme-service
      version: v1
  template:
    metadata:
      labels:
        app: callme-service
        version: v1
    spec:
      containers:
        - name: callme-service
          image: piomin/callme-service
          imagePullPolicy: IfNotPresent
          ports:
            - containerPort: 8080
          env:
            - name: VERSION
              value: "v1"
---
apiVersion: apps/v1
kind: Deployment
metadata:
  name: callme-service-v2
spec:
  replicas: 1
  selector:
    matchLabels:
      app: callme-service
      version: v2
  template:
    metadata:
      labels:
        app: callme-service
        version: v2
    spec:
      containers:
        - name: callme-service
          image: piomin/callme-service
          imagePullPolicy: IfNotPresent
          ports:
            - containerPort: 8080
          env:
            - name: VERSION
              value: "v2"
---
apiVersion: v1
kind: Service
metadata:
  name: callme-service
  labels:
    app: callme-service
spec:
  type: ClusterIP
  ports:
  - port: 8080
    name: http
  selector:
    app: callme-service
Of course there is also caller-service. We also need to deploy it. But this time there is only a single Deployment.
apiVersion: apps/v1
kind: Deployment
metadata:
  name: caller-service
spec:
  replicas: 1
  selector:
    matchLabels:
      app: caller-service
  template:
    metadata:
      name: caller-service
      labels:
        app: caller-service
        version: v1
    spec:
      containers:
      - name: caller-service
        image: piomin/caller-service
        imagePullPolicy: IfNotPresent
        ports:
        - containerPort: 8080
        env:
          - name: VERSION
            value: "v1"
---
apiVersion: v1
kind: Service
metadata:
  name: caller-service
  labels:
    app: caller-service
spec:
  type: NodePort
  ports:
    - port: 8080
      name: http
  selector:
    app: caller-service
Istio rules
Finally, we are creating two Istio components DestinationRule and VirtualService. The callme-service-destination destination rule contains definitions of subsets based on label version from Deployment. The callme-service-route virtual service uses these rules and sets weight for each subset. Additionally it injects 3s delay to route for 33% of requests.
apiVersion: networking.istio.io/v1beta1
kind: DestinationRule
metadata:
  name: callme-service-destination
spec:
  host: callme-service
  subsets:
    - name: v1
      labels:
        version: v1
    - name: v2
      labels:
        version: v2
---
apiVersion: networking.istio.io/v1beta1
kind: VirtualService
metadata:
  name: callme-service-route
spec:
  hosts:
    - callme-service
  http:
    - route:
      - destination:
          host: callme-service
          subset: v2
        weight: 80
      - destination:
          host: callme-service
          subset: v1
        weight: 20
      fault:
        delay:
          percentage:
            value: 33
          fixedDelay: 3s
Since a delay is injected into the route by Istio, we have to set timeout on the client side (caller-service). To test that timeout on caller-service we can’t use port forwarding to call endpoint directly from the pod. It also won’t work if we call Kubernetes Service. That’s why we will also create Istio Gateway for caller-service. It is exposed on port 80 and it is using hostname caller.example.com.
apiVersion: networking.istio.io/v1beta1
kind: Gateway
metadata:
  name: caller-gateway
spec:
  selector:
    istio: ingressgateway
  servers:
    - port:
        number: 80
        name: http
        protocol: HTTP
      hosts:
        - "caller.example.com"
---
apiVersion: networking.istio.io/v1beta1
kind: DestinationRule
metadata:
  name: caller-service-destination
spec:
  host: caller-service
  subsets:
    - name: v1
      labels:
        version: v1
---
apiVersion: networking.istio.io/v1beta1
kind: VirtualService
metadata:
  name: caller-service-route
spec:
  hosts:
    - "caller.example.com"
  gateways:
    - caller-gateway
  http:
    - route:
        - destination:
            host: caller-service
            subset: v1
      timeout: 0.5s
Testing Istio Spring Boot communication
The fastest way of deploying an application is with Jib and Skaffold. First you go to directory callme-service and execute skaffold dev command with optional --port-forward parameter.
$ cd callme-service
$ skaffold dev --port-forward
Then do the same for caller-service.
$ cd caller-service
$ skaffold dev --port-forward
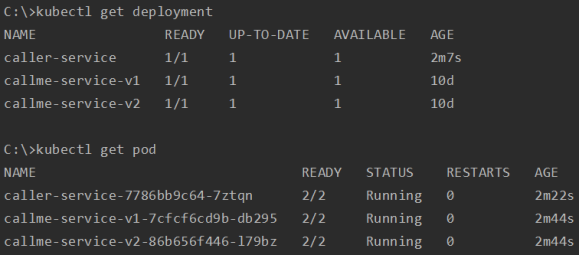
Our both applications should be succesfully built and deployed on Kubernetes. The Kubernetes and Istio manifests should be applied. Let’s check out the list of deployments and running pods.
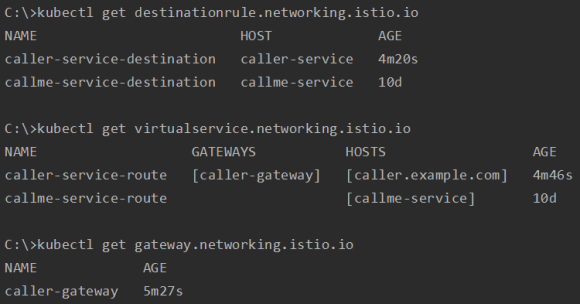
We can also verify a list of Istio components.
How can we access our Istio Ingress Gateway? Let’s take a look at its configuration.
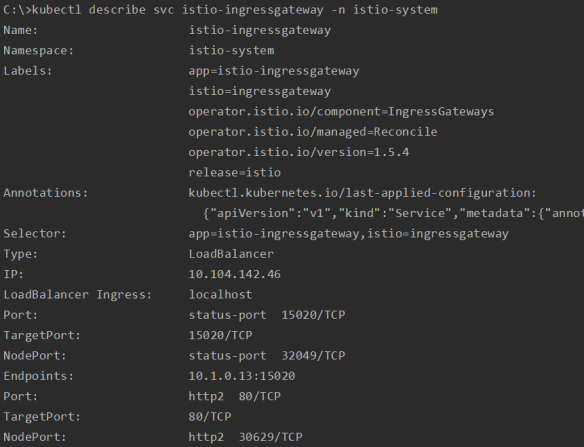
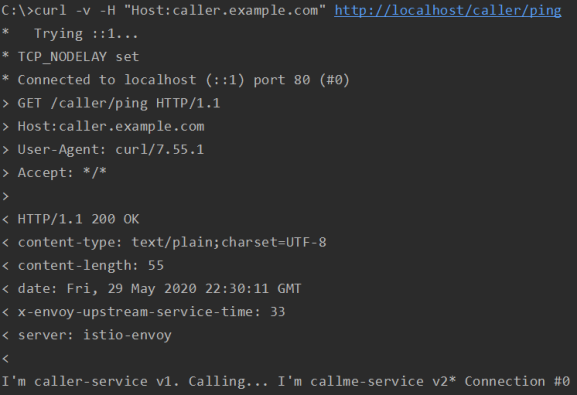
Ingress Gateway is available on localhost:80. We just need to set HTTP header Host during call on value taken from caller-gateway – caller.example.com. Here’s the successful call without any delay.
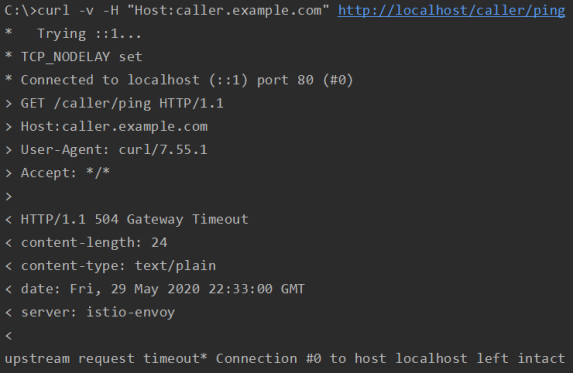
Here’s a call that has been delayed 3s on the callme-service side. Since we have set timeout to 0.5s on the caller-service it is finished with HTTP 504.
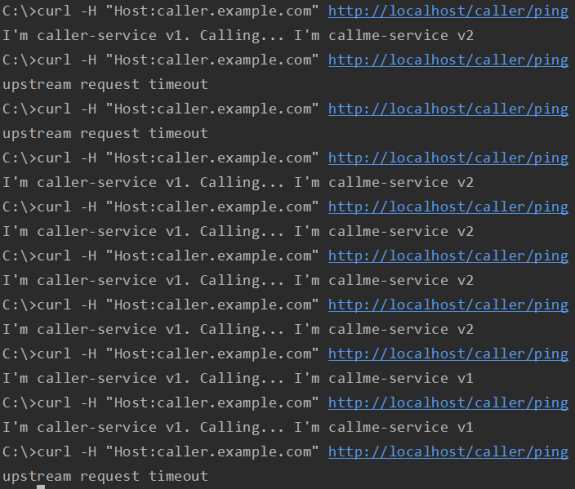
Now let’s perform some same calls in row. Because traffic from caller-service to callme-service is split 80% to 20% between v2 and v1 versions most of logs is I’m caller-service v1. Calling… I’m callme-service v2. Additionally around ⅓ of calls is finishing with 0.5s timeout.


Related Posts