Local Java Development on Kubernetes
There are many tools, which may simplify your local Java development on Kubernetes. For Java applications you may also take an advantage of integration between popular runtime frameworks and Kubernetes. In this article I’m going to present some of the available solutions.
Skaffold
Skaffold is a simple command-line tool that is able to handle the workflow for building, pushing and deploying your Java application on Kubernetes. It saves a lot of developer time by automating most of the work from source code to the deployment. It natively supports the most common image-building and application deployment strategies. Skaffold is an open-source project from Google. It is not the only one interesting tool from Google that may be used to help in local development on Kubernetes. Another one of them, Jib, is dedicated only for Java applications. It allows you to build optimized Docker and OCI images for your Java applications without a Docker daemon. It is available as Maven of Gradle plugin, or just as a Java library. With Jib you do not need to maintain a Dockerfile or even run a Docker daemon. It is also able to take advantage of image layering and registry caching to achieve fast, incremental builds. To use Jib during our application build we just need to include it to Maven pom.xml. We may easily customize the behaviour of Jib Maven Plugin by using properties inside configuration section. But for a standard Java application it is highly possible you could use default settings as shown below.
<plugin>
   <groupId>com.google.cloud.tools</groupId>
   <artifactId>jib-maven-plugin</artifactId>
   <version>1.8.0</version>
</plugin>
By default, Skaffold uses Dockerfile while building an image with our application. We may customize this behaviour to use Jib Maven Plugin instead of Dockerfile. We may do it by changing the Skaffold configuration file available in our project root directory – skaffold.yaml. We should also define there a name of the generated Docker image and its tagging policy.
apiVersion: skaffold/v2alpha1
kind: Config
build:
  artifacts:
    - image: piomin/department
       jib: {}
  tagPolicy:
    gitCommit: {}
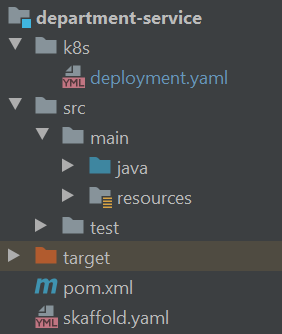
If your Kubernetes deployment manifest is located inside k8s directory and its name is deployment.yaml you don’t have to provide any additional configuration. Here’s a structure of our sample project that fulfills Skaffold requirements.
Assuming you have successfully run a Minikube instance on your local machine, you just need to run command skaffold dev in your root project directory. This command starts the process of building a Docker image with your application and then deploys it on Minikube. After that it watches for any change in your source code and triggers a new build after every change in the filesystem. There are some parameters, which may be used for customization. Option --port-forward is responsible for running command kubectl port-forward for all the ports exposed outside the container. We may also disable auto-build triggered after file change, and enable only manual mode that triggers build on demand. It may be especially useful, for example if you are using autosave mode in your IDE like IntelliJ. The last option used in the example of command visible below, --no-prune, is responsible for disable removal of images, containers and deployment created by Skaffold.
$ skaffold dev --port-forward --trigger=manual --no-prune
Another useful Skaffold command during development is skaffold debug. It is very similar to skaffold dev, but configures our pipeline for debugging. For Java applications it is running JWDP agent exposed on port 5005 outside the container. Then you may easily connect with the agent, for example using your IDE.
$ skaffold debug --port-forward --no-prune
I think the most suitable way to show you Skaffold in action is on video. Here’s a 9 minutes long movie that shows you how to use Skaffold for local Java development, running and debugging a Spring Boot application on Kubernetes.
[wpvideo 3Op96XNi]
Cloud Code
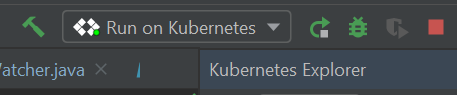
Not every developer likes command-line tools. At this point Google comes GUI tools, which may be easily installed as plugins on your IDEs: IntelliJ or Visual Studio Code. This set of tools called Cloud Code help you write, run, and debug cloud-native applications quickly and easily. Cloud Code uses Skaffold in background, but hides it behind two buttons available in your Run Configurations (IntelliJ): Develop on Kubernetes and Run on Kubernetes.
Develop on Kubernetes is running Skaffold in the default notify mode that triggers build after every change of file inside your project.

Develop on Kubernetes is running Skaffold in the manual mode that starts the build on demand after you click that button.
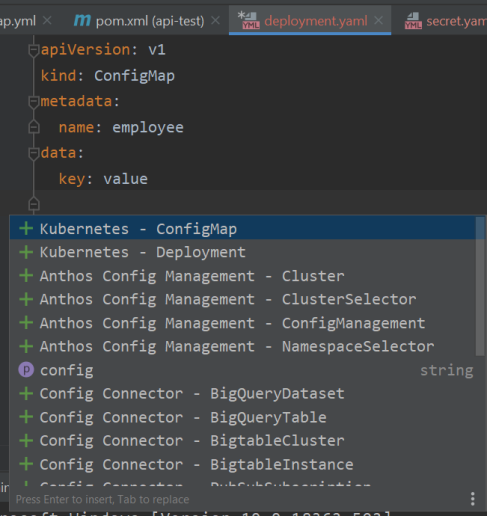
Cloud Cloud offers some other useful features. It provides an auto-completion for syntax inside Kubernetes YAML manifests.
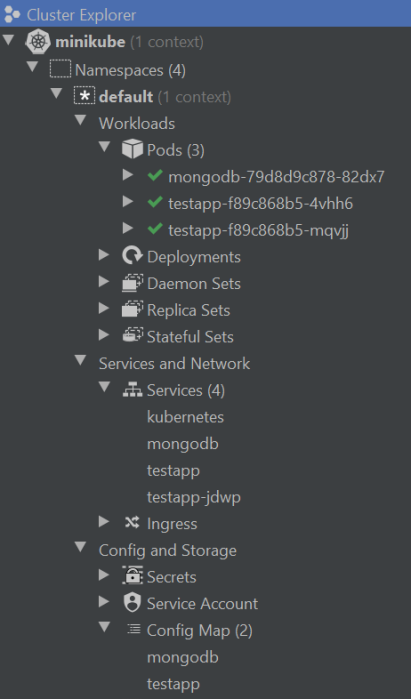
You may also display a graphical representation of your Kubernetes cluster as shown below.
Dekorate
We have already discussed some interesting tools for automating the deployment process beginning from a change in the source code to running an application on Kubernetes cluster (Minikube). Beginning from this section we will discuss interesting libraries and extensions to popular JVM frameworks, which helps you to speed-up your Java development on Kubernetes. First of them is Dekorate. Dekorate is a collection of compile time generators and decorators of Kubernetes manifests. It makes generating and decorating Kubernetes manifests as simple as adding a dependency to your project. It allows you to use well-known Java annotations style to define Kubernetes resources used by your application. It provides integration for Spring Boot and Quarkus frameworks.
To enable integration for your Spring Boot application you just need to include the following dependency to your Maven pom.xml.
<dependency>
  <groupId>io.dekorate</groupId>
  <artifactId>kubernetes-spring-starter</artifactId>
  <version>0.10.10</version>
</dependency>
Now, if you build your application using the Maven command visible below Dekorate is able to analyze your source code and generate Kubernetes manifest basing on that.
$ mvn clean install -Ddekorate.build=true -Ddekorate.deploy=true
Besides just an analysis of source code Dekarate allows to define Kubernetes resources using configuration files or annotations. The following code snippet shows you how to set 2 replicas of your application, expose it outside the cluster as route and refer to the existing ConfigMap on your OpenShift instance. You may also use @JvmOptions to set some JVM running parameters like maximum heap usage.
@SpringBootApplication
@OpenshiftApplication(replicas = 2, expose = true, envVars = {
        @Env(name="sample-app-config", configmap = "sample-app-config")
})
@JvmOptions(xms = 128, xmx = 256, heapDumpOnOutOfMemoryError = true)
@EnableSwagger2
public class SampleApp {

    public static void main(String[] args) {
        SpringApplication.run(SampleApp.class, args);
    }

}
Of course, I presented only a small set of options offered by Dekorate. You can also define Kubernetes labels, annotations, secrets, volumes and many more. For more details about using Dekorate with OpenShift you may in one of my previous articles Deploying Spring Boot Application on OpenShift with Dekorate.
Spring Cloud Kubernetes
If you are building your web applications on top of Spring Boot you should consider using Spring Cloud Kubernetes for integration with Kubernetes. Spring Cloud Kubernetes provides Spring Cloud common interface implementations that consume Kubernetes native services via master API. The main features of that project are:
- Kubernetes
PropertySourceimplementation including auto-reload of configuration afterConfigMaporSecretchange - Kubernetes native discovery with DiscoveryClient implementation including multi-namespace discovery
- Client side load balancing with Spring Cloud Netflix Ribbon
- Pod health indicator
If you would like to use both Spring Cloud Kubernetes Discovery and Config modules you should include the following property to your Maven pom.xml
<dependency>
   <groupId>org.springframework.cloud</groupId>
   <artifactId>spring-cloud-starter-kubernetes-all</artifactId>
</dependency>
<dependencyManagement>
   <dependencies>
      <dependency>
         <groupId>org.springframework.cloud</groupId>
         <artifactId>spring-cloud-dependencies</artifactId>
         <version>Hoxton.RELEASE</version>
         <type>pom</type>
         <scope>import</scope>
      </dependency>
   </dependencies>
</dependencyManagement>
After that discovery and configuration based on ConfigMap is enabled. If you also would like to use Secret<.code> as property source for the application you need to enable it in bootstrap.yml.
spring:
  application:
    name: department
  cloud:
    kubernetes:
      secrets:
        enableApi: true
The name of ConfigMap or Secret (property manifest.name) should be the same as the application name to use them without any configuration customization. Here’s sample ConfigMap for department application. It is managed by Spring Cloud Kubernetes without a necessity to inject it Deployment manifest.
apiVersion: v1
kind: ConfigMap
metadata:
  name: department
data:
  application.yml: |-
    spring:
     cloud:
      kubernetes:
        discovery:
          all-namespaces: true
    spring:
      data:
       mongodb:
        database: admin
        host: mongodb
Spring Cloud Kubernetes Discovery and Ribbon integration allows you to use any of Spring Rest Client to communicate with other services via name. Here’s the example of Spring Cloud OpenFeign usage.
@FeignClient(name = "employee")
public interface EmployeeClient {

   @GetMapping("/department/{departmentId}")
   List<Employee> findByDepartment(@PathVariable("departmentId") String departmentId);

}
Another useful Spring Cloud Kubernetes feature is an ability to reload configuration after change in ConfigMap or Secret. That’s a pretty amazing thing for a developer, because it is possible to refresh some beans without restarting the whole pod with application. However, you should keep in mind that configuration beans annotated with @ConfigurationProperties or @RefreshScope are reloaded. By default, this feature is disabled. To enable you should use the following property.
spring:
  cloud:
    kubernetes:
      reload:
        enabled: true
For more details about Spring Cloud Kubernetes including source code examples you may refer to my previous article Microservices with Spring Cloud Kubernetes.
Micronaut
Similar to Spring Boot, Micronaut provides a library for integration with Kubernetes. In comparison to Spring Cloud Kubernetes it additionally allows to read ConfigMap and Secret from mounted volumes and allows to enable filtering services by their name during discovery. To enable Kubernetes discovery for Micronaut applications we first to include the following library to our Maven pom.xml.
<dependency>
    <groupId>io.micronaut.kubernetes</groupId>
    <artifactId>micronaut-kubernetes-discovery-client</artifactId>
</dependency>
This module also allows us to use Micronaut HTTP Client with discovery by service name.
@Client(id = "employee", path = "/employees")
public interface EmployeeClient {

    @Get("/department/{departmentId}")
    List<Employee> findByDepartment(Long departmentId);

}
You don’t have to include any additional library to enable integration with Kubernetes PropertySource, since it is provided in Micronaut Config Client core library. You just need to enable it in application bootstrap.yml. Unlike Spring Boot, Micronaut uses labels instead of metada.name to match ConfigMap or Secret with application. After enabling Kubernetes config client, also configuration auto-reload feature is enabled. Here’s our bootstrap.yml file.
micronaut:
  application:
    name: department
  config-client:
    enabled: true
kubernetes:
  client:
    config-maps:
      labels:
        - app: department
    secrets:
      enabled: true
      labels:
        - app: department
Now, our ConfigMap also needs to be labeled with app=department.
apiVersion: v1
kind: ConfigMap
metadata:
  name: department
  labels:
    app: department
data:
  application.yaml: |-
    mongodb:
      collection: department
      database: admin
    kubernetes:
      client:
        discovery:
          includes:
            - employee
For more details about integration between Micronaut and Kubernetes you may refer to my article Guide to Micronaut Kubernetes.


Related Posts