Deploying Spring Boot Application on OpenShift with Dekorate
More advanced deployments to Kubernetes or OpenShift are a bit troublesome for developers. In comparison to Kubernetes OpenShift provides S2I (Source-2-Image) mechanism, which may help reduce the time required for preparation of application deployment descriptors. Although S2I is quite useful for developers, it solves only simple use cases and does not provide a unified approach to building deployment configuration from a source code. Dekorate (https://dekorate.io), the recently created open-source project, tries to solve that problem. This project seems to be very interesting. It appears to be confirmed by RedHat, which has already announced a decision on including Dekorate to Red Hat OpenShift Application Runtimes as a “Tech Preview”.
You can read more about it in this article: https://developers.redhat.com/blog/2019/08/15/how-to-use-dekorate-to-create-kubernetes-manifests.
How does it work?
Dekorate is a library that defines a set of annotation processors used for generating and decorating Kubernetes or OpenShift manifests. In fact, you just need to annotate your application main class properly and Dekorate will take care of everything else. To use this library you only have to include it in your Maven pom.xml as shown below.
<dependency>
   <groupId>io.dekorate</groupId>
   <artifactId>openshift-spring-starter</artifactId>
   <version>0.8.2</version>
</dependency>
The starter contains not only annotations and annotation processors that may be used on your application, but also support for generation during Maven build, which is executed during the compile phase. To enable Decorate during build you need to set property dekorate.build to true. You can also enable deployment by setting property dekorate.deploy to true as shown below.
$ mvn clean install -Ddekorate.build=true -Ddekorate.deploy=true
Dekorate supports OpenShift S2I. It generates ImageStream for builder and target application, and also BuildConfig resource. If you enable deploy mode it also generates deployment config with required resources. Here’s the screen with logs from Maven build executed on my local machine.
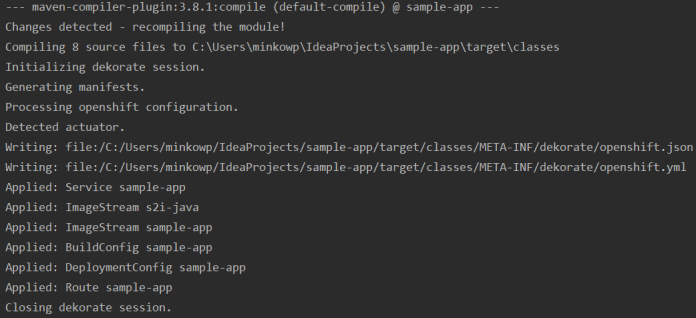
In this case Dekorate is generating OpenShift manifest files and saves them inside directory target/classes/META-INF/dekorate/, and then performing deployment on my instance of Minishift available under virtual address 192.168.99.100.
Unfortunately, we have to modify generated BuildConfig for our convenience. So instead of source type Binary we will just declare Git source repository address.
apiVersion: "build.openshift.io/v1"
kind: "BuildConfig"
metadata:
  labels:
    app: "sample-app"
    version: "1.1.0"
    group: "minkowp"
  name: "sample-app"
spec:
  output:
    to:
      kind: "ImageStreamTag"
      name: "sample-app:1.1.0"
  source:
    git:
      uri: 'https://github.com/piomin/sample-app.git'
    type: Git
  strategy:
    sourceStrategy:
      from:
        kind: "ImageStreamTag"
        name: "s2i-java:2.3"
In order to apply the changes execute the following commands:
$ oc delete bc sample-app
$ oc apply -f build-config-dekorate.yaml
Customization
If you have Spring Boot applications it is possible to completely bypass annotations by utilizing already-existing, framework-specific metadata. To customize the generated manifests you can add dekorate properties to your application.yml or application.properties descriptors. I have some problems running these modes with Dekorate, so I avoided it. However, I prefer using annotations on the code, so I prepared the following configuration, which has been successfully generated:
@SpringBootApplication
@OpenshiftApplication(replicas = 2, expose = true, envVars = {
        @Env(name="sample-app-config", configmap = "sample-app-config")
})
@JvmOptions(xms = 128, xmx = 256, heapDumpOnOutOfMemoryError = true)
@EnableSwagger2
public class SampleApp {

    public static void main(String[] args) {
        SpringApplication.run(SampleApp.class, args);
    }

    // ... REST OF THE CODE
}
In the fragment of code visible above we have declared some useful settings for the application. First, it should be run in two pods (replicas=2). It also should be exposed outside a cluster using OpenShift route (expose=true). The application uses Kubernetes ConfigMap as a source of dynamically managed configuration settings. By annotating the main class with @JvmOptions we may customize the behavior of JVM running on the container, for example by setting maximum heap memory consumption. Here’s the definition of ConfigMap created for the test purpose:
apiVersion: v1
kind: ConfigMap
metadata:
  name: sample-app-config
  namespace: myproject
data:
  showAddress: 'true'
  showContactInfo: 'true'
  showSocial: 'false'
Sample Application
The sample application code snippet is available on GitHub under repository https://github.com/piomin/sample-app.git. This very basic Spring Boot web application exposes a simple REST API with some monitoring endpoints included with Spring Boot Actuator and API documentation generated using Swagger.
<dependency>
   <groupId>org.springframework.boot</groupId>
   <artifactId>spring-boot-starter-web</artifactId>
</dependency>
<dependency>
   <groupId>org.springframework.boot</groupId>
   <artifactId>spring-boot-starter-actuator</artifactId>
</dependency>
<dependency>
   <groupId>io.springfox</groupId>
   <artifactId>springfox-swagger2</artifactId>
   <version>2.9.2</version>
</dependency>
<dependency>
   <groupId>io.springfox</groupId>
   <artifactId>springfox-swagger-ui</artifactId>
   <version>2.9.2</version>
</dependency>
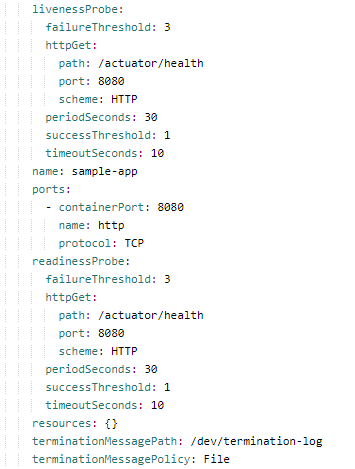
Dekorate is able to automatically detect existence of Spring Boot Actuator dependency and based on it generate OpenShift readiness and liveness healthchecks definitions as shown below. By default it sets timeout on 10 seconds, and period on 30 seconds. We can override a default behaviour using fields liveness and readiness of @OpenshiftApplication.
The controller class provides implementation for some basic CRUD REST operations. It also injects some environment variables taken from ConfigMap sample-app-config. Based on their values it decides whether to show or not to show additional person parameters like address, contact information or social links. Here’s an implementation of PersonController:
@RestController
@RequestMapping("/persons")
public class PersonsController {

    private static final Logger LOGGER = LoggerFactory.getLogger(PersonsController.class);

    @Autowired
    PersonRepository repository;

    @Value(value = "${showAddress:false}")
    boolean showAddress;
    @Value(value = "${showContactInfo:false}")
    boolean showContactInfo;
    @Value(value = "${showSocial:false}")
    boolean showSocial;

    @PostMapping
    public Person add(@RequestBody Person person) {
        LOGGER.info("Person add: {}", person);
        return repository.add(person);
    }

    @GetMapping("/{id}")
    public Person findById(@PathVariable("id") Integer id) {
        LOGGER.info("Person find: id={}", id);
        return hidePersonParams(repository.findById(id));
    }

    @GetMapping
    public List<Person> findAll() {
        LOGGER.info("Person find");
        return repository.findAll().stream().map(this::hidePersonParams).collect(Collectors.toList());
    }

    private Person hidePersonParams(Person person) {
        if (!showAddress)
            person.setAddress(null);
        if (!showContactInfo)
            person.setContact(null);
        if (!showSocial)
            person.setSocial(null);
        return person;
    }
}
Here’s an implementation of a model class. I used the Lombok library for getters, setters, and constructor generation.
@Getter
@Setter
@NoArgsConstructor
@AllArgsConstructor
@JsonInclude(JsonInclude.Include.NON_NULL)
public class Person {

    private Integer id;
    private String name;
    private int age;
    private Gender gender;
    private Address address;
    private Contact contact;
    private Social social;

}
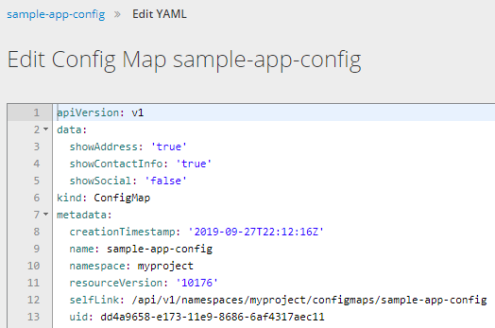
Here’s a definition of ConfigMap sample-app-config on my instance of Minishift.
Deployment
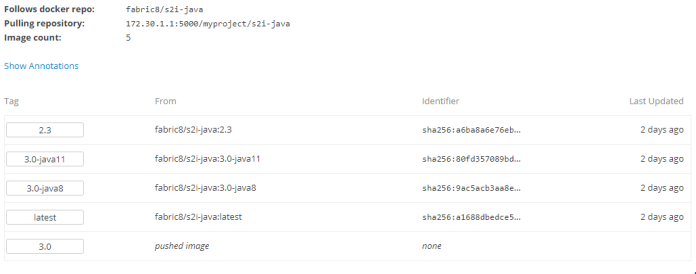
The current version of Dekorate uses fabric/s2i-java in version 2.3 as a builder image. It creates ImageStream without any tags, so we have the Docker image from docker.io manually by executing the following command:
$ oc import-image fabric/s2i-java:2.3
This commands forces to download some additional versions of a builder image including the newest version for JDK 11. The library still uses the older version of s2i-java image although we have declared JDK 11 as a default version in pom.xml. In this example we can see that Dekorate has still some things to improve 🙂
Assuming we have already performed all the required steps described in the previous sections of this article we may start OpenShift build by running the following command:
$ oc start-build sample-app
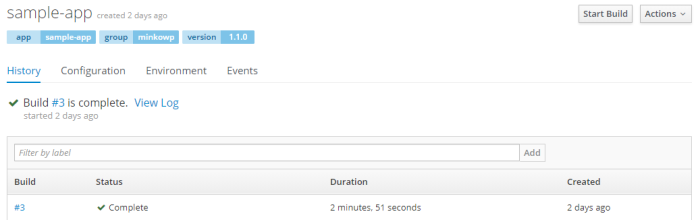
The build should be finished successfully as shown below.
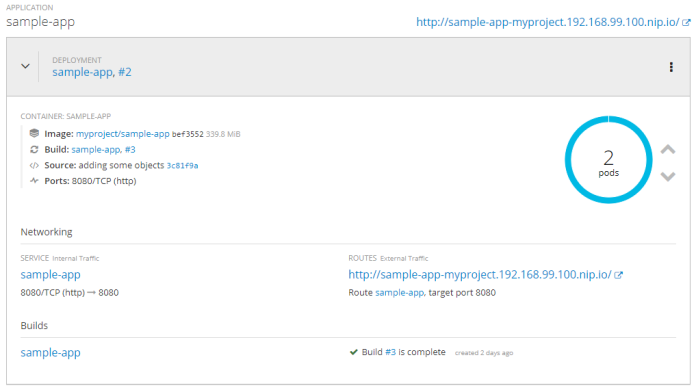
After successful build the new image is pushed to OpenShift registry. It triggers the start of a new deployment of our application. As you see on the picture below our application is started in two instances, and the route is created automatically.
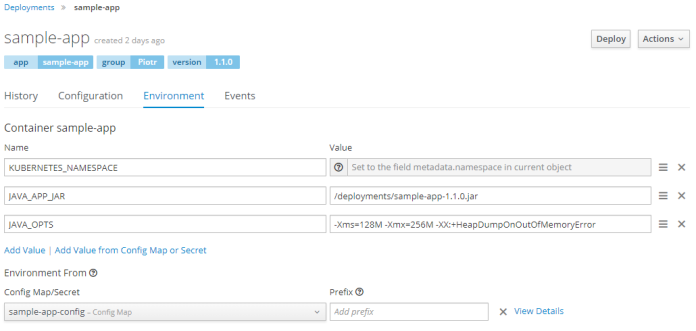
We can also take a look at environment settings. JVM options have been set, and ConfigMap has been assigned to the deployment config.
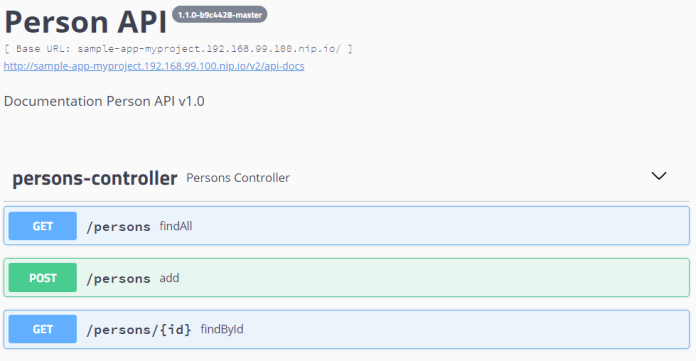
Finally we may test the sample application. The Swagger API documentation is available under address http://sample-app-myproject.192.168.99.100.nip.io/swagger-ui.html.
Conclusion
I think it is a great idea to use Java annotations for customizing application deployment on Kubernetes/OpenShift. Using Dekorate with frameworks based on annotation processing like Spring Boot greatly simplifies the deployment process for developers. Although the library is in the early stage of development and still has some things to improve I definitely recommend using it. In this article, I’m trying to give you some tips for a quick start. Enjoy 🙂


Related Posts