Logging with Spring Boot and Elastic Stack

In this article I’ll introduce my library for Spring Boot request and response logging designed especially for Spring Boot RESTful web application. The main assumptions regarding this library are:
- Logging all incoming HTTP requests and outgoing HTTP responses with full body
- Integration with Elastic Stack through Logstash using
logstash-logback-encoderlibrary - Possibility for enabling logging on a client-side for most commonly used components in Spring Boot application:
RestTemplateandOpenFeign - Generating and propagating correlationId across all communication within a single API endpoint call
- Calculating and storing execution time for each request
- A library should be auto-configurable – you don’t have to do anything more than including it as a dependency to your application to make it work
Motivation for request and response logging
I guess that after reading the preface to that article you may ask why I decided to build such a library, while Spring Boot has such features. But the question is if it really has these features? It may be quite surprisingly, but the answer is no. While you may easily log HTTP requests using some built-in Spring components like CommonsRequestLoggingFilter, you don’t have any out-of-the-box mechanism for logging response body. Of course you may implement your own custom solution based Spring HTTP interceptor (HandlerInterceptorAdapter) or filter (OncePerRequestFilter), but that is no so simple as you might think. The second option is to use Zalando Logbook, which is an extensible Java library to enable complete request and response logging for different client-side and server-side technologies. It is a very interesting library dedicated especially for logging HTTP requests and responses, that provides many customization options and supports different clients. So, for more advanced you may always use this library.
My goal is to create a simple library that not only log requests and responses, but provides auto-configuration for sending these logs to Logstash and correlating them. It will also generate automatically some valuable statistics like time of request processing. All such values should be sent to Logstash. Let’s proceed to the implementation.
Implementation of Spring Boot logging library
Let’s start with dependencies. We need some basic Spring libraries, which are included to spring-web, and spring-context that provides some additional annotations. For integration with Logstash we use logstash-logback-encoder library. Slf4j contains abstraction for logging, while javax.servlet-api for HTTP communication. Commons IO is not required, but it offers some useful methods for manipulating input and output streams.
<properties>
   <java.version>11</java.version>
   <commons-io.version>2.6</commons-io.version>
   <javax-servlet.version>4.0.1</javax-servlet.version>
   <logstash-logback.version>5.3</logstash-logback.version>
   <spring.version>5.1.6.RELEASE</spring.version>
   <slf4j.version>1.7.26</slf4j.version>
</properties>
<dependencies>
   <dependency>
      <groupId>org.springframework</groupId>
      <artifactId>spring-context</artifactId>
      <version>${spring.version}</version>
   </dependency>
   <dependency>
      <groupId>org.springframework</groupId>
      <artifactId>spring-web</artifactId>
      <version>${spring.version}</version>
   </dependency>
   <dependency>
      <groupId>net.logstash.logback</groupId>
      <artifactId>logstash-logback-encoder</artifactId>
      <version>${logstash-logback.version}</version>
   </dependency>
   <dependency>
      <groupId>javax.servlet</groupId>
      <artifactId>javax.servlet-api</artifactId>
      <version>${javax-servlet.version}</version>
      <scope>provided</scope>
   </dependency>
   <dependency>
      <groupId>commons-io</groupId>
      <artifactId>commons-io</artifactId>
      <version>${commons-io.version}</version>
   </dependency>
   <dependency>
      <groupId>org.slf4j</groupId>
      <artifactId>slf4j-api</artifactId>
      <version>${slf4j.version}</version>
   </dependency>
</dependencies>
The first step is to implement HTTP request and response wrappers. We have to do it because it is not possible to read the HTTP stream twice. If you would like to log the request or response body, you first have to read the input stream before processing or the output stream before returning it to the client. Spring provides an implementation of an HTTP request and response wrappers, but for unknown reasons they support only some specific use cases like content type application/x-www-form-urlencoded. Because we usually use application/json content type in the communication between RESTful applications Spring ContentCachingRequestWrapper and ContentCachingResponseWrapper won’t be useful here.
Here’s my implementation of the HTTP request wrapper. This can be done in various ways. This is just one of them:
public class SpringRequestWrapper extends HttpServletRequestWrapper {

    private byte[] body;

    public SpringRequestWrapper(HttpServletRequest request) {
        super(request);
        try {
            body = IOUtils.toByteArray(request.getInputStream());
        } catch (IOException ex) {
            body = new byte[0];
        }
    }

    @Override
    public ServletInputStream getInputStream() throws IOException {
        return new ServletInputStream() {
            public boolean isFinished() {
                return false;
            }

            public boolean isReady() {
                return true;
            }

            public void setReadListener(ReadListener readListener) {

            }

            ByteArrayInputStream byteArray = new ByteArrayInputStream(body);

            @Override
            public int read() throws IOException {
                return byteArray.read();
            }
        };
    }
}
The same thing has to be done for the output stream. This implementation is a little bit more complicated:
public class SpringResponseWrapper extends HttpServletResponseWrapper {

   private ServletOutputStream outputStream;
   private PrintWriter writer;
   private ServletOutputStreamWrapper copier;

   public SpringResponseWrapper(HttpServletResponse response) throws IOException {
      super(response);
   }

   @Override
   public ServletOutputStream getOutputStream() throws IOException {
      if (writer != null) {
         throw new IllegalStateException("getWriter() has already been called on this response.");
      }

      if (outputStream == null) {
         outputStream = getResponse().getOutputStream();
         copier = new ServletOutputStreamWrapper(outputStream);
      }

      return copier;
   }

   @Override
   public PrintWriter getWriter() throws IOException {
      if (outputStream != null) {
         throw new IllegalStateException("getOutputStream() has already been called on this response.");
      }

      if (writer == null) {
         copier = new ServletOutputStreamWrapper(getResponse().getOutputStream());
         writer = new PrintWriter(new OutputStreamWriter(copier, getResponse().getCharacterEncoding()), true);
      }

      return writer;
   }

   @Override
   public void flushBuffer() throws IOException {
      if (writer != null) {
         writer.flush();
      }
      else if (outputStream != null) {
         copier.flush();
      }
   }

   public byte[] getContentAsByteArray() {
      if (copier != null) {
         return copier.getCopy();
      }
      else {
         return new byte[0];
      }
   }

}
I moved the implementation out ServletOutputStream wrapper into the separated class:
public class ServletOutputStreamWrapper extends ServletOutputStream {

   private OutputStream outputStream;
   private ByteArrayOutputStream copy;

   public ServletOutputStreamWrapper(OutputStream outputStream) {
      this.outputStream = outputStream;
      this.copy = new ByteArrayOutputStream();
   }

   @Override
   public void write(int b) throws IOException {
      outputStream.write(b);
      copy.write(b);
   }

   public byte[] getCopy() {
      return copy.toByteArray();
   }

   @Override
   public boolean isReady() {
      return true;
   }

   @Override
   public void setWriteListener(WriteListener writeListener) {

   }
}
Because we need to wrap both HTTP request stream and response stream before processing we should use an HTTP filter for that. Spring provides their own implementation of an HTTP filter. Out filter is extending it and uses custom request and response wrappers to log payloads. Additionally it generates and sets X-Request-ID, X-Correlation-ID headers, and request processing time.
public class SpringLoggingFilter extends OncePerRequestFilter {

    private static final Logger LOGGER = LoggerFactory.getLogger(SpringLoggingFilter.class);
    private UniqueIDGenerator generator;

    public SpringLoggingFilter(UniqueIDGenerator generator) {
        this.generator = generator;
    }

    protected void doFilterInternal(HttpServletRequest request, HttpServletResponse response, FilterChain chain) throws ServletException, IOException {
        generator.generateAndSetMDC(request);
        final long startTime = System.currentTimeMillis();
        final SpringRequestWrapper wrappedRequest = new SpringRequestWrapper(request);
        LOGGER.info("Request: method={}, uri={}, payload={}", wrappedRequest.getMethod(),
                wrappedRequest.getRequestURI(), IOUtils.toString(wrappedRequest.getInputStream(),
                wrappedRequest.getCharacterEncoding()));
        final SpringResponseWrapper wrappedResponse = new SpringResponseWrapper(response);
        wrappedResponse.setHeader("X-Request-ID", MDC.get("X-Request-ID"));
        wrappedResponse.setHeader("X-Correlation-ID", MDC.get("X-Correlation-ID"));
        chain.doFilter(wrappedRequest, wrappedResponse);
        final long duration = System.currentTimeMillis() - startTime;
        LOGGER.info("Response({} ms): status={}, payload={}", value("X-Response-Time", duration),
                value("X-Response-Status", wrappedResponse.getStatus()),
                IOUtils.toString(wrappedResponse.getContentAsByteArray(), wrappedResponse.getCharacterEncoding()));
    }
}
Auto-configuration
Once we have finished an implementation of wrappers and HTTP filter, we may prepare auto-configuration for our library. The first step is to create @Configuration that contains all the required beans. We have to register our custom HTTP filter SpringLoggingFilter, the logger appender for integration with Logstash and RestTemplate with HTTP client interceptor:
@Configuration
public class SpringLoggingAutoConfiguration {

   private static final String LOGSTASH_APPENDER_NAME = "LOGSTASH";

   @Value("${spring.logstash.url:localhost:8500}")
   String url;
   @Value("${spring.application.name:-}")
   String name;

   @Bean
   public UniqueIDGenerator generator() {
      return new UniqueIDGenerator();
   }

   @Bean
   public SpringLoggingFilter loggingFilter() {
      return new SpringLoggingFilter(generator());
   }

   @Bean
   public RestTemplate restTemplate() {
      RestTemplate restTemplate = new RestTemplate();
      List<ClientHttpRequestInterceptor> interceptorList = new ArrayList<ClientHttpRequestInterceptor>();
      restTemplate.setInterceptors(interceptorList);
      return restTemplate;
   }

   @Bean
   public LogstashTcpSocketAppender logstashAppender() {
      LoggerContext loggerContext = (LoggerContext) LoggerFactory.getILoggerFactory();
      LogstashTcpSocketAppender logstashTcpSocketAppender = new LogstashTcpSocketAppender();
      logstashTcpSocketAppender.setName(LOGSTASH_APPENDER_NAME);
      logstashTcpSocketAppender.setContext(loggerContext);
      logstashTcpSocketAppender.addDestination(url);
      LogstashEncoder encoder = new LogstashEncoder();
      encoder.setContext(loggerContext);
      encoder.setIncludeContext(true);
      encoder.setCustomFields("{\"appname\":\"" + name + "\"}");
      encoder.start();
      logstashTcpSocketAppender.setEncoder(encoder);
      logstashTcpSocketAppender.start();
      loggerContext.getLogger(Logger.ROOT_LOGGER_NAME).addAppender(logstashTcpSocketAppender);
      return logstashTcpSocketAppender;
   }

}
The configuration set inside the library has to be loaded by Spring Boot. Spring Boot checks for the presence of a META-INF/spring.factories file within your published jar. The file should list your configuration classes under the EnableAutoConfiguration key:
org.springframework.boot.autoconfigure.EnableAutoConfiguration=\
pl.piomin.logging.config.SpringLoggingAutoConfiguration
Integration with Logstash
Integration with Logstash is realized through auto-configured logging appender. We can override Logstash destination URL by setting property spring.logstash.url in application.yml file;
spring:
  application:
    name: sample-app
  logstash:
    url: 192.168.99.100:5000
To enable all the features described in this article in your application you just need to include my library to the dependencies:
<dependency>
   <groupId>pl.piomin</groupId>
   <artifactId>spring-boot-logging</artifactId>
   <version>1.0-SNAPSHOT</version>
</dependency>
Before running your application you should start Elastic Stack tools on your machine. The best way to do that is through Docker containers. But first let’s create a Docker network to enable communication between containers via container name.
$ docker network create es
Now, let’s start a single node instance of Elasticsearch exposed on port 9200. I use version6.7.2 of Elastic Stack tools :
$ docker run -d --name elasticsearch --net es -p 9200:9200 -p 9300:9300 -e "discovery.type=single-node" elasticsearch:6.7.2
When running Logstash we need to provide an additional configuration that contains input and output definitions. We will start TCP input with JSON codec, which is not enabled by default. Elasticsearch URL is set as an output. It will also create an index containing the name of the application.
input {
  tcp {
    port => 5000
    codec => json
  }
}
output {
  elasticsearch {
    hosts => ["http://elasticsearch:9200"]
    index => "micro-%{appname}"
  }
}
Now we can start Docker container with Logstash. It is exposed on port 5000 and reads configuration from logstash.conf file:
docker run -d --name logstash --net es -p 5000:5000 -v ~/logstash.conf:/usr/share/logstash/pipeline/logstash.conf docker.elastic.co/logstash/logstash:6.7.2
Finally, we can run Kibana, which used just for displaying logs:
$ docker run -d --name kibana --net es -e "ELASTICSEARCH_URL=http://elasticsearch:9200" -p 5601:5601 docker.elastic.co/kibana/kibana:6.7.2
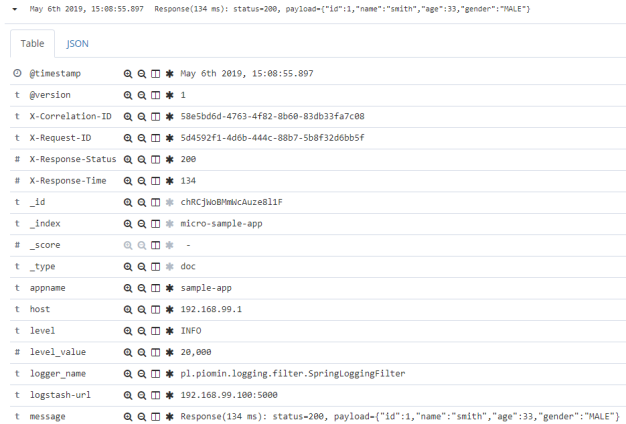
After starting my sample application that uses spring-boot-logging library the logs from POST requests are displayed in Kibana as shown below:
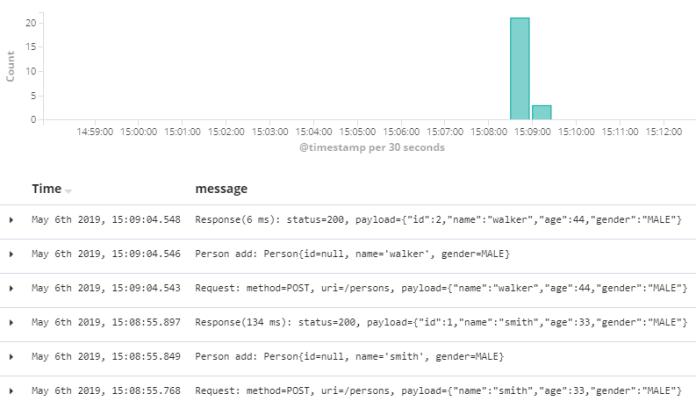
Each entry with response log contains X-Correlation-ID, X-Request-ID, X-Response-Time and X-Response-Status headers.
Summary
My Spring logging library is available on GitHub in the repository https://github.com/piomin/spring-boot-logging.git. I’m still working on it, so any feedback or suggestions are very welcome. This library is dedicated for use in microservices-based architecture, where your applications may be launched in many instances inside containers. In this model, storing logs in the files does not have any sense. That’s why integration with Elastic Stack is very important.
But the most important feature of this library is to log HTTP request/response with full body and some additional information to this log like correlation id or request processing time. The library is really simple, small, and everything is done out-of-the-box after including it in your application.


Related Posts