Quick Guide to Microservices with Quarkus on Openshift

In this article I will show you how to use the Quarkus OpenShift module. Quarkus is a framework for building Java applications in times of microservices and serverless architectures. If you compare it with other frameworks like Spring Boot / Spring Cloud or Micronaut, the first difference is native support for running on Kubernetes or Openshift platforms. It is built on top of well-known Java standards like CDI, JAX-RS, and Eclipse MicroProfile which also distinguishes it from Spring Boot or Micronaut.
Some other features that may convince you to use Quarkus are extremely fast boot time, minimal memory footprint optimized for running in containers, and lower time-to-first-request. Also, even though it is a relatively new framework, it has a lot of extensions including support for Hibernate, Kafka, RabbitMQ, OpenApi, Vert.x, and many more.
I’m going to guide you through building microservices with Quarkus and running them on OpenShift 4. We will cover the following topics:
- Building REST-based application with input validation
- Communication between microservices with
RestClient - Exposing health checks (liveness, readiness)
- Exposing OpenAPI/Swagger documentation
- Running applications on the local machine with Quarkus Maven plugin
- Testing with JUnit and RestAssured
- Deploying and running Quarkus applications on OpenShift using source-2-image
 Source code
The source code of application is available on GitHub: https://github.com/piomin/sample-quarkus-microservices.git.
If you are interested in more materials related to Quarkus framework you can read my previous articles about it. In the article Guide to Quarkus with Kotlin I’m showing how to build a simple REST-based application written in Kotlin. In the article Guide to Quarkus on Kubernetes, I’m showing how to deploy it using Quarkus built-in support for Kubernetes.
1. Dependencies required for Quarkus OpenShift
When creating a new application you may execute a single Maven command that uses quarkus-maven-plugin. A list of dependencies should be declared in parameter -Dextensions.
mvn io.quarkus:quarkus-maven-plugin:1.7.0.Final:create \
    -DprojectGroupId=pl.piomin.services \
    -DprojectArtifactId=employee-service \
    -DclassName="pl.piomin.services.employee.controller.EmployeeController" \
    -Dpath="/employees" \
    -Dextensions="resteasy-jackson, hibernate-validator"
Here’s the structure of our pom.xml:
<properties>
   <quarkus.version>1.7.0.Final</quarkus.version>
   <project.build.sourceEncoding>UTF-8</project.build.sourceEncoding>
   <maven.compiler.source>11</maven.compiler.source>
   <maven.compiler.target>11</maven.compiler.target>
</properties>
<dependencyManagement>
   <dependencies>
      <dependency>
         <groupId>io.quarkus</groupId>
         <artifactId>quarkus-bom</artifactId>
         <version>${quarkus.version}</version>
         <type>pom</type>
         <scope>import</scope>
      </dependency>
   </dependencies>
</dependencyManagement>
<build>
   <plugins>
      <plugin>
         <groupId>io.quarkus</groupId>
         <artifactId>quarkus-maven-plugin</artifactId>
         <version>${quarkus.version}</version>
         <executions>
            <execution>
               <goals>
                  <goal>build</goal>
               </goals>
            </execution>
         </executions>
      </plugin>
   </plugins>
</build>
For building a simple REST-based application with input validation we don’t need to include many modules. As you have probably noticed I declared just two extensions, which is the same as the following list of dependencies in Maven pom.xml:
<dependency>
   <groupId>io.quarkus</groupId>
   <artifactId>quarkus-resteasy-jackson</artifactId>
</dependency>
<dependency>
   <groupId>io.quarkus</groupId>
   <artifactId>quarkus-hibernate-validator</artifactId>
</dependency>
2. Source code
What might be a bit surprising for Spring Boot or Micronaut users there is no main, runnable class with static javax.ws.rs library. Here’s the implementation of REST controller inside employee-service:
@Path("/employees")
@Produces(MediaType.APPLICATION_JSON)
public class EmployeeController {

   private static final Logger LOGGER = LoggerFactory.getLogger(EmployeeController.class);

   @Inject
   EmployeeRepository repository;

   @POST
   public Employee add(@Valid Employee employee) {
      LOGGER.info("Employee add: {}", employee);
      return repository.add(employee);
   }

   @Path("/{id}")
   @GET
   public Employee findById(@PathParam("id") Long id) {
      LOGGER.info("Employee find: id={}", id);
      return repository.findById(id);
   }

   @GET
   public Set<Employee> findAll() {
      LOGGER.info("Employee find");
      return repository.findAll();
   }

   @Path("/department/{departmentId}")
   @GET
   public Set<Employee> findByDepartment(@PathParam("departmentId") Long departmentId) {
      LOGGER.info("Employee find: departmentId={}", departmentId);
      return repository.findByDepartment(departmentId);
   }

   @Path("/organization/{organizationId}")
   @GET
   public Set<Employee> findByOrganization(@PathParam("organizationId") Long organizationId) {
      LOGGER.info("Employee find: organizationId={}", organizationId);
      return repository.findByOrganization(organizationId);
   }

}
We use CDI for dependency injection and SLF4J for logging. The controller class uses an in-memory repository bean for storing and retrieving data. Repository bean is annotated with CDI @ApplicationScoped and injected into the controller:
public class EmployeeRepository {

   private Set<Employee> employees = new HashSet<>();

   public EmployeeRepository() {
      add(new Employee(1L, 1L, "John Smith", 30, "Developer"));
      add(new Employee(1L, 1L, "Paul Walker", 40, "Architect"));
   }

   public Employee add(Employee employee) {
      employee.setId((long) (employees.size()+1));
      employees.add(employee);
      return employee;
   }

   public Employee findById(Long id) {
      Optional<Employee> employee = employees.stream()
            .filter(a -> a.getId().equals(id))
            .findFirst();
      if (employee.isPresent())
         return employee.get();
      else
         return null;
   }

   public Set<Employee> findAll() {
      return employees;
   }

   public Set<Employee> findByDepartment(Long departmentId) {
      return employees.stream()
            .filter(a -> a.getDepartmentId().equals(departmentId))
            .collect(Collectors.toSet());
   }

   public Set<Employee> findByOrganization(Long organizationId) {
      return employees.stream()
            .filter(a -> a.getOrganizationId().equals(organizationId))
            .collect(Collectors.toSet());
   }

}
And the last component is domain class with validation:
public class Employee {

   private Long id;
   @NotNull
   private Long organizationId;
   @NotNull
   private Long departmentId;
   @NotBlank
   private String name;
   @Min(1)
   @Max(100)
   private int age;
   @NotBlank
   private String position;

   // ... GETTERS AND SETTERS

}
3. Unit Testing
Unit testing with Quarkus is very simple. If you are testing REST-based web application you should include the following dependencies in your pom.xml:
<dependency>
   <groupId>io.quarkus</groupId>
   <artifactId>quarkus-junit5</artifactId>
   <scope>test</scope>
</dependency>
<dependency>
   <groupId>io.rest-assured</groupId>
   <artifactId>rest-assured</artifactId>
   <scope>test</scope>
</dependency>
Let’s analyze the test class from organization-service (our another microservice along with employee-service and department-service). A test class should be annotated with @QuarkusTest. We may inject other beans via @Inject annotation. The rest is typical for JUnit and RestAssured – we are testing the API methods exposed by the controller. Because we are using an in-memory repository we don’t have to mock anything except inter-service communication (we discuss it later in that article). We have some positive scenarios for GET, POST methods and a single negative scenario that does not pass input validation (testInvalidAdd).
@QuarkusTest
public class OrganizationControllerTests {

   @Inject
   OrganizationRepository repository;

   @Test
   public void testFindAll() {
      given().when().get("/organizations")
	         .then()
			 .statusCode(200)
			 .body(notNullValue());
   }

   @Test
   public void testFindById() {
      Organization organization = new Organization("Test3", "Address3");
      organization = repository.add(organization);
      given().when().get("/organizations/{id}", organization.getId()).then().statusCode(200)
             .body("id", equalTo(organization.getId().intValue()))
             .body("name", equalTo(organization.getName()));
   }

   @Test
   public void testFindByIdWithDepartments() {
      given().when().get("/organizations/{id}/with-departments", 1L).then().statusCode(200)
             .body(notNullValue())
             .body("departments.size()", is(1));
   }

   @Test
   public void testAdd() {
      Organization organization = new Organization("Test5", "Address5");
      given().contentType("application/json").body(organization)
             .when().post("/organizations").then().statusCode(200)
             .body("id", notNullValue())
             .body("name", equalTo(organization.getName()));
   }

   @Test
   public void testInvalidAdd() {
      Organization organization = new Organization();
      given().contentType("application/json").body(organization)
	         .when()
			 .post("/organizations")
			 .then()
			 .statusCode(400);
   }

}
4. Inter-service communication
Since Quarkus is dedicated to running on Kubernetes it does not provide any built-in support for third-party service discovery (for example through Consul or Netflix Eureka) and HTTP client integrated with this discovery. However, it provides dedicated client support for REST communication. To use it we first need to include the following dependency:
<dependency>
   <groupId>io.quarkus</groupId>
   <artifactId>quarkus-rest-client</artifactId>
</dependency>
Quarkus provides declarative REST client based on MicroProfile REST Client. You need to create an interface with the required methods and annotate it with @RegisterRestClient. Other annotations are pretty the same as on the server-side. Since you use @RegisterRestClient for marking Quarkus know that this interface is meant to be available for CDI injection as a REST Client.
@Singleton
@Path("/departments")
@RegisterRestClient
public interface DepartmentClient {

   @GET
   @Path("/organization/{organizationId}")
   @Produces(MediaType.APPLICATION_JSON)
   List<Department> findByOrganization(@PathParam("organizationId") Long organizationId);

   @GET
   @Path("/organization/{organizationId}/with-employees")
   @Produces(MediaType.APPLICATION_JSON)
   List<Department> findByOrganizationWithEmployees(@PathParam("organizationId") Long organizationId);

}
Now, let’s take a look at the controller class inside the organization-service. Together with @Inject we need to use @RestClient annotation to inject REST client bean properly. After that, you can use interface methods to call endpoints exposed by other services.
@Path("/organizations")
@Produces(MediaType.APPLICATION_JSON)
public class OrganizationController {

   private static final Logger LOGGER = LoggerFactory.getLogger(OrganizationController.class);

   @Inject
   OrganizationRepository repository;
   @Inject
   @RestClient
   DepartmentClient departmentClient;
   @Inject
   @RestClient
   EmployeeClient employeeClient;

   // ... OTHER FIND METHODS

   @Path("/{id}/with-departments")
   @GET
   public Organization findByIdWithDepartments(@PathParam("id") Long id) {
      LOGGER.info("Organization find: id={}", id);
      Organization organization = repository.findById(id);
      organization.setDepartments(departmentClient.findByOrganization(organization.getId()));
      return organization;
   }

   @Path("/{id}/with-departments-and-employees")
   @GET
   public Organization findByIdWithDepartmentsAndEmployees(@PathParam("id") Long id) {
      LOGGER.info("Organization find: id={}", id);
      Organization organization = repository.findById(id);
      organization.setDepartments(departmentClient.findByOrganizationWithEmployees(organization.getId()));
      return organization;
   }

   @Path("/{id}/with-employees")
   @GET
   public Organization findByIdWithEmployees(@PathParam("id") Long id) {
      LOGGER.info("Organization find: id={}", id);
      Organization organization = repository.findById(id);
      organization.setEmployees(employeeClient.findByOrganization(organization.getId()));
      return organization;
   }

}
The last missing thing required for communication is the addresses of target services. We may provide them using field baseUri of @RegisterRestClient annotation. However, it seems that a better solution would be to place them inside application.properties. The name of the property needs to contain the fully qualified name of the client interface and suffix mp-rest/url. The address used for communication in development mode is different than in production mode when the application is deployed on Kubernetes or OpenShift. That’s why I’m using prefix %dev in the name of the property setting target URL.
%dev.pl.piomin.services.organization.client.DepartmentClient/mp-rest/url=http://localhost:8090
%dev.pl.piomin.services.organization.client.EmployeeClient/mp-rest/url=http://localhost:8080
I have already mentioned unit testing and inter-service communication in the previous section. To test the API method that communicates with other applications we need to mock the REST client. Here’s the sample of mock created for DepartmentClient. It should be visible only during the tests, so we have to place it inside src/test/java. If we annotate it with @Mock and @RestClient Quarkus automatically use this bean by default instead of declarative REST client-defined inside src/main/java.
@Mock
@ApplicationScoped
@RestClient
public class MockDepartmentClient implements DepartmentClient {

    @Override
    public List<Department> findByOrganization(Long organizationId) {
        return Collections.singletonList(new Department("Test1"));
    }

    @Override
    public List<Department> findByOrganizationWithEmployees(Long organizationId) {
        return null;
    }

}
5. Monitoring and Documentation
We can easily expose health checks or API documentation with Quarkus. API documentation is built using OpenAPI/Swagger. Quarkus leverages libraries available within the project SmallRye. We should include the following dependencies to our pom.xml:
<dependency>
   <groupId>io.quarkus</groupId>
   <artifactId>quarkus-smallrye-openapi</artifactId>
</dependency>
<dependency>
   <groupId>io.quarkus</groupId>
   <artifactId>quarkus-smallrye-health</artifactId>
</dependency>
We can define two types of health checks: readiness and liveness. There are available under /health/ready and /health/live context paths. To expose them outside application we need to define a bean that implements MicroProfile HealthCheck interface. Readiness endpoint should be annotated with @Readiness, while liveness with @Liveness.
@ApplicationScoped
@Readiness
public class ReadinessHealthcheck implements HealthCheck {

    @Override
    public HealthCheckResponse call() {
        return HealthCheckResponse.named("Employee Health Check").up().build();
    }

}
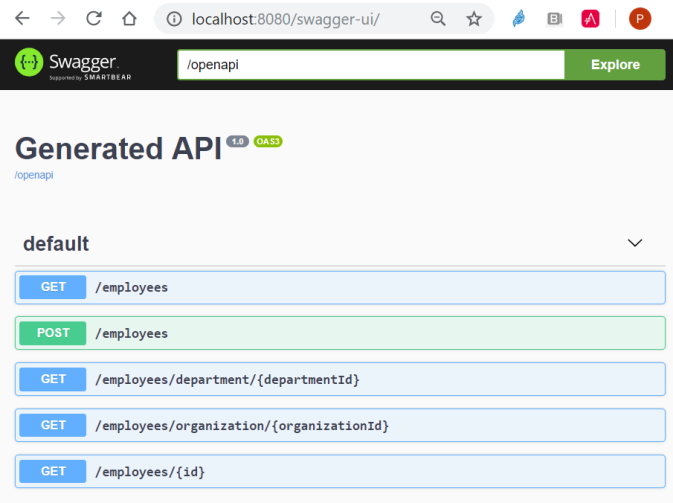
To enable Swagger documentation we don’t need to do anything more than adding a dependency. Quarkus also provides a built-in UI for Swagger. By default it is enabled on development mode, so if you are willing to use on the production you should add the line quarkus.swagger-ui.always-include=true to your application.properties file. Now, if run the application employee-service locally in development mode by executing Maven command mvn compile quarkus:dev you may view API specification available under URL http://localhost:8080/swagger-ui.
Here’s my log from application startup. It prints a listening port and list of loaded extensions.

6. Running Quarkus Microservices on the Local Machine
Because we would like to run more than one application on the same machine we need to override their default HTTP listening port. While employee-service is still running on the default 8080 port, other microservices use different ports as shown below.
department-service:
![]()
organization-service:
![]()
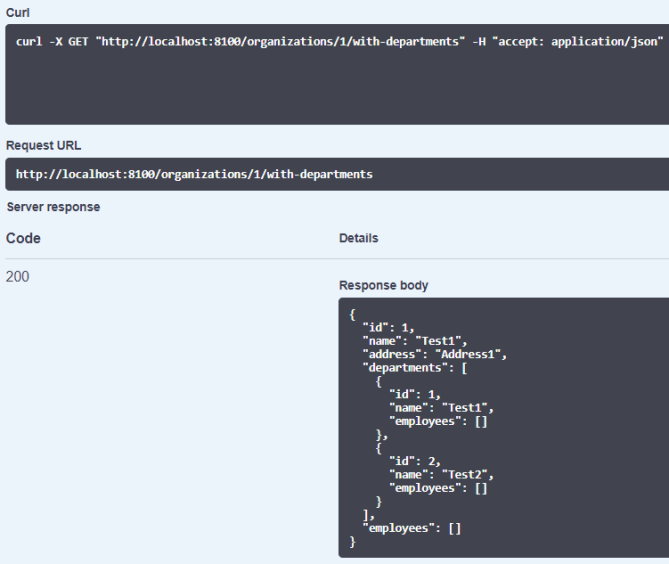
Let’s test inter-service communication from Swagger UI. I called endpoint GET /organizations/{id}/with-departments that calls endpoint GET /departments/organization/{organizationId} exposed by department-service. The result is visible on the below.
7. Running Quarkus on OpenShift
We have already finished the implementation of our sample microservices architecture and run them on the local machine. Now, we can proceed to the last step and deploy these applications on OpenShift or Minishift. We have some different approaches when deploying the Quarkus application on OpenShift. Today I’ll show you leverage the S2I build mechanism for that.
We are going to use Quarkus GraalVM Native S2I Builder. It is available on quai.io as quarkus/ubi-quarkus-native-s2i. I’m using the Openshift 4 cluster running on Azure. You try it as well on the local version OpenShift 3 – Minishift. Before deploying our applications we need to start Minishift. Following Quarkus documentation GraalVM-based native build consumes much memory and CPU, so you should set 6GB and 4 cores for Minishift.
$ minishift start --vm-driver=virtualbox --memory=6G --cpus=4
Also, we need to modify the source code of our application a little. As you probably remember we used JDK 11 for running them locally. We also need to include a declaration of native profile as shown below:
<properties>
   <quarkus.version>1.7.0.Final</quarkus.version>
   <project.build.sourceEncoding>UTF-8</project.build.sourceEncoding>
   <maven.compiler.source>1.8</maven.compiler.source>
   <maven.compiler.target>1.8</maven.compiler.target>
</properties>
...
<profiles>
   <profile>
      <id>native</id>
      <activation>
         <property>
            <name>native</name>
         </property>
      </activation>
      <build>
         <plugins>
            <plugin>
               <groupId>io.quarkus</groupId>
               <artifactId>quarkus-maven-plugin</artifactId>
               <version>${quarkus.version}</version>
               <executions>
                  <execution>
                     <goals>
                        <goal>native-image</goal>
                     </goals>
                     <configuration>
                        <enableHttpUrlHandler>true</enableHttpUrlHandler>
                     </configuration>
                  </execution>
               </executions>
            </plugin>
            <plugin>
               <artifactId>maven-failsafe-plugin</artifactId>
               <version>2.22.1</version>
               <executions>
                  <execution>
                     <goals>
                        <goal>integration-test</goal>
                        <goal>verify</goal>
                     </goals>
                     <configuration>
                        <systemProperties>
                           <native.image.path>${project.build.directory}/${project.build.finalName}-runner</native.image.path>
                        </systemProperties>
                     </configuration>
                  </execution>
               </executions>
            </plugin>
         </plugins>
      </build>
   </profile>
</profiles>
Two other changes should be performed inside application.properties file. We don’t have to override port number, since OpenShift dynamically assigns virtual IP for every pod. An inter-service communication is realized via OpenShift discovery, so we just need to set the name of service instead of the localhost. It can be set in the default profile for the property since properties with %dev prefix are used in development mode.
quarkus.swagger-ui.always-include=true
pl.piomin.services.organization.client.DepartmentClient/mp-rest/url=http://department:8080
pl.piomin.services.organization.client.EmployeeClient/mp-rest/url=http://employee:8080
Finally we may deploy our applications on OpenShift. To do that you should execute the following commands using your oc client:
$ oc new-app quay.io/quarkus/ubi-quarkus-native-s2i:20.1.0-java11~https://github.com/piomin/sample-quarkus-microservices.git --context-dir=employee-service --name=employee
$ oc new-app quay.io/quarkus/ubi-quarkus-native-s2i:20.1.0-java11~https://github.com/piomin/sample-quarkus-microservices.git --context-dir=department-service --name=department
$ oc new-app quay.io/quarkus/ubi-quarkus-native-s2i:20.1.0-java11~https://github.com/piomin/sample-quarkus-microservices.git --context-dir=organization-service --name=organization
As you can see the repository with applications source code is available on my GitHub account under address https://github.com/piomin/sample-quarkus-microservices.git. Because all the applications are stored within a single repository we need to define a parameter context-dir for every single deployment.
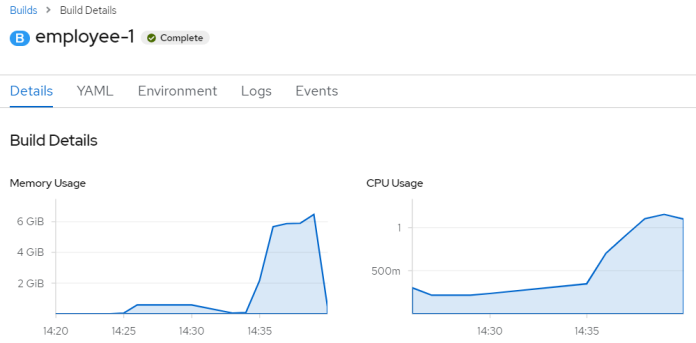
I was quite disappointed. Since we are using GraalVM for compilation the memory consumption of the build is pretty large. The whole build process takes around 10 minutes.
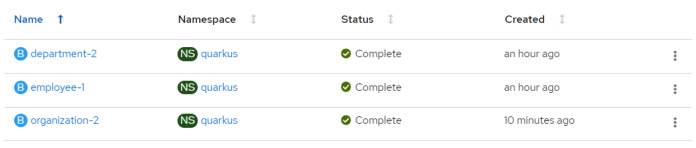
Here’s the list of performed builds.
Although a build process consumes much memory, the memory usage of Quarkus applications compiled using GraalVM is just amazing.
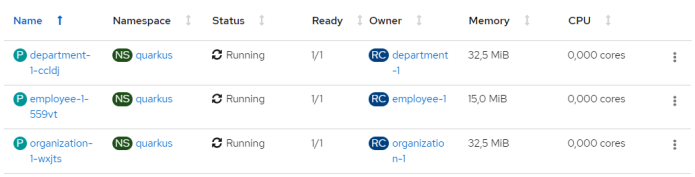
To execute some test calls we need to expose applications outside the OpenShift cluster.
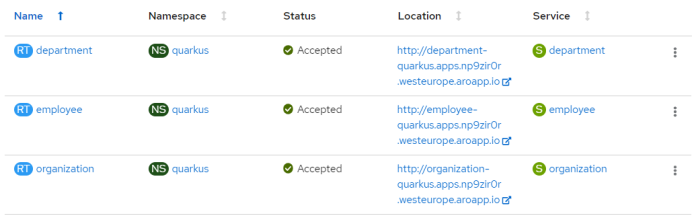
$ oc expose svc employee
$ oc expose svc department
$ oc expose svc organization
In my OpenShift cluster they will be available under the address, for example http://department-quarkus.apps.np9zir0r.westeurope.aroapp.io. You can run Swagger UI by calling /swagger-ui context path on every single application.


Related Posts